
Your new Generac generator won’t reach peak performance without completing the proper break-in procedure. Skipping these critical first hours can cause premature wear that cuts your generator’s lifespan in half. During the initial operation, microscopic metal particles circulate through the engine while piston rings slowly seat against cylinder walls. Without the correct load cycling and oil changes, these particles score internal surfaces and lead to excessive oil consumption down the road.
Following Generac’s official break-in procedure ensures maximum efficiency, maintains your warranty coverage, and prevents costly repairs. This guide covers the exact steps for all Guardian, Protector, CorePower, and portable models. You’ll learn the specific load percentages, timing intervals, and maintenance tasks that professional technicians use for reliable installations. Whether you have a 7kW home standby unit or a 17.5kW portable, these procedures apply to your specific model.
Why Your Generac Generator Break-In Procedure Can’t Be Skipped
Failing to complete the proper break-in cycle triggers immediate warranty voidance for most Generac models. The manufacturer requires the first oil change within 8 hours of operation—any delay invalidates your coverage. During the initial hours, metal shavings from manufacturing circulate through the engine, and piston rings gradually seat against cylinder walls. Without proper load cycling, these particles embed into critical components causing irreversible damage.
Warranty-voiding mistakes to avoid:
– Running continuously for more than 4 hours without load cycling
– Using non-synthetic oil during the first 25 hours (except factory fill)
– Skipping the first oil change before 8 operating hours
– Exceeding 80% load during the break-in period
Essential Pre-Break-In Checks for Guardian Series Models

Fuel System Verification for Natural Gas Units
Confirm your natural gas supply delivers 5-7 inches of water column pressure at the generator supply valve. Use a manometer to verify pressure while the unit is running—insufficient pressure causes lean operation and overheating. Propane systems require 10-13 inches water column with at least 100 gallons in the tank (50% usable minimum). Gasoline portables need fresh 87-octane unleaded fuel with fuel stabilizer if the fuel will sit longer than 30 days.
Battery Voltage Testing Protocol
Your 12V DC battery must read at least 12.5 volts open-circuit and drop no lower than 9.6 volts during cranking. Test with a multimeter while someone attempts to start the generator. Tighten battery terminals to the precise 45-50 inch-pounds specification using a torque wrench—loose connections cause starting failures during power outages.
Correct Oil Selection and Capacity for Your Generac Model
Oil Grade Requirements by Climate
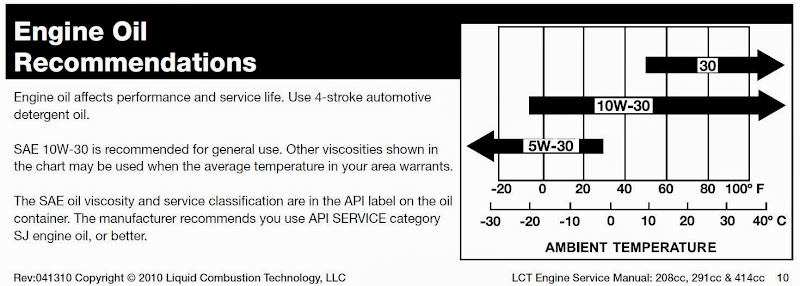
Use SAE 10W-30 for most climates (-20°F to 100°F) or switch to SAE 5W-30 for sustained below-freezing conditions. Never use lighter 5W-20 oil in warm weather as it causes low oil pressure shutdowns. The factory-shipped oil contains extra zinc (ZDDP) for initial protection but must be changed after the first cycle.
Model-Specific Oil Capacities
- 7-9 kW air-cooled (Guardian): 1.8 quarts
- 11-14 kW air-cooled (Guardian): 2.2 quarts
- 16-26 kW air-cooled (Guardian): 2.3 quarts
- Protector liquid-cooled: 4.5-7 quarts (varies by engine block)
First 10 Minutes: Critical No-Load Testing Steps
Start your generator and let it run for exactly 10 minutes with no electrical load. This initial run circulates oil throughout the engine and allows you to spot obvious problems before applying any load. Verify the oil pressure light turns off within 5 seconds—any longer indicates a serious lubrication issue.
Immediate shutdown required if you notice:
– Oil pressure light staying illuminated
– Excessive white or blue smoke after first 5 minutes
– Loud knocking or metallic pinging sounds
– Visible oil leaks around engine seals
Step-by-Step Light Load Break-In (25% Capacity)
Setting Up Your Load Bank Correctly
Connect resistive loads totaling 25% of your generator’s rated capacity. For a 20 kW unit, this means exactly 5 kW of load. Ceramic space heaters and halogen work lights work perfectly since they provide pure resistive load without motors. Avoid inductive loads like refrigerators or power tools during this phase.
Monitoring During First Hour of Load
Run at 25% load for one full hour while checking every 15 minutes for:
– Oil leaks around the engine block
– Exhaust smoke color (light blue initially is normal)
– Fault codes on Evolution controller display
– Unusual engine temperatures
Pro tip: Use an infrared thermometer to check cylinder head temperatures. Air-cooled models should stay below 325°F at the head—any higher indicates cooling system problems.
Intermediate Load Phase: Avoiding Thermal Shock at 50% Capacity
Gradual Load Increase Method
Increase load in 5% increments every 5 minutes to prevent thermal shock. This gradual approach prevents sudden temperature changes that could warp engine components. Monitor oil pressure closely during transitions—drops below 25 psi indicate lubrication issues.
Key Monitoring Points at Half Capacity
- Engine temperature rise should be steady, not sudden spikes
- Voltage output must remain stable (±2% of rated voltage)
- Governor response should be smooth without hunting
- No unusual odors from the exhaust system
High-Load Break-In: When to Stop at 75% on 20 kW Units

Maximum Safe Load Thresholds
Apply 75% load for 30 minutes maximum—never exceed 80% during break-in. Watch coolant temperatures on liquid-cooled units; keep below 220°F. Air-cooled models should maintain cylinder head temperatures under 325°F. For a 20 kW generator, this means applying no more than 15 kW of load.
Critical High-Load Observations
This phase reveals manufacturing defects or assembly issues. Listen carefully for:
– Valve train noise at high load
– Governor instability under load
– Excessive exhaust smoke
– Oil pressure fluctuations
Proper First Oil Change After Break-In Cycle
Warm Oil Drain Technique
After the high-load phase, remove all electrical load and run the generator for 5 minutes at no-load to cool down. Shut off using the control switch, then drain the oil while warm—this takes about 15 minutes and ensures metallic particles flow out with the oil. Use a magnetic drain plug to catch remaining metal fragments.
Filter Replacement Specifications
Install a new OEM oil filter torqued to 90-210 inch-pounds. Pre-lubricate the filter gasket with fresh oil. Common filter part numbers:
– Air-cooled 760/990cc engines: Generac 070185E or FRAM PH3614
– G-Force 1000-series: Generac 0H2545
Evolution Controller Settings to Activate Post-Break-In
Weekly Exercise Configuration
Access the installer menu on Evolution-equipped models:
– Set weekly exercise time to 12-minute no-load run
– Configure exercise load to “on” after 25 hours (off during break-in)
– Adjust utility dropout to 60% (default range 55-70%)
– Verify firmware version 1.20 or higher
Portable Digital Display Adjustments
Reset the hour meter to zero after your first oil change. Enable COsense auto-shutdown if equipped. Turn off eco-mode during break-in to maintain full-speed governor operation—this ensures proper load testing.
25-Hour Maintenance Checklist for Warranty Compliance
Follow this critical post-break-in schedule:
| Hours | Required Action |
|---|---|
| 5-8 | First oil & filter change |
| 20-25 | Second oil change (portables only) |
| 25 | Remove break-in oil sticker |
| 50 | Replace air filter |
| 100 | Check spark plug gap (0.030″) |
Warranty tip: Generac’s 5-year limited warranty requires documented proof of these maintenance steps. Keep your service records for potential warranty claims.
Troubleshooting Blue Smoke and Surging During Break-In
Persistent Blue Exhaust Smoke
Light blue smoke during the first hour is normal oil burn-off. If it continues beyond 2 hours, immediately check for air filter obstruction or oil overfill. Remove and clean the foam pre-filter on air-cooled models—restricted airflow causes incomplete combustion.
Engine Surging Under Load
This typically indicates carburetor contamination from factory debris. Shut down immediately and clean the main jet using compressed air and carburetor cleaner. Reinstall with proper torque (90-210 inch-pounds) to prevent fuel leaks.
Environmental Adjustments for Coastal and Cold Weather Installations
Cold Climate Modifications Below 32°F
Switch to 5W-30 synthetic oil and install a battery warmer kit (Generac part 7105). This ensures reliable starting and proper lubrication during cold weather. Test your unit weekly with full load to maintain battery charge.
Coastal/Marine Applications
After break-in, spray exposed steel components with CRC 656 corrosion inhibitor. Rinse salt residue weekly to prevent corrosion. Check all electrical connections monthly for corrosion signs.
Safety Compliance Requirements for Your Installation
Always operate generators outdoors with exhaust outlets at least 5 feet from building openings and 1.5 feet above grade. Install CO detectors in your dwelling and never refuel while the engine is hot. Ensure your installation meets NEC 2020 requirements with a disconnect switch within 50 feet of the equipment.
Your Generac generator is now properly broken in and ready for reliable service. Following this exact procedure ensures maximum efficiency while maintaining full warranty coverage. Schedule your first regular maintenance at the 25-hour mark, and you’ll enjoy decades of dependable backup power. Keep your detailed service records in a waterproof folder near your generator for quick reference during future maintenance.


