When the lights go out, your portable generator becomes your lifeline—but only if you connect it safely. Without a proper transfer switch, you’re risking deadly backfeed into utility lines that could electrocute repair crews while powering your refrigerator. A correctly installed home generator transfer switch creates a legal, safe connection that lets you power essential circuits during outages while protecting utility workers. This guide reveals exactly what you need to know about home generator transfer switch installation, whether you’re preparing for frequent storms or want peace of mind during winter blackouts.
Most homeowners don’t realize that simply plugging a generator into a wall outlet (commonly called “backfeeding”) violates electrical codes and creates lethal hazards. A professionally installed transfer switch solves this problem by mechanically isolating your home from the utility grid while routing generator power to pre-selected circuits. In the next few sections, you’ll learn how to choose the right switch, calculate your circuit needs, and understand why this 5/5 difficulty project typically requires a licensed electrician.
Why Extension Cords Won’t Cut It for Whole-Home Backup Power
How Transfer Switches Prevent Deadly Utility Worker Electrocution
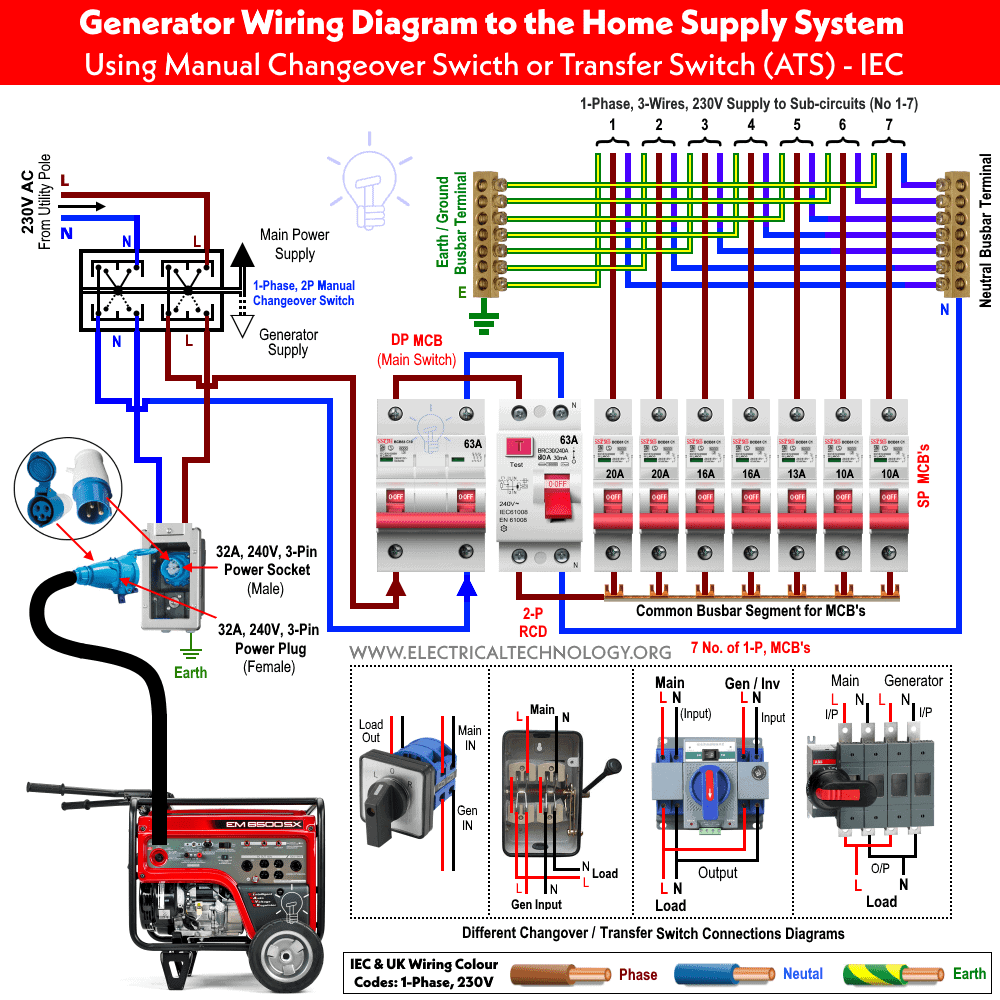
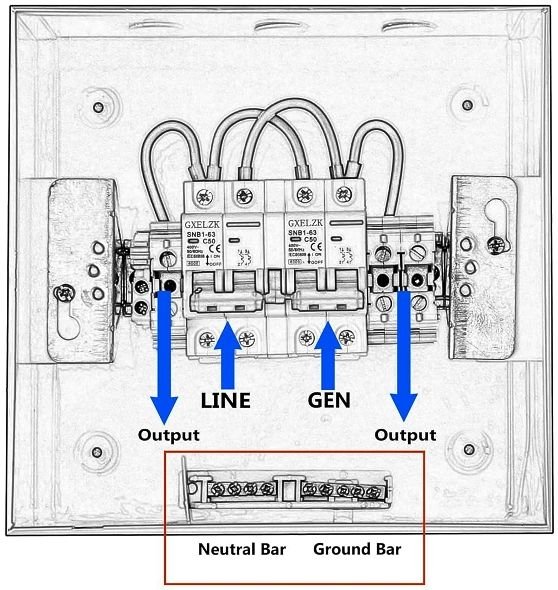
Every time you connect a generator directly to home wiring without a transfer switch, you risk sending power backward through utility lines. This backfeed can electrocute repair workers restoring power—making it both dangerous and illegal in most jurisdictions. A properly installed transfer switch creates a mechanical interlock ensuring only one power source (either utility or generator) can energize your home circuits at any given time. This critical safety component physically prevents backfeed by requiring you to turn off the main breaker before engaging generator power.
The switch creates two distinct positions: “LINE” for normal utility power and “GEN” for generator operation. When you switch to generator mode, the main breaker must be off, creating a physical barrier between your home and the grid. This simple mechanical design has prevented countless electrocutions and is why electrical codes strictly prohibit backfeeding through outlets or improper connections.
Manual vs. Automatic Systems: Which Fits Your Power Outage Needs?
Manual transfer switches put you in control during outages, requiring you to physically flip switches after starting your generator. These cost $150-$400 for residential 6-10 circuit panels and work perfectly with portable generators. You’ll manually connect the generator cord, turn off the main breaker, and switch individual circuits from utility to generator power—ideal for occasional outages in areas with reliable grid service.
Automatic transfer switches detect power loss instantly and switch to generator power within seconds—perfect for homes with frequent outages or medical equipment needs. These systems pair with permanent standby generators and cost $1,500-$5,000+ installed. While automatic switches offer convenience, manual systems remain the practical choice for most homeowners using portable generators due to significantly lower costs and simpler installation requirements.
Calculate Exactly How Many Circuits Your Transfer Switch Must Handle
Essential Circuit Wattage Guide for Generator Sizing
Before purchasing equipment, list every circuit you want powered during outages with their wattage requirements:
- Refrigerator: 750 watts running (plus 2,200+ startup surge)
- Freezer: 700-800 watts running
- Forced air furnace: 1,100-1,500 watts running
- Sump pump: 800-1,000 watts running
- LED lighting: 10-15 watts per bulb (vs 60W for incandescent)
- Television and electronics: 300-500 watts
Quick sizing formula: Add running wattages of essential circuits, multiply by 1.25 to account for startup surges, then ensure your generator exceeds this total. A 5,000-watt generator typically powers 6-8 essential circuits comfortably when you stagger appliance startup.
Match Your Home Size to the Right Transfer Switch Capacity
Most homes benefit from 6-10 circuit manual switches handling 30-50 amps, covering essentials like refrigeration, heating, lighting, and a few outlets. Larger 12-16 circuit panels accommodate bigger homes but require larger generators and higher installation costs. Use this quick reference:
| House Size | Generator kW | Typical Circuits |
|---|---|---|
| 1,500 sq ft | 5-8 kW | 6-8 circuits |
| 2,500 sq ft | 10-12 kW | 8-10 circuits |
| 3,500 sq ft | 14-16 kW | 10-12 circuits |
| 5,000+ sq ft | 20+ kW | Whole house |
Don’t overestimate your needs—focus on true essentials. Powering your entire home typically requires a standby generator costing thousands more than a portable unit with a transfer switch.
5 Critical Safety Steps Before Starting Transfer Switch Installation
Why This Project Rates 5/5 Difficulty (And When to Call a Pro)
Home generator transfer switch installation ranks as a 5/5 difficulty project for good reason. You’ll be working near energized electrical panels where one mistake could cause electrocution, fire, or equipment damage. Even with the main breaker off, panel terminals remain energized—creating constant shock hazards. Most jurisdictions require licensed electricians for this work due to complex code compliance requirements and load balancing calculations.
Professional installation typically costs $350-$700 for labor (4-6 hours) plus permits and materials, totaling $650-$1,550. While DIY kits cost $150-$400, improper installation may void equipment warranties, violate local codes, and potentially invalidate home insurance claims after electrical incidents. Unless you’re a licensed electrician, hire a professional—your safety and insurance coverage depend on it.
Required Tools and Safety Gear Checklist for Successful Installation
For professionals, the essential equipment list includes:
– Pre-wired transfer switch kit (saves hours of labor)
– Weatherproof inlet box for exterior mounting
– 10/3 Romex or THHN conductors for connections
– Generator power cord matching your equipment
– Voltage tester (non-contact preferred)
– Insulated screwdrivers and wire strippers
– Yellow wire connectors and electrical tape
Critical safety reminder: Never work alone on electrical panels. Use proper lockout procedures, wear safety goggles and gloves, and stand on a non-conductive mat. Even experienced electricians treat main panels with extreme caution—these contain the highest energy levels in your home’s electrical system.
Step-by-Step Transfer Switch Wiring Process Without Code Violations
How to Connect Essential Circuits to Your Transfer Switch
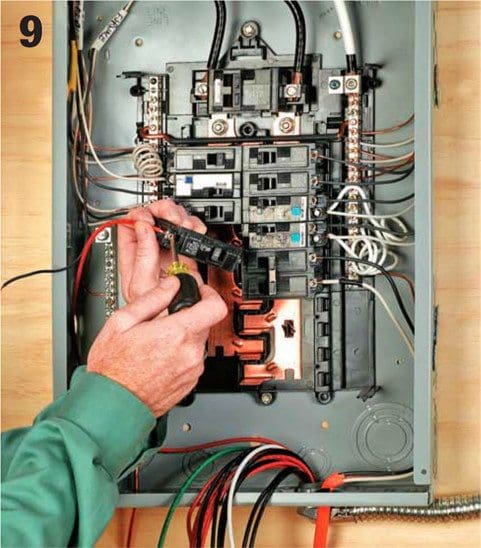
- Turn off main breaker (remember: terminals remain energized!)
- Remove breakers for selected circuits at your main panel
- Disconnect hot wires from each breaker
- Connect red wire from transfer switch to original breaker
- Connect black wire to original load wire using wire connector
- Repeat for all pre-selected circuits
For each essential circuit, the transfer switch creates a three-way connection point. The red wire carries utility power to the breaker, while the black wire delivers either utility or generator power to the circuit. When you switch to generator mode, the black wire receives power from your generator instead of the utility grid—only possible when the main breaker is off.
Special Handling for 240-Volt Appliances Like Furnaces and AC Units
Double-pole circuits for 240-volt appliances require special attention. Use two adjacent transfer switch circuits for each double-pole breaker and install a handle tie between switches. Verify red leads connect properly to the double-pole breaker while maintaining proper phase balancing. Many homeowners overlook that furnaces often require both 120V (for the control board) and 240V (for the blower motor)—check your equipment specifications before finalizing circuit selection.
Ensure your generator can handle the combined startup surge of these high-draw appliances. A furnace might require 1,500 watts running but 4,500+ watts during startup—easily overwhelming a 5,000-watt generator when combined with other essential loads.
Testing Protocol: Verify Your Transfer Switch Works Before the Next Outage
Monthly Maintenance Routine That Prevents System Failures
Test your system monthly with this simple procedure:
1. Start generator and let stabilize for 5 minutes
2. Connect to inlet box (never while generator runs)
3. Turn off main breaker to simulate outage
4. Switch transfer switch circuits to GEN position
5. Verify each circuit powers up correctly
6. Check wattage meters as you add circuits
7. Return to utility power and shut down generator
During testing, watch for flickering lights (indicating loose neutral connections) or breakers that won’t stay on (signaling overload). Keep a log of test results noting any issues that need attention. After major storms, inspect for water intrusion or physical damage to exterior components.
7 Costly Installation Mistakes That Could Void Your Home Insurance
Wiring Errors That Create Fire and Shock Hazards
The most dangerous mistake is improper grounding—creating shock hazards that could electrocute family members. Other critical errors include:
– Backfeed danger: Skipping the main breaker off step
– Overloaded generator: Exceeding 80% capacity during operation
– Wrong wire gauge: Using undersized conductors for circuit amperage
– Poor connections: Creating hot spots that lead to fires
– Inaccessible location: Mounting switches where you can’t reach during outages
Pro tip: Always maintain the neutral-ground bond at your service panel while ensuring your generator neutral is floating (not bonded to frame). This critical detail prevents stray currents that could damage equipment or create shock hazards.
Professional Installation vs. DIY: Real Cost Breakdown and Value Analysis
A professionally installed home generator transfer switch adds $2,000-$4,000 in home value while providing priceless peace of mind during extended outages. The investment protects your warranties, ensures code compliance for insurance claims, and most importantly—keeps utility workers safe from backfeed electrocution. When the next storm hits, you’ll appreciate having a reliable system that powers your essentials without extension cord chaos.
Remember: Your transfer switch installation creates a permanent connection between generator and home. Always keep the generator 20+ feet from your house during operation, never connect/disconnect cords while it’s running, and maintain both systems through regular testing. A properly installed transfer switch transforms generator ownership from emergency workaround to seamless backup power system—ensuring safe, reliable electricity when you need it most.


