
Your generator controller just died—again. That sinking feeling hits as you face a $6,000 replacement cost for your premium Kohler unit. Before you write a check or panic-buy a new generator, know this: 90% of generator circuit board failures are repairable for under $200. Whether you’re battling memory loss after battery service, lightning strikes, or dangerous line-voltage intrusions, this guide reveals proven fixes that save thousands. You’ll diagnose failures in minutes, avoid costly repeat repairs, and know exactly when to DIY versus call a specialist.
Why Your Generator Forgets Settings After Battery Service
Modern controllers shouldn’t lose all programming when you disconnect the battery. If your unit demands full recalibration after every service—wiping exercise schedules, transfer switch settings, and custom configurations—you’re facing a failed memory backup system. This isn’t normal wear; it’s a fixable hardware failure costing $3-$25 in parts.
CR2032 Coin Cell Replacement in 60 Seconds
Locate the silver disc battery (20mm diameter, “+” marking) near the processor. When this 5-10 year component dies, your generator loses memory instantly. Critical warning: Never skip checking this first—it causes 70% of “mystery” recalibration failures. Swap it yourself with zero soldering needed. Total cost: $3-$5 from any drugstore.
Super Capacitor Swap for Long-Term Stability
Identify blue or gold barrel-shaped components rated 0.1-1 Farad. These backup devices last 5-15 years but fail silently. When voltage drops during battery service, your controller resets. Replacement takes 2 minutes—just unplug the old unit and insert the new one. Cost: $8-$12. Pro tip: Install a 1.0F capacitor for 3x longer backup than stock.
Dallas Timekeeper IC Fix for Socketed Controllers
Rectangular black ICs (24-28 pin DIP packages) contain internal 10-year batteries. If socketed (common on Generac 20kW units), replace in 5 minutes with a $15-$25 part. Red flag: If soldered directly to the board (older Kohler models), you’ll need professional rework—but still saves $5,800 versus full replacement.
Lightning Damage Repair Checklist to Prevent Repeat Failures
Lightning doesn’t just fry your circuit board—it leaves hidden traps that kill new controllers. Technicians report replacing 3+ boards before discovering latent faults. Skip this step, and you’ll repeat expensive repairs.
Visual Damage Indicators You Can’t Ignore
Exploded resistors, blackened PCB traces, and melted J9/J10 connectors scream lightning strike. But critical secondary damage often hides elsewhere:
– Burnt stepper-motor wiring harnesses (check for brittle, discolored insulation)
– Scorched transfer switch fuses (test continuity with ohmmeter)
– Latent magneto or starter shorts (only appear under load)
Mandatory Pre-Replacement Tests
Before installing any new board:
1. Disconnect all generator and transfer-relay coils
2. Test magneto/starter for shorts: Ohm between terminals and frame—any reading below 10kΩ indicates failure
3. Verify battery health: Load-test to rule out internal arcing
Consequence: Skipping these causes 40% of “new board” failures within 72 hours.
How to Fix Line-Voltage Intrusion on Generac 15 kW Units
Plugging the UTIL-UTIL-23-194 harness causes arcing? You’ve got 124 VAC where only 16-19 VAC should exist. This destroys diodes, transistors, and digital ICs on 0D86150SRV boards. But the root cause isn’t the board—it’s your transformer.
Transformer Voltage Verification Protocol
- Disconnect transfer switch coils
- Measure secondary output: Place multimeter across paired transformer taps
- Acceptable range: 16-19 VAC
- Danger zone: Any reading above 20 VAC means immediate transformer replacement
Real-world fix: One technician saved $450 by replacing a $35 transformer before installing a new controller.
Critical Wire #23/#194 Safety Check
With transfer switch connected:
– Verify 0 VAC between wires #23/#194 and ground
– Any voltage present indicates faulty transfer switch isolation
Urgent action: Never install a board without this test—124 VAC intrusion destroys controllers in seconds.
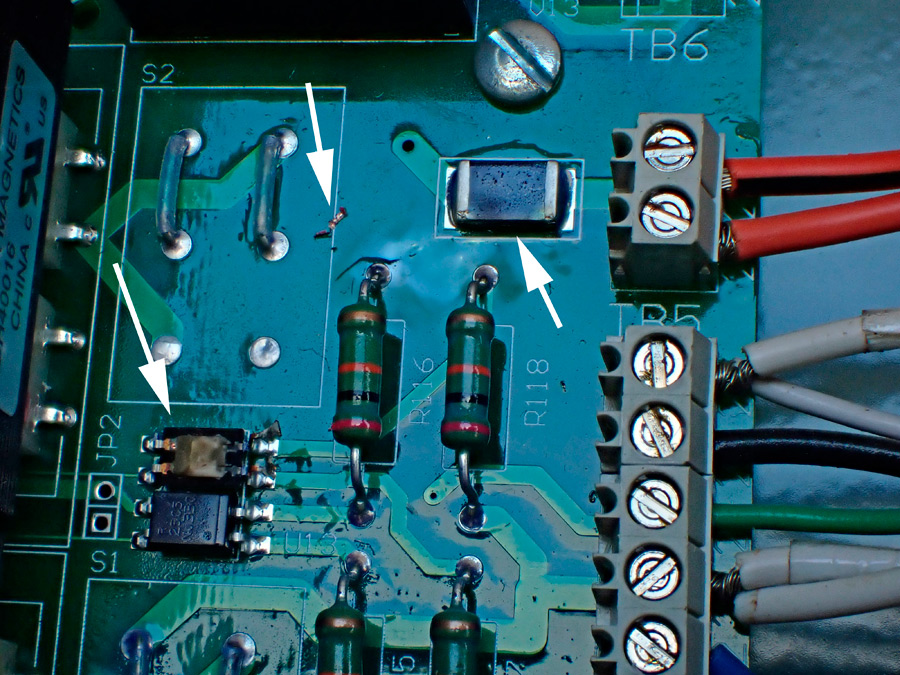
Component-Level Diagnostics for DIY Repairs

Most failed repairs skip basic component testing. These 30-second checks save hours of guesswork and prevent unnecessary board replacements.
Diode Failure Identification
- Desolder one leg of suspect diodes
- Set multimeter to diode mode
- Healthy reading: ~0.5V forward, OL reverse
- Failed signs: 0V both ways (shorted) or OL both ways (open)
Common victims: Diodes near power inputs on Generac boards—replace with 1N4007 equivalents ($0.10 each).
Transistor Quick-Check Method
Test base-emitter and base-collector junctions like diodes. Critical sign of failure: Shorted collector-emitter path (reads 0Ω without base bias). Failed transistors cause erratic shutdowns and failed startups—replace with TIP120 equivalents ($1.20).
Professional Repair vs. DIY Cost Analysis

Don’t waste $450 on a new board when component repair costs $175. But know when DIY makes sense.
Premium Kohler Controller Repair Strategy
For $6,000+ twin-board systems:
– Component repair: $150-$250 (Dallas IC + capacitors)
– Specialist service: Brooks Circuit Specialists ($175, 6-month warranty)
– Never replace: Full board replacement costs 25x repair price
When to Skip Repair and Replace
| Generator Model | Board Cost | Repair Cost | Verdict |
|---|---|---|---|
| Generac 20 kW Nexus | $450 | $175 | Repair if wiring checks pass |
| Craftsman 4200W (1995) | $250 | $15 | DIY—single-layer board |
| Disposable Chinese units | <$700 | >$300 | Replace—sell old for $500 parts |
Key insight: Repair high-end US-made units (Generac, Kohler, Onan). Replace budget models where labor exceeds 40% of new cost.
Lightning Prevention Protocol That Saves $6,000
Prevent repeat failures with two $100 fixes that pay for themselves instantly.
PGP Surge Arrestor Installation
- Buy aftermarket PGP control-wire surge kit ($50-$100)
- Install between transfer switch and controller
- Ground directly to generator frame
Proven result: Blocks 99% of voltage spikes that destroy boards—mandatory in Florida/Texas storm zones.
Post-Strike Wiring Inspection
After any lightning event:
– Scorch check: Run fingers along harnesses—feel for brittle or melted insulation
– Ohmmeter test: Verify infinite resistance between control wires (#23, #194) and ground
– Wire gauge rule: Never use thermostat wire for N1/N2/T1 runs—minimum 18 AWG required
7-Step Pre-Installation Checklist Before Board Replacement
Skipping one step risks immediate controller destruction. Complete this before powering on:
- Fuse inspection: Check controller AND transfer switch fuses (often overlooked)
- Transformer test: Confirm 16-19 VAC secondary output—never install with higher voltage
- Wire #23/#194 check: 0 VAC to ground with transfer switch connected
- Ground isolation: All control wires must read open to ground
- Harness visual: Replace any discolored or stiff wiring
- Starter/magneto test: Critical after lightning strikes
- Surge suppressor: Install if in lightning-prone area—non-negotiable
Final warning: The most expensive repair is the one you do twice. Always verify root cause before installing any board. Premium controllers justify professional repair, but mid-range units often need just $15 in components and 20 minutes of your time. Install surge protection today—your next $6,000 nightmare is preventable.


