When drought restrictions tighten or your well runs dry, knowing how to make an atmospheric water generator transforms from a science experiment into a survival necessity. These devices pull pure drinking water from humidity in the air—using the same physics that creates morning dew on your grass. The best part? You can build one in your garage for under $750 using salvaged parts and basic tools, creating a reliable water source during emergencies or in remote locations.
This guide walks you through three proven DIY designs: a high-output refrigeration unit producing 30+ liters daily, a compact thermoelectric system for apartments, and a solar-powered desiccant setup for off-grid living. Each method creates medical-grade water from nothing but ambient air, giving you true water independence. You’ll learn exactly how to make an atmospheric water generator tailored to your climate and needs—no wells, no deliveries, just pure water from the air you breathe.
Refrigeration AWG Build (30L Daily Output)
This mini-split conversion delivers the highest water yield by leveraging vapor-compression refrigeration—the same technology in your home AC. At 70% humidity and 80°F, expect 7-8 gallons daily while using less electricity than a hair dryer. The system works by chilling air below its dew point, forcing moisture to condense on cold coils.
Required Components List
Core System:
– Used 9,000-12,000 BTU mini-split unit ($250-400)
– 304 stainless steel condensate pan ($30)
– 20-liter polypropylene reservoir with float switch ($45)
– Digital thermostat controller (STC-1000) ($25)
Water Treatment Chain:
– 5-micron sediment filter housing ($10)
– Activated carbon block filter ($15)
– 0.2-micron hollow-fiber cartridge ($25)
– 5-watt UV-C sterilizer ($65)
Critical Controls:
– Arduino Nano with humidity sensor ($25)
– 12V diaphragm pump, 1 GPM ($35)
– Refrigerant gauges and R-290 propane ($100)
Five-Day Construction Process
Day 1: Salvage and Prep
Remove the indoor evaporator unit from your mini-split. Use a recovery machine (rented from auto parts stores) to evacuate old refrigerant. Cut away decorative housing—keep only the A-coil and blower assembly. Inspect copper lines for damage; replace if corroded.
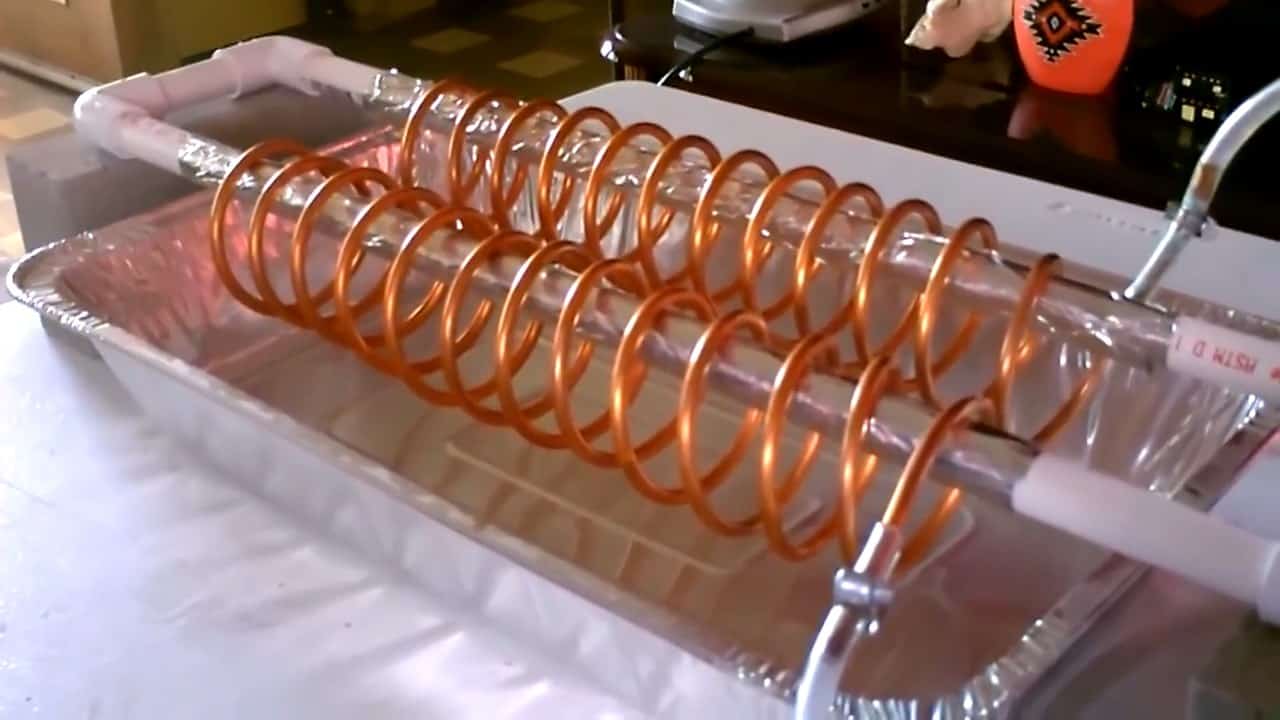
Day 2: Condensate System Installation
Weld or rivet the stainless pan beneath the evaporator coil with a 2-degree slope toward the drain port. Install a ¾-inch bulkhead fitting using FDA-grade RTV silicone. Connect braided vinyl tubing to your reservoir—any kinks here cause immediate failure. Verify slope with a bubble level.
Day 3: Refrigeration Loop Rebuild
Re-braze cut copper lines, then pressure-test with nitrogen at 150 PSI for 15 minutes. Evacuate the system to 200 microns using a vacuum pump (critical for efficiency). Charge with 350-450 grams of R-290 propane—measure precisely using a scale.
Day 4: Control System Integration
Wire the STC-1000 thermostat to maintain 36°F evaporator temperature. Program the Arduino to shut off the compressor when humidity drops below 35%. Install kill switches for high-pressure (450 PSI) and low-pressure (50 PSI) conditions—this prevents catastrophic failures.
Day 5: Water Polishing Setup
Mount filters in this sequence: sediment → carbon → hollow-fiber. Position the UV sterilizer after the final filter, ensuring 30 mJ/cm² exposure. Connect the 12V pump to activate when the reservoir reaches 75% capacity. Pro tip: Add an aquarium heater to maintain 65°F water temperature—this prevents bacterial growth.
Performance Validation Protocol
Run your AWG for 4 hours at 80°F and 70% humidity. Target production: 3+ liters per hour. Calculate efficiency by dividing total kWh consumed by liters collected—healthy systems achieve 0.6-0.8 kWh per liter. Use an IR thermometer to verify evaporator surface temperature stays 2-4°F below dew point. If output drops after 3 months, dirty coils or refrigerant undercharge are likely culprits.
Compact Peltier AWG (5L Daily for Small Spaces)

This solid-state unit fits under kitchen counters and runs whisper-quiet on 12V solar—ideal for RVs or apartments where refrigerants are prohibited. Unlike compressor systems, it has no moving parts except fans, but requires careful thermal management to prevent ice buildup.
Build Specifications for Reliable Operation
Core Components:
– 4× TEC1-12715 thermoelectric modules ($60)
– 8× 120mm CPU heat sinks with heat pipes ($80)
– 12V 30A power supply ($40)
– 5-liter borosilicate reservoir ($25)
Critical Thermal Design:
– Cold-side fins must be coated with food-grade hydrophilic epoxy to reduce metal leaching
– Implement 30-second defrost cycles every 10 minutes via Arduino PID control
– Maintain cold-side temperature at 39°F—any colder causes ice blockage
Assembly Process for Maximum Yield
Stack TEC modules between cold-side fins (facing down) and hot-side fins with 120mm fans. Mount this assembly inside a 4-inch PVC pipe cap acting as an air duct. Add an 80mm inlet fan with MERV-6 foam pre-filter to reduce coil fouling. Connect cold-side thermistors to your Arduino for real-time temperature control. Warning: Insufficient heat sinking on the hot side will instantly destroy TEC modules—use thermal paste and secure with nylon bolts.
Real-World Performance Expectations
At 79°F and 60% humidity, expect 0.2 liters per hour (4-6 liters daily) while consuming 240 watts. Output plummets below 50% humidity—this system only works reliably in coastal or humid climates. Unlike refrigeration units, Peltier systems can’t be scaled beyond 5L daily due to thermoelectric limitations. Replace modules every 3-5 years as efficiency degrades.
Solar Desiccant System (10L Daily Off-Grid)
This lithium chloride brine design works in 30% humidity where other systems fail—perfect for desert climates. It uses solar thermal energy to regenerate the desiccant, requiring minimal electricity. The two-step process absorbs moisture at night and releases it via solar heat during the day.
System Design for Arid Conditions
Absorption Tower:
– 6-inch PVC pipe packed with polypropylene rings
– Continuously fed with 40% LiCl brine solution
– Pulls 0.4 kg water per hour at 77°F/60% RH
Regeneration Loop:
– 30-tube evacuated solar collector heats brine to 185°F
– Water flashes to steam and condenses in night-sky cooled coil
– Thermal COP of 0.6–0.8 (0.2-0.3 kWh thermal input per liter)
Critical Safety Notes
LiCl is highly corrosive—use only polypropylene or PVC components. Wear acid-resistant gloves when handling brine. Install overflow trays beneath all reservoirs. Never mix desiccants—lithium chloride requires different handling than silica gel. Test water for residual salts monthly; improper regeneration leaves dangerous concentrations.
Essential Maintenance Schedule
Weekly:
– Rinse pre-filter with vinegar solution
– Verify reservoir level (should be 75% full during operation)
Monthly:
– Clean evaporator coils with non-acidic cleaner (acid damages aluminum fins)
– Check refrigerant line insulation for wear
Quarterly:
– Replace sediment and carbon filters (stale carbon causes metallic taste)
– Calibrate humidity sensors using salt-solution method
Annually:
– Pressure-test refrigerant lines
– Replace UV-C lamp (output degrades even if still glowing)
– Test water for copper, aluminum, and zinc
Compressors last 8-12 years with proper maintenance; TEC modules need replacement every 3-5 years. Desiccant brine degrades after 2-3 years—replace when daily yield drops 20%.
Cost Analysis: DIY vs. Commercial
Your refrigeration AWG produces water at $0.06-0.08 per gallon when electricity costs $0.10/kWh—far cheaper than $0.40+ per gallon for delivered water in remote areas. The $530-$750 build pays for itself in 2-3 years at 200 gallons monthly usage. Compare this to commercial units costing $1,300+ for similar output but limited to 15L daily.
Peltier systems cost $210 to build but run at $0.12 per gallon—only economical for emergency backups. Solar desiccant units reach $0.03 per gallon with free thermal energy but require $900+ in materials. Start with the refrigeration design for maximum output, then experiment with smaller systems as your needs evolve. Once operational, your atmospheric water generator delivers complete water independence—no infrastructure, no deliveries, just pure water from the air.


