
Your Champion generator sputters to a halt during a power outage, leaving you stranded in the dark. Before you call a technician or risk engine damage, you need to know: how to check oil on Champion generator correctly. Low oil is the most common cause of unexpected shutdowns in air-cooled generators, but verifying the level takes just minutes if you follow the right steps. This guide reveals the exact process for every Champion model—from compact 2000W inverters to 8750W workhorses—so you can prevent catastrophic engine failure and keep power flowing when storms hit.
Most users make critical errors when checking oil, like measuring on uneven ground or ignoring cool-down periods. These mistakes trigger false “low oil” warnings that shut down your generator unnecessarily. Worse, overfilling causes oil blow-by into the air filter, creating dangerous smoke and reducing power output by up to 35%. By mastering Champion’s specific oil inspection system, you’ll dodge expensive repairs and extend your generator’s lifespan by years. Let’s dive into the precise method that works every time.
Stop These Champion Oil Check Mistakes Immediately
Why 15 Minutes of Cooling Time Is Non-Negotiable
Skipping the cool-down period risks severe burns and inaccurate readings. Hot oil expands up to 15% while circulating, creating a false “full” reading that hides dangerously low levels once the engine cools. Champion mandates a 15–30 minute wait after shutdown for oil to drain back into the crankcase. During this time, metal components contract to their normal dimensions—critical for accurate measurement. If you’re checking after a long run, use this window to clear debris from the air filter. Never attempt oil checks while the engine is warm; the manual explicitly warns this causes measurement errors up to 1/4 inch.
Level Ground Setup That Prevents False Readings
Even a 2-degree tilt distorts your dipstick reading by 0.25 inches—enough to misread “low” as “full.” Place your generator on firm, level concrete or asphalt, not grass or gravel. Verify with a smartphone level app: position it on the generator’s control panel for an instant accuracy check. Before opening the oil cap, turn the engine switch OFF, disconnect all appliances, and pull the spark plug boot to eliminate accidental starts. This three-step safety sequence prevents deadly backfires during maintenance. Always wear nitrile gloves—they protect against hot oil splashes and keep fingerprints off critical components.
Essential Tools You Already Own
You don’t need specialized equipment for this task. Keep these items in your generator maintenance kit:
– Lint-free microfiber cloth (paper towels shed fibers that contaminate oil)
– Small funnel with ≤0.75-inch spout (fits narrow Champion fill necks)
– LED flashlight for shadowed areas under fuel tanks
– Measuring cup with ounce markings (for precise top-ups)
Find Your Champion Oil Dipstick in 60 Seconds

Right-Side Access on Standard 196cc–224cc Models
On Champion’s popular open-frame generators (3650W–6250W), locate the oil cap on the right side below the fuel tank. It sits directly behind the recoil starter handle and features yellow or black plastic with knurled grip ridges. Post-2019 models have the “SAE 10W-30” stamp and oil-can icon molded into the cap. If you see a “Low Oil” warning symbol (dripping can), you’ve found the correct component. Avoid confusing it with the fuel cap—oil caps are always positioned lower on the engine block.
Hidden Front Panel on Inverter Models
Champion inverter generators (100162, 100302, 100692) conceal the dipstick behind the front maintenance door. Release the quarter-turn thumb screws counterclockwise, then swing the panel open. You’ll see a single integrated dipstick/cap assembly—no separate oil fill port. This design prevents debris contamination during operation. For models like the 100900, note the clear sight glass adjacent to the dipstick; we’ll cover how to read this alternative gauge shortly.
Commercial Unit Dipstick Location
On heavy-duty 3500W–8750W generators, find the brass-colored metal dipstick near the crankcase power-take-off side. It’s often shielded by a protective bracket, so run your fingers along the lower right quadrant of the engine block. If you encounter resistance, you’ve hit the dipstick’s protective housing—rotate the bracket to access it. Never force the cap; Champion specifies hand-tightening only to avoid cracking the plastic housing.
Read Oil Levels Like a Champion Technician
The 4-Step Dipstick Method That Eliminates Errors
- Wipe clean the cap area with your microfiber cloth to prevent dirt from falling into the crankcase
- Twist counterclockwise 90–180 degrees (1/4–1/2 turn) and lift straight up—no yanking
- Completely wipe the dipstick with a clean section of cloth, then reinsert without threading
- Withdraw slowly and check oil coating on both sides of the stick
This two-pass technique is critical. Your first wipe removes residual oil, while the unthreaded reinsertion ensures an accurate reading. Champion’s dipsticks have a 0.4-inch safety zone between “L” (Low) and “F” (Full) marks. If oil sits below “L”, add 2–3 oz immediately. Above “F” requires draining excess—overfilling causes oil blow-by into your air filter.
Decoding Sight Glass Readings on Inverter Models
Select Champion inverters (100900, 200954) use a clear sight glass instead of a dipstick. With the generator level and engine off, oil should sit between the two engraved notches. For low-light checks, shine your flashlight at 45 degrees to eliminate glare—never tap the glass, as this cracks the housing. If oil appears milky, stop immediately; this indicates coolant contamination requiring professional service.
Add Oil Without Triggering Smoke or Shutdowns
Temperature-Driven Oil Selection Chart
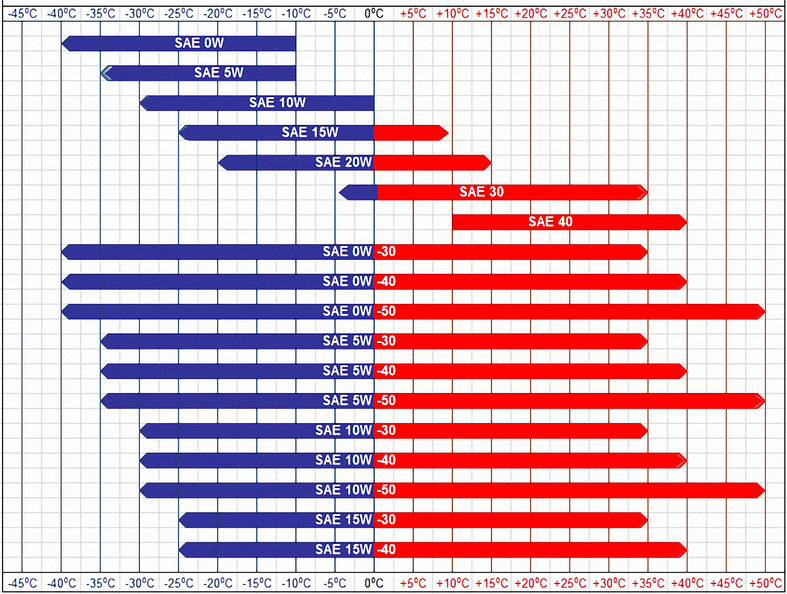
| Ambient Temperature | Required Oil Grade | Critical Notes |
|---|---|---|
| Below 32°F (-4°C) | 5W-30 SJ+ | Prevents cold-start seizure |
| 32°F–104°F (0°C–40°C) | 10W-30 SJ+ | Standard all-season choice |
| Above 104°F (40°C) | 15W-40 SJ+ | Stops viscosity breakdown |
Never substitute automotive oil—Champion requires API SJ or higher certification for generator-specific additives. Using the wrong grade in freezing weather can cause permanent bearing damage during startup.
Model-Specific Oil Capacities & Top-Up Rules
- 3650W–4000W models: 0.6 qt capacity (add 2 oz increments)
- 2500W inverter: 0.4 qt capacity (max fill = 12.8 oz)
- 7500W–8750W units: 1.16 qt capacity (drain excess if above “F”)
Pro Tip: After adding oil, wait 30 seconds for it to settle before rechecking. Overfilling by just 1 oz triggers Champion’s low-oil sensor—this is why incremental top-ups are mandatory. If you exceed “F”, use the drain petcock (not the dipstick hole) to remove excess.
Fix These 3 Critical Oil Problems Before They Destroy Your Engine
Rapid Oil Loss in Under 10 Hours
If levels drop faster than normal, inspect the oil drain bolt and seal immediately. Tighten the bolt to exactly 15 ft-lb (20 N·m)—use a torque wrench, as overtightening strips threads. Check the breather tube for cracks; a damaged tube sucks oil into the combustion chamber. If leaks persist after tightening, replace the oil seal (Champion #100215) before restarting.
Milky or Foamy Oil After Storage
This signals condensation buildup from temperature swings during storage. Change the oil immediately, then run the engine for 5 minutes to evaporate moisture. Never ignore this—water in oil creates sludge that clogs oil passages. For winter storage, run the generator after oiling to circulate fresh oil through all components.
Low-Oil Light Stays On After Refilling
Gently tilt the generator 5 degrees side-to-side to release trapped air bubbles in the crankcase. If the warning light persists, the oil level sensor (Champion #100111) has failed. Test by pouring 2 oz oil directly into the fill neck—if the light turns off, you’ve confirmed sensor failure. Replacement takes 10 minutes with a Phillips screwdriver.
Champion Oil Maintenance Schedule That Prevents 90% of Failures
Change oil after the first 5 hours of use to flush factory metal shavings—this break-in step is non-negotiable. For standard operation:
– Open-frame models: Every 50 hours or 6 months (whichever comes first)
– Inverter models: Every 100 hours or 12 months
– Dusty environments: Halve all intervals
Before seasonal storage, fill oil to the “F” mark, run for 5 minutes, then shut off the fuel valve until the carburetor runs dry. This prevents varnish buildup that clogs jets. Always log changes using Champion’s maintenance decal (100123-DECAL)—stick it to your generator for instant access to service history.
STOP – WAIT – DIP – WIPE – CHECK – TOP – RECORD
This 7-step sequence prevents 99% of oil-related failures. Check your Champion generator oil monthly and before every major storm—it takes less than five minutes but saves thousands in engine repairs. When you master these precise techniques, you’ll never face another unexpected shutdown during critical power outages.


