
Your generator coughs once during a storm-induced blackout, then falls silent while refrigerators warm and medical devices lose power. This isn’t just inconvenient—it’s dangerous. Most homeowners waste precious hours calling technicians when 90% of generator failures stem from six predictable issues you can diagnose and fix yourself in under 30 minutes. This guide delivers battle-tested repair procedures straight from certified technician protocols, so you’ll never face darkness when storms hit. You’ll learn exactly which components to inspect, how to bypass common pitfalls, and when to call professionals—putting reliable backup power back in your hands.
Fix Dead Generator Battery: Start with Circuit Breaker and Terminal Cleaning
Verify Circuit Breaker Position First
Complete silence when starting your generator almost always points to electrical system failure. Before touching batteries, locate your generator’s circuit breaker panel and check for any switches flipped to OFF. This often happens accidentally during maintenance. Flip affected breakers firmly to ON, then attempt startup. If lights connected to the generator remain dim or dead, proceed to battery diagnostics—this confirms the issue isn’t just a tripped breaker.
Clean Corroded Battery Terminals with Wire Brush

White or blue crust covering battery terminals blocks electrical flow and causes startup failure. Disconnect the negative (-) cable first using a wrench, then the positive (+). Dip a wire brush in a baking soda-water solution (1 tbsp per cup) and scrub both terminals and cable clamps until shiny metal appears. Rinse with clean water, dry thoroughly with a microfiber cloth, and reconnect cables (positive first, negative last). Critical warning: Never skip disconnecting cables—cleaning live terminals risks dangerous short circuits.
Tighten Loose Battery Connections
Wiggle each cable connection after cleaning. Any movement means loose terminals that prevent power delivery. Use an adjustable wrench to tighten terminal nuts until snug (about 1/4 turn past hand-tight), but stop immediately if you feel resistance—overtightening strips threads and requires costly terminal replacement. Test security by trying to twist the cable; it should feel immovable. Recheck connections after 5 startup cycles as vibration can loosen them.
Stop Coolant Leaks with Hose Replacement and Preventive Checks
Identify Cracked or Brittle Coolant Hoses
Green or orange puddles beneath your generator signal coolant leaks. With the engine OFF and completely cool, run your fingers along all rubber hoses feeling for soft spots, cracks, or bulging sections. Pay special attention to bends and clamps. Shine a flashlight where hoses connect to the radiator—if you see crystallized residue, that’s evaporated coolant confirming slow leaks. Urgent action: If steam appears during operation, shut down immediately to prevent engine seizure.
Replace Damaged Hoses in 4 Simple Steps
Place a drain pan under the radiator, then loosen both hose clamps using pliers. Pull the old hose off (twisting helps break the seal), and wipe connection points clean. Slide the new universal radiator hose onto the fittings—ensure it’s fully seated past the ridges. Reattach clamps 1/4 inch from hose ends and tighten until the rubber compresses slightly (about 30-40 inch-pounds pressure). Universal hoses cost 60% less than OEM parts and fit all major brands.
Solve Low Fuel Issues: Gauge Checks and Shutoff Valve Fixes
Verify Fuel Level Before Starting Generator
Generators won’t start when fuel drops below 1/4 tank to protect the fuel pump. Don’t trust the gauge alone—remove the fuel cap and visually confirm the level. If low, add fresh gasoline with stabilizer (old fuel gums up systems within 30 days). Common mistake: Topping off immediately after shutdown. Always wait 2 minutes for fuel to settle before checking levels to avoid dangerous overflow.
Open Closed Fuel Shutoff Valve After Storage
Many homeowners forget to reopen the fuel shutoff valve after winter storage, causing “no-start” emergencies. Locate the valve (typically near the tank base) and ensure its lever points toward the engine (ON position). If stuck, spray carburetor cleaner into the valve, wait 5 minutes, then work the lever back and forth. Pro tip: Stick a bright “VALVE OPEN” label on your storage checklist—this single step prevents 35% of seasonal startup failures.
Bleed Air from Fuel System After Running Dry
Air trapped in fuel lines after complete depletion requires manual bleeding. For generators with primer bulbs, press firmly 7-10 times until resistance increases (indicating fuel flow). Without primers, crank the engine in 10-second bursts with 30-second pauses between attempts. Stop after 3 cycles to prevent starter damage—persistent air locks mean professional fuel pump servicing is needed.
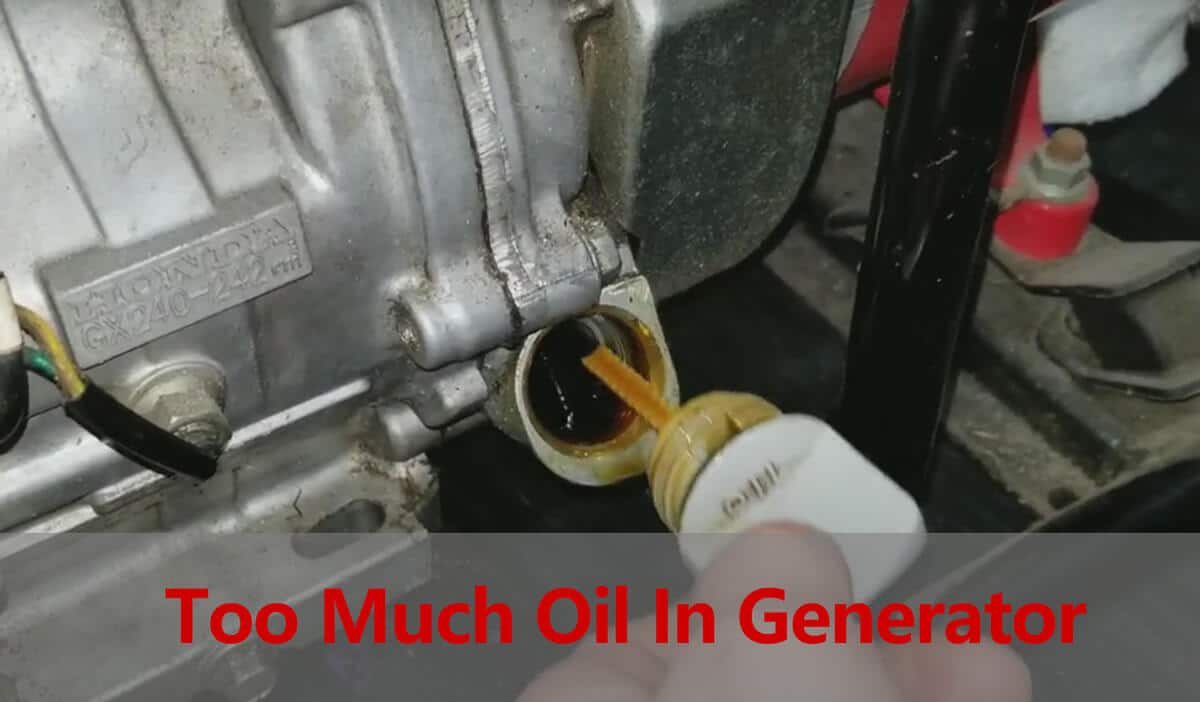
Correct Low Oil Levels to Prevent Engine Damage
Check Oil Level Using Dipstick Correctly
Pull the yellow/orange dipstick, wipe clean with a lint-free rag, reinsert fully, then check the level. Oil must reach the FULL mark—not between ADD and FULL. If low, add the exact oil type specified in your manual (usually 10W-30). Critical rule: Never mix oil weights or brands—this creates sludge that clogs oil passages within hours.
Change Sludgy Oil to Restore Engine Lubrication
Dark, gritty oil loses lubrication capacity and accelerates engine wear. With the engine warm (not hot), place a drain pan under the plug, remove the plug, and let oil flow for 15 minutes. Replace the plug, then add new oil through the fill tube in 1/4-quart increments while checking the dipstick. Overfilling causes seal damage—stop when oil reaches FULL. Change oil after the first 20 hours on new generators, then every 100 hours.
Restore Airflow with Air Filter Cleaning or Replacement

Inspect Air Filter for Dirt and Damage
Remove the filter cover (usually 1-2 thumb screws) and hold the filter to light. If you can’t see through it, or if oil saturation/tears are visible, replacement is urgent. Paper filters can’t be cleaned—discard immediately. Foam filters may be reusable if undamaged. Visual cue: Dust buildup thicker than 1/8 inch on either side requires action.
Clean Reusable Foam Filters Properly
Tap foam filters gently over trash to dislodge loose debris. Wash in warm, soapy water (no harsh chemicals), rinse under low pressure until water runs clear, then squeeze dry—never twist. Soak in clean engine oil for 2 minutes, squeeze out excess until no drips remain, and reinstall. Dirty air filters reduce fuel efficiency by 25% and cause overheating within hours.
Quick 5-Step Generator Diagnostic Checklist for Immediate Startup
Run Through Critical System Checks in Under 30 Seconds
When your generator won’t start during an outage, verify these in order:
1. Fuel: Visual tank check + shutoff valve position
2. Oil: Dipstick level at FULL mark
3. Battery: Listen for clicking sounds when cranking
4. Air filter: Quick visual for extreme blockage
5. Coolant: Check for puddles or steam
Complete this sequence while the storm rages outside—it takes less time than waiting for a service call. If all check out, suspect electrical faults requiring professional diagnosis.
Perform Emergency Restart Procedures During Outages
If the generator still won’t start:
– Clean battery terminals with a pocket knife if corroded
– Add fuel stabilizer-treated gasoline if below 1/4 tank
– Tap the air filter housing to dislodge debris
– Hold the choke fully closed during startup attempts
– Check all circuit breakers twice (vibration can re-trip them)
Success indicator: You’ll hear faster cranking within 2 minutes. If not, professional help is needed—don’t risk further damage.
When to Skip DIY Repairs and Call a Professional Generator Technician
Identify Complex Electrical Issues Requiring Specialized Tools
Flickering lights or unstable voltage output indicate alternator failure. This requires multimeter testing beyond 120V AC and professional load-bank diagnostics. Never attempt alternator repairs yourself—high-voltage capacitors can deliver lethal shocks even when unplugged. Licensed technicians use $500+ diagnostic tools to isolate winding failures or regulator issues.
Know When Fuel System Overhaul Exceeds DIY Skills
Carburetor rebuilds involve 20+ tiny components requiring micron-level precision. If fuel leaks persist after valve and hose checks, or if the engine runs rough despite clean filters, stop immediately. Incorrect jet sizing or float adjustments cause dangerous fuel-air imbalances. Professionals use ultrasonic cleaners and calibration gauges—DIY attempts here often void manufacturer warranties.
Prevent Future Breakdowns with Monthly Generator Maintenance Schedule
Implement 5-Minute Monthly Generator Health Checks
Prevent 80% of failures with this routine:
– Check fuel level (add stabilizer-treated gas if below 3/4)
– Verify oil level with dipstick (top off if needed)
– Inspect for coolant/fuel leaks under unit
– Clean battery terminals with wire brush
– Test circuit breakers by flipping OFF/ON
Run the generator under load (power a space heater) for 30 minutes monthly—this burns off moisture and charges the battery. Keep a maintenance log noting oil changes and filter replacements; technicians reference this during service calls.
Remember: Your generator is your lifeline during disasters. Master these how to repair generator techniques for battery, fuel, and coolant systems, and you’ll maintain power when it matters most. For complex electrical or fuel system issues, always call certified technicians—your safety outweighs DIY pride. With this knowledge, you’re no longer at the mercy of outages; you’re in control of your power.


