Your lights flicker, the refrigerator hum fades, and suddenly you’re plunged into darkness. Power outages happen when you least expect them, but with a properly installed generator transfer switch, you can keep essential appliances running safely during emergencies. This critical device creates a secure connection between your backup generator and home’s electrical system, preventing dangerous backfeed while powering selected circuits. Understanding how to hook up a generator transfer switch properly ensures your family stays safe and comfortable when the grid fails—without risking electrocution to utility workers or damaging your home’s electrical system.
Why Your Generator Won’t Power Your Home Without a Transfer Switch
Connecting a generator directly to your home’s electrical system through an outlet or direct wiring creates a deadly hazard called backfeed. Without a transfer switch, generator power can flow backward into utility lines, potentially electrocuting line workers repairing the grid. A manual transfer switch solves this by physically disconnecting your home from the utility grid before connecting to generator power. When properly installed, this device acts as a traffic controller for electricity—routing power safely through pre-selected circuits while isolating your home from dangerous backfeed conditions.
Critical Transfer Switch Functions You Must Understand
Your transfer switch performs three life-saving functions during power outages. First, it completely isolates your home from utility power lines, creating a safe electrical island around your property. Second, it prevents backfeed that could electrocute utility workers miles away from your home. Third, it routes generator power through your existing household wiring to specific circuits you’ve designated as critical. Unlike automatic transfer switches that detect power loss and start generators automatically, manual versions require you to flip switches to change power sources—giving you complete control over which appliances receive backup power.
Calculate Your Power Needs Before Installation
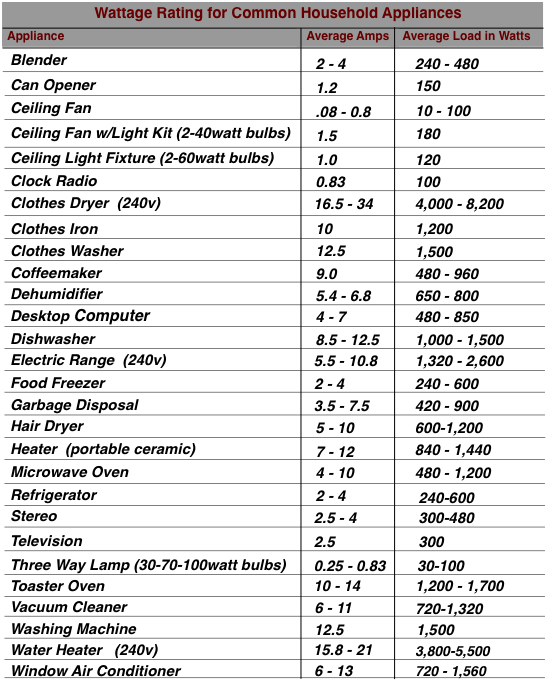
Before purchasing equipment, determine which circuits need emergency power by calculating your household’s wattage requirements. Start with essential appliances like your refrigerator (750 watts running), furnace blower (1,100-1,500 watts), sump pump (800-1,000 watts), and lighting circuits. Remember that startup wattage for many appliances can be 2-3 times their running wattage—your refrigerator might need 2,250 watts to start even though it runs on 750 watts.
Generator Sizing by Home Size and Load Requirements
| Square Footage | Minimum Generator Size | Critical Circuits Supported |
|---|---|---|
| Up to 2,700 sq ft | 5-11 kW | Refrigerator, furnace, sump pump, lighting |
| 2,700-3,700 sq ft | 14-16 kW | All critical circuits plus garage door |
| 3,700-4,700 sq ft | 20 kW | Extended circuits including medical equipment |
| 4,700+ sq ft | 42-47 kW | Near-whole-house capability |
Pro Tip: Multiply your total running wattage by 1.25 to determine minimum generator capacity. Plan to start appliances sequentially rather than simultaneously to avoid overloading your generator during startup surges.
Essential Tools for Generator Transfer Switch Installation

Gather these tools before starting your how to hook up a generator transfer switch project:
– Screwdrivers (both flathead and Phillips)
– Wire strippers and cutters
– Non-contact voltage tester (critical for safety)
– Drill with appropriate masonry bits
– Wall anchors for your specific wall type
– Yellow wire connectors (for 12-10 gauge wires)
– Electrical tape
– Safety glasses and insulated gloves
Critical Warning: Most local building codes require licensed electricians to perform transfer switch connections to your main electrical panel. Check your municipality’s requirements before beginning—improper installation can void your home insurance and create life-threatening hazards.
Safety First: Power Down Procedures That Save Lives
Step 1: Turn off the main breaker in your electrical panel. Never skip this step: The terminals where power enters the main breaker remain energized even when switched off. Use a non-contact voltage tester to confirm circuits are de-energized before working. Keep a flashlight handy since you’ll be working without utility power during installation.
How to Verify Your Panel Is Safe to Work On
After turning off the main breaker, test each circuit you’ll be working with using your voltage tester. Hold it near wire connections without touching them—no buzzing or lights means the circuit is dead. If your tester indicates power, stop immediately and consult a professional electrician. Working on live circuits while installing your generator transfer switch could result in severe electrical shock or electrocution.
Choose Critical Circuits That Keep Your Home Functional
Step 2: Select 6-10 circuits for emergency power based on your calculated wattage needs. Standard critical circuits include your refrigerator/freezer (prevent food spoilage), furnace/blower (maintain heating), sump pump (prevent flooding), one lighting circuit per floor, and one small appliance circuit. Avoid selecting high-wattage circuits like electric ranges, dryers, or air conditioners unless your generator is specifically sized for them.
Balancing Your Electrical Load Effectively
Distribute heavy loads evenly across your transfer switch—don’t put refrigerator and freezer circuits on the same side. Match 15-amp and 20-amp circuits correctly to prevent overloads. For 240-volt circuits like well pumps, use adjacent transfer switch circuits with the handle tie connecting both switches. Proper load balancing prevents generator overload and ensures stable voltage during operation.
Mount Transfer Switch Box With Precision
Step 4: Select the appropriate knockout at the bottom of your main service panel. The knockout size must match your flexible conduit connector—usually 1-inch for standard installations. Carefully remove the knockout using a screwdriver and hammer, protecting yourself from metal shards.
Step 5: Feed labeled wires from the transfer switch through the knockout, protecting wire insulation from sharp edges using a bushing. Each wire should be clearly labeled to correspond with specific circuits in your home.
Step 6: Mount the transfer switch box approximately 18 inches from the main panel’s center using appropriate fasteners:
– Masonry anchors for concrete walls
– Toggle bolts for drywall installations
– Tapcon screws for block walls
Wire Transfer Switch Connections Safely and Correctly
Step 7: Remove the first critical circuit breaker from the main panel. Disconnect the hot wire from the breaker lug carefully while verifying with your voltage tester that no power remains.
Step 8: Connect the red wire from the transfer switch (corresponding to this circuit) to the removed breaker. Reinstall the breaker in its original position, ensuring it seats properly.
Step 9: Twist the black wire from the same transfer switch circuit together with the original feed wire using a yellow wire connector. Tuck wires neatly along panel edges to maintain proper clearance.
Step 10: For 240-volt circuits, connect red leads from two adjacent transfer switch circuits to the double-pole breaker. Ensure the handle tie connects both switches and verify double-pole breaker compatibility before proceeding.
Complete Neutral and Ground Connections Properly
Step 11: Connect the white neutral wire to an available opening in your main panel’s neutral bus bar. Ensure the connection is tight—a loose neutral causes dangerous voltage fluctuations that can damage appliances.
Step 12: Connect the green ground wire to an open port on the grounding bar. This critical safety connection prevents electrical shock if faults occur during generator operation. Double-check all connections are secure and properly labeled for future reference.
System Testing Protocol for Reliable Operation
Step 13: Initial system verification:
– Set all transfer switches to LINE position
– Verify main breakers remain off during testing
– Confirm generator has fresh fuel and oil
Step 14: Generator connection test:
– Never connect cord while generator runs
– Attach generator cord to transfer switch first
– Start generator and let stabilize for 2 minutes
Step 15: Load activation sequence:
– Flip circuits to GEN position one at a time
– Alternate between left and right sides for balance
– Monitor wattage meters during each circuit addition
– Avoid simultaneous activation of all circuits
Common Installation Mistakes That Cause System Failure
Avoid these frequent errors when learning how to hook up a generator transfer switch:
– Overloading circuits by exceeding generator capacity
– Reversed wire connections causing improper switching
– Unbalanced loads concentrated on one side
– Missing permits violating local electrical codes
– Inadequate grounding creating shock hazards
Generator Connection Best Practices for Safe Operation
Operating Sequence:
1. Start generator with no load connected
2. Connect generator cord to transfer switch
3. Flip circuits to GEN position individually
4. Monitor total wattage throughout operation
Shutdown Procedure:
1. Turn off all circuits at transfer switch
2. Allow generator to run 2-3 minutes with no load
3. Disconnect generator cord
4. Turn off generator and allow to cool
Maintenance and Testing Schedule for Reliability
Monthly: Test transfer switch operation with utility power on
Quarterly: Run generator under load for 15-20 minutes
Annually: Check all wire connections for tightness
Before storm season: Verify fuel supply and oil level
Create a circuit map showing which appliances connect to each transfer switch circuit. Post this inside the transfer switch cover for quick reference during outages.
Final Safety Considerations for Generator Use
Never operate a generator indoors or in enclosed spaces—carbon monoxide kills within minutes. Position generators at least 20 feet from windows and doors with the exhaust pointing away from your home. Your properly installed transfer switch provides reliable backup power while protecting utility workers from dangerous backfeed. With correct installation and regular testing, you’ll weather the next power outage with confidence, keeping your family safe and comfortable when the grid goes dark. Remember that how to hook up a generator transfer switch correctly isn’t just about convenience—it’s a critical safety measure that protects lives and property during emergencies.


