Your Honda generator coughs, sputters, and dies during a power outage? That frustrating symptom almost always points to one culprit: a clogged carburetor. When varnish from stale fuel blocks critical passages, your generator loses power or won’t start at all. This complete guide shows you exactly how to clean a carburetor on a Honda generator using basic tools, eliminating the need for expensive repairs. You’ll restore reliable power within 15 minutes once you master this essential maintenance task.
Ignoring carburetor issues leads to permanent damage—like warped gaskets or seized needles—that costs hundreds to fix. But with this step-by-step process, you’ll diagnose fuel flow problems, remove stubborn deposits, and prevent future clogs. Most Honda generator owners complete this cleaning in under 30 minutes with common tools. Let’s get your generator running smoothly again.
Essential Safety Steps Before Touching Your Carburetor
Skip these precautions and you risk fire, fuel spills, or engine damage. First, turn your fuel valve OFF—this stops gasoline flow and prevents dangerous leaks. Verify the generator switch is also OFF before proceeding. Never work on a hot engine; allow 30 minutes cooling time after operation. If you smell gasoline, stop immediately and ventilate the area.
Critical tools you absolutely need:
– Safety glasses (fuel spray causes eye damage)
– 8mm socket with ratchet (for air filter housing)
– Fuel line pliers (to clamp fuel lines)
– 10mm wrench (float bowl bolt)
– Carburetor cleaner with precision straw
– Compressed air (canned or compressor)
– Drain pan (holds 500ml minimum)
– Replacement gaskets (float bowl, carburetor-to-engine)
Pro Tip: Order OEM Honda gaskets (part # 16211-ZL8-003 for float bowl) before starting. Reusing warped gaskets guarantees fuel leaks—this $5 part prevents costly rework.
Why Your Honda Generator Carburetor Clogs in 90 Days
Ethanol-blended gasoline breaks down rapidly, forming gum and varnish that clogs microscopic passages. Honda generators sitting unused for 60+ days develop these deposits even with fuel stabilizer. You’ll see thick, amber-colored sludge coating the float bowl bottom—this is the #1 cause of hard starting and rough idling. Running your generator monthly prevents this, but once symptoms appear, immediate carburetor cleaning is required.
Locate Your Honda Generator Carburetor in 60 Seconds

Honda hides carburetors in two distinct locations—know which one you have before starting:
Side-panel models (EU2200i, EU3000i): Remove 3-4 Phillips screws on the right-side access panel. The carburetor sits directly behind the air filter housing—shiny metal with fuel lines attached.
Open-frame models (EG5000, EM5000): No panel removal needed. Follow the fuel line from the tank to the metal carburetor body bolted near the air filter.
Visual ID Check: The carburetor always connects to:
– Air filter housing (via rubber gasket)
– Fuel line (from tank)
– Small breather hose (to crankcase)
– Electrical wires (eco-throttle system)
Remove Air Filter Assembly Without Damage
For side-panel models: After removing the access panel, locate the air filter cover. Remove the single front screw, then unscrew the two 8mm bolts securing the housing. Before lifting it off, disconnect the thin black breather hose from the crankcase nipple—this often breaks if pulled too hard.
Critical Mistake to Avoid: Never force stuck components. If the air filter housing resists removal, gently twist it side-to-side while pulling upward. Take photos of all connections with your phone—this saves 10+ minutes during reassembly.
Disconnect Fuel Line Without Spills
Position your drain pan under the carburetor inlet. Use fuel line pliers to clamp the fuel line 2 inches from the carburetor. Remove the small metal clamp securing the line, then twist and pull the hose straight off. Expect 50-100ml of residual fuel—this is why the drain pan is non-negotiable.
Leak Warning: If gasoline sprays under pressure, your fuel pump is faulty. Stop work immediately and consult your Honda dealer.
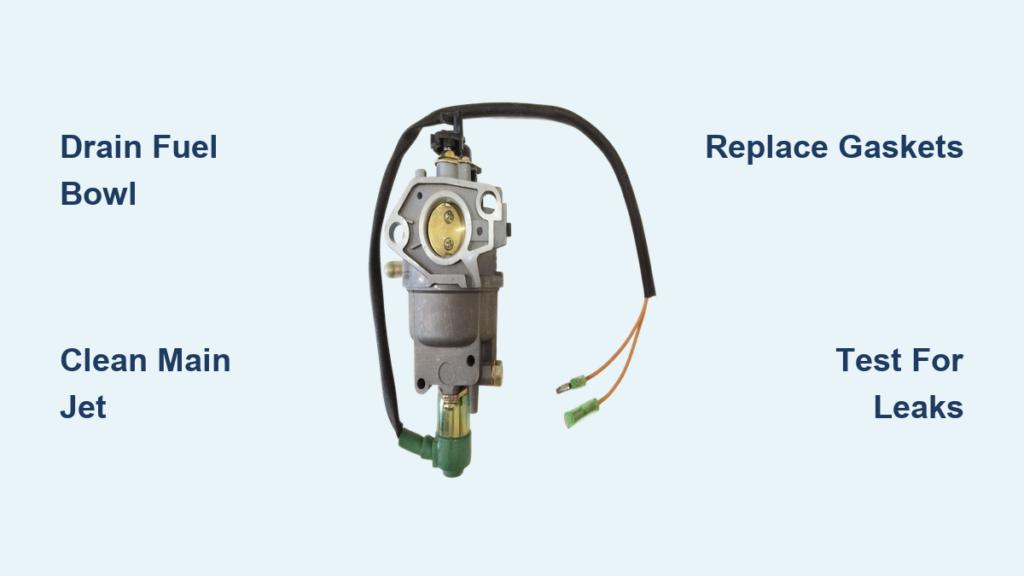
Drain Fuel Bowl and Remove Carburetor
Locate the drain screw at the carburetor’s base—a flathead screw or plastic knob. Place your drain pan directly underneath, then loosen the screw completely. Allow all fuel to empty (30-60 seconds). On some models, a drain hose exits through the generator housing—ensure it’s clear.
Electrical Disconnection: Gently pivot the carburetor away from the engine to access the white eco-throttle cover. Unclip this cover and disconnect the two-pin wiring harness. Note the wire orientation—reversing these prevents startup.
Disassemble Carburetor for Deep Cleaning

With the carburetor on your workbench, remove the 10mm float bowl bolt. Tilt it over your drain pan—residual fuel will spill. Lift off the bowl to expose the float assembly.
Inspect these critical components:
– Float needle: Should move freely on its spring. Sticky movement = varnish buildup
– Seat: Check for pitting or debris (replace if damaged)
– Float bowl: Amber sludge = stale fuel. Clean with carb cleaner
Push out the float pin to remove the float. The main jet sits inside the brass tube—use a small screwdriver to unscrew it. Hold it to light; blocked holes appear cloudy.
Clean Main Jet Passages Like a Pro
Soak the main jet in carburetor cleaner for 2 minutes. Spray cleaner through both ends while holding it over rags. Use compressed air to blast debris from the tiny side holes—never use wire as it enlarges holes and ruins fuel calibration.
Pro Technique: Hold the jet vertically and spray upward through the bottom. Gravity helps dislodge stubborn particles. Repeat until cleaner flows clear through all orifices.
Reassemble Carburetor with New Gaskets

Never reuse old gaskets. Install a new float bowl gasket by pressing it into the carburetor groove—no adhesive needed. Reinsert the main jet tube first, then screw in the main jet until snug (do not overtighten).
Float assembly sequence:
1. Insert float onto pivot post
2. Slide needle into seat
3. Reinstall float pin (tap gently with screwdriver)
4. Verify float moves freely—no binding
Orientation Tip: Position the float bowl so the drain valve faces forward. This allows quick future draining without full disassembly.
Reinstall Carburetor and Test for Leaks
Mount the carburetor on the engine with new gaskets. Hand-tighten the 8mm mounting bolts—overtightening cracks the aluminum body. Reconnect the eco-throttle wires, ensuring the clip snaps securely.
Critical Step: Route the drain hose through the generator housing so 1/4″ protrudes externally. A kinked hose causes fuel overflow.
Turn the fuel valve ON and inspect for 60 seconds. Check:
– Carburetor base (common leak point)
– Fuel line connections
– Drain hose exit point
– Inside housing (use flashlight)
Immediate Action: If leaks appear, shut off fuel valve and recheck gasket seating.
Final Startup Test and Performance Verification
Start the generator and let it run for 15 seconds. Shut it down and check the drain hose—zero fuel should drip. Fuel leakage here means the float needle isn’t sealing, requiring replacement.
Successful cleaning shows:
– Instant cold starts (within 2 pulls)
– Steady 3000 RPM idle (no surging)
– Full power output at rated load
– Clear exhaust (no black smoke)
If problems persist, the main jet wasn’t fully cleaned—repeat the cleaning process focusing on the side holes.
Prevent Carburetor Clogs During Storage
Monthly Maintenance: Run your generator under load for 15 minutes every 30 days. This circulates fresh fuel and prevents varnish formation.
Long-Term Storage Protocol:
1. Turn fuel valve OFF while generator runs
2. Let engine burn remaining carburetor fuel (runs 30-60 seconds)
3. Remove float bowl and drain completely
4. Store with spark plug disconnected
Warning Signs Requiring Immediate Cleaning:
– Hard starting after sitting >30 days
– Engine dies when applying load
– Excessive fuel smell during operation
– Visible fuel leaks around carburetor
Clean your carburetor at the first sign of these issues—delaying causes permanent damage to the needle seat. With this routine maintenance, your Honda generator will deliver reliable power for decades. Now that you know how to clean a carburetor on a Honda generator, you’ve eliminated the #1 cause of generator failure. Keep carburetor cleaner and replacement gaskets in your emergency kit—next time, you’ll fix it before the storm hits.


