Your generator sputters and dies despite fresh fuel and a clean spark plug. If you’ve already checked the basics, you’re likely facing a carburetor problem—the most common generator failure point after fuel issues. Instead of paying a repair shop $200-400 for this simple fix, you can complete this how to change a carburetor on a generator project in under an hour with basic tools. Most portable generators share similar carburetor designs, making this repair surprisingly accessible even for beginners.
Don’t let intimidating mechanical jargon scare you off—this guide breaks down each step with crystal-clear instructions, highlighting the critical connections most DIYers miss. By the end, you’ll have your generator running smoothly again while saving significant money on professional service fees. Let’s tackle this repair together and get your power source back in action.
Safety First: Fuel System Lockdown Procedures
Never attempt carburetor replacement on a running generator. Begin by turning the fuel valve to OFF and letting the engine cool completely for at least 15 minutes. Position your generator on level ground in a well-ventilated area away from ignition sources—gasoline vapors are highly explosive and can travel along the ground.
Keep a Class B fire extinguisher within arm’s reach throughout the entire process. Consult your specific generator’s operator manual for any model-specific safety warnings, as some units require additional precautions like battery disconnection. When disconnecting components, always photograph each connection before removal—this visual reference prevents reassembly mistakes that could cause further issues.
Tools and Parts Checklist for Successful Replacement
Essential Tools You Must Have
- Ratchet with 8mm and 10mm sockets (verify your model’s requirements)
- Needle-nose pliers for precise component handling
- Small fuel container (minimum 1 quart capacity)
- Shop rags for immediate spill cleanup
Critical Replacement Parts
- Correct carburetor model (confirm compatibility with your generator)
- New mounting gasket (typically included with carburetor)
- Comprehensive repair kit (contains fuel lines and clamps)
- Fuel stabilizer (essential for long-term reliability)
Pro tip: Don’t fall for “universal” carburetors sold online—these often have incorrect jetting or mounting configurations. Always order your replacement using your generator’s exact model number found on the identification plate near the engine.
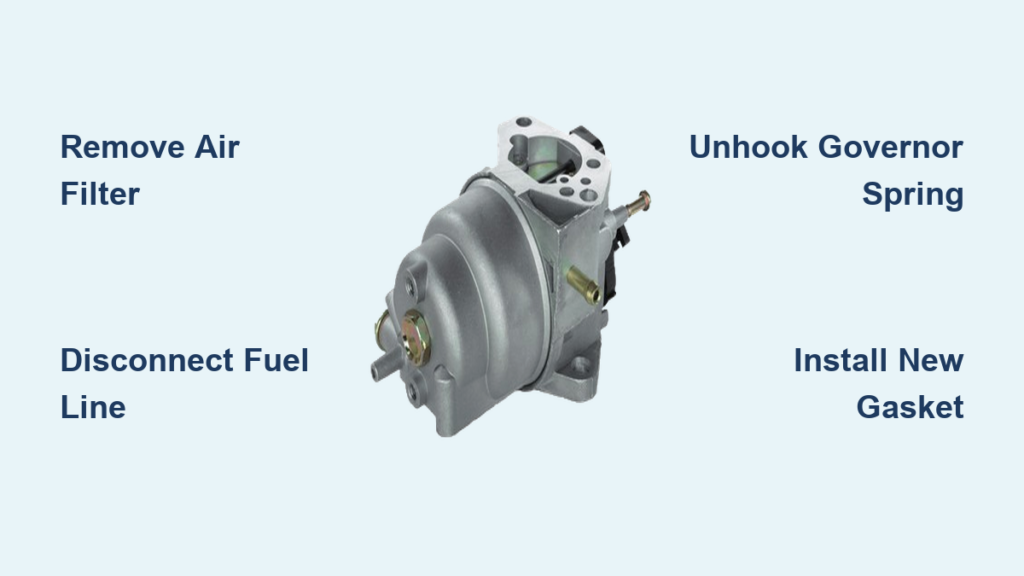
Access Carburetor Behind Air Filter Assembly

The carburetor sits directly behind the air filter housing on the generator’s left side, visible when working from the recoil starter area. On most portable generators, the air filter assembly completely covers the carburetor, requiring its removal for access. You’ll notice the black plastic air filter box connects via several hoses to the carburetor beneath it.
Identify the three to four mounting bolts securing the air filter housing—on many models, these same bolts also secure the carburetor to the engine block. This dual-purpose design means removing these fasteners serves both functions, simplifying the process significantly.
Remove Air Filter Assembly Step-by-Step
Detach Filter Cover and Elements
1. Unscrew the thumbscrew at the air filter’s base and lift the cover straight up—forcing it sideways can break the plastic tabs. The cover slides off two top mounting pins.
2. Remove the foam filter element (expect it to be saturated with oil). Squeeze excess oil into your rag to prevent messy drips during reinstallation.
3. Pull off the wire mesh backing by disengaging it from two plastic pins. This mesh prevents the foam filter from getting sucked into the engine during operation.
Unbolt Air Filter Housing
4. Remove the three securing nuts in this order:
– Center nut (visible inside filter cavity)
– Top-left nut (near recoil starter mechanism)
– Bottom-rear nut (hardest to reach—use a socket extension)
5. Disconnect the rubber breather hose on the housing’s left side. Slide the clamp back with pliers, then twist and pull the hose free.
6. Detach the top vacuum hose by pulling it straight off. With all connections removed, the entire air filter assembly lifts off as one unit, fully exposing the carburetor.
Disconnect Old Carburetor Properly
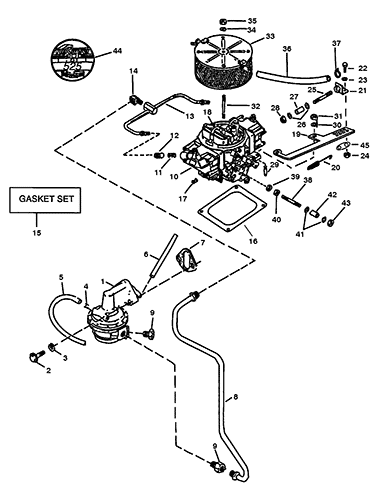
Fuel and Linkage Removal
7. Position your fuel container under the carburetor. Remove the drain bolt (if equipped) to empty residual fuel—expect 2-4 ounces of gasoline.
8. Disconnect the fuel line from the carburetor’s right side. Slide the spring clamp back with pliers, then twist and pull the hose. Keep your container ready for inevitable drips.
9. Remove the old gasket from the mounting studs but keep it nearby for thickness comparison with your new gasket.
10. Pull the carburetor forward until the governor spring tightens. Unhook the spring from the throttle lever using needle-nose pliers—note its exact attachment point for reinstallation.
11. Disconnect the throttle linkage by rotating the carburetor’s throttle arm fully right, then lifting the control rod upward. The carburetor now slides completely off the mounting studs.
Install New Carburetor Correctly
Pre-Installation Verification
Confirm the choke lever moves freely on your replacement carburetor. Check that bowl bolts are snug but not over-tightened—factory settings are usually optimal. Compare your old and new gaskets; if the new one appears thinner, consider using your original gasket for better sealing on worn surfaces.
Mounting and Connection Sequence
1. Slide the new carburetor onto the mounting studs. Connect the governor spring first—it provides resistance that helps align everything properly.
2. Hook the throttle linkage by rotating the carburetor’s arm right and dropping the control rod into place. Test the connection by manually moving the governor arm—throttle should open and close smoothly without binding.
3. Install the new gasket (or verified old one) against the carburetor. Push it firmly against the intake adapter for proper sealing.
4. Reconnect the fuel line to the carburetor’s right side. Position the clamp 1/4 inch from the carburetor body for secure sealing—too close can damage the hose, too far risks leaks.
Reassemble Air Filter System Completely
Housing Reinstallation Process
1. Slide the air filter housing back over the carburetor. Start all three nuts finger-tight before final tightening sequence:
– Center nut first (establishes alignment)
– Top-left nut second
– Bottom-rear nut last (hardest to reach)
2. Reconnect the breather hose to the housing’s left side—secure with the original clamp. The top vacuum hose pushes straight on without tools but ensure it’s fully seated.
3. Replace the wire mesh backing—confirm it snaps securely onto both plastic pins. This critical safety component prevents the foam filter from getting ingested into the carburetor.
4. Reinstall the foam filter (oily side facing toward engine). Close the cover and tighten the thumbscrew firmly but don’t over-tighten—this can warp the plastic housing.
Post-Installation Testing for Reliable Operation
First Start Procedure
Add fresh gasoline mixed with fuel stabilizer. Turn the fuel valve ON and set the choke to full. Pull the starter rope 3-4 times—the new carburetor should deliver fuel immediately without excessive priming.
Once running, let the generator warm up for 5 minutes before moving the choke to RUN. Test under light load (like a lamp) to verify smooth operation. The engine should rev cleanly without hunting, surging, or hesitation.
Common Post-Install Troubleshooting
- Engine races uncontrollably: Governor spring connected to wrong hole on throttle lever
- No start despite fresh carburetor: Fuel valve still off or choke mechanism not closing properly
- Rough idle or stalling: Vacuum hose disconnected or gasket not properly seated
Maintenance to Prevent Future Carburetor Problems
Run your generator monthly with fuel containing stabilizer to prevent varnish buildup that clogs carburetor jets. After each use, turn the fuel valve off and let the engine run until it dies—this empties the carburetor bowl of ethanol-blended fuel that causes corrosion.
Replace your air filter annually. A clogged filter creates excessive vacuum that pulls excess fuel through the carburetor, leading to rich running conditions and eventual failure. Critical storage tip: For generators stored longer than 30 days, remove the bowl drain screw and let fuel evaporate overnight—this prevents gum deposits from forming during storage.
When to Call a Professional Generator Technician
If your new carburetor doesn’t resolve the problem, you may have deeper issues requiring professional diagnosis:
– Low compression from worn piston rings
– Ignition timing problems
– Fuel pump failure (on electric-start models)
These issues require specialized tools and expertise beyond basic carburetor replacement. Most small engine shops diagnose complex problems for $50-75—a worthwhile investment before throwing more parts at the problem. If you’re unsure about any step in this how to change a carburetor on a generator process, consult a professional rather than risk further damage.
Your generator should now start reliably and run smoothly with its new carburetor. This repair typically saves $150-300 over shop rates while giving you valuable maintenance skills for future generator issues. Keep the old carburetor as a backup—you can often rebuild it with a $15 kit for your next project. With proper maintenance, your generator will provide dependable power for years to come, ready when you need it most.


