
Your generator engine runs smoothly, but not a single outlet delivers power. After checking fuel, spark plugs, and circuit breakers, you realize the problem: your Automatic Voltage Regulator (AVR) has failed. This critical component controls your generator’s entire electrical output, and when it fails, your equipment becomes useless. The good news? Replacing an AVR is a straightforward DIY task that saves you hundreds in repair costs and gets your power back within an hour. This guide details exactly how to change AVR of generator safely and correctly.
Most generator owners face this issue unexpectedly during a power outage or while preparing for an important event. With the right approach, you can complete this repair in under 60 minutes without specialized tools. Whether you’re maintaining a portable camping generator or a whole-house backup system, these proven steps work across most generator models.
Essential Safety Steps Before Starting AVR Replacement
Before touching any generator components, complete these critical safety checks to prevent injury or equipment damage. Power down completely and let the engine cool for at least 30 minutes—hot components can cause severe burns during AVR replacement. Disconnect all electrical loads from the generator outlets to eliminate shock hazards.
Turn the fuel valve OFF to prevent dangerous leaks while working near the generator head. Gather your essential tools: a complete screwdriver set (Phillips and flathead), digital multimeter, small wire labels, and your replacement AVR unit. Consult your generator manual for model-specific wiring diagrams and torque specifications—this prevents connection errors during how to change AVR of generator process.
Locate Your Generator’s AVR Position Quickly
Finding the AVR requires knowing exactly where to look. On most portable generators, the AVR sits on the bottom left-hand side of the generator head. Look for a small rectangular box—roughly 3×2 inches—with multiple wire connections. The unit typically features “AVR” or “Voltage Regulator” labels prominently printed on its casing.
Alternative locations include mounted on the control panel or inside a separate electrical enclosure for larger units. Consult your generator manual for exact positioning if you don’t immediately spot the unit. Visual identification tip: the AVR has a quick-connector plug and 2-4 mounting screws securing it to the frame—this distinguishes it from similar-looking components.
Remove Generator Head Cover Without Damage
Access the electrical compartment by removing the generator head cover safely. Locate all securing screws—typically 6-8 around the cover perimeter—and remove them systematically starting from one side. Keep screws organized in a small container to prevent loss during AVR replacement.
As you lift the cover, note the carbon brush holder positioned in the top center. This component connects to the AVR wiring and may need temporary removal. Set the cover aside in a clean, safe location where it won’t get damaged by tools or debris. Take a moment to wipe away any accumulated dust from the generator head—this prevents contamination during how to change AVR of generator process.
Handle Carbon Brush Holder Correctly to Prevent Damage
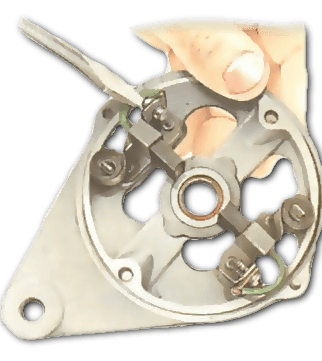
If your generator uses carbon brushes, handle this step carefully to avoid additional repairs. Disconnect both positive and negative wires from the brush holder terminals using needle-nose pliers with insulated handles. Label each wire with colored tape to ensure correct reconnection later—mismatched connections cause immediate AVR failure.
Remove the single securing screw holding the brush holder bracket using the appropriate screwdriver size. Extract the holder gently to expose the carbon brushes without damaging delicate spring mechanisms. Inspect brushes immediately—if they’re worn past 1/4 inch or stuck in the downward position, replace them before installing your new AVR. Clean any corrosion from brush contacts using fine sandpaper (220 grit) in gentle circular motions.
Disconnect and Remove Failed AVR Safely
Document wire connections before touching anything—take a clear photo with your smartphone or label each wire with numbered masking tape. Press the quick connector’s release tab firmly while pulling the plug straight out—never twist or force the connection as this damages the socket.
Remove the mounting screws using the appropriate screwdriver size. Most AVRs use 2-4 screws securing them to the generator frame—hold the unit steady while removing the last screw to prevent dropping. Note the unit’s orientation as you extract it—installing the new AVR in the wrong position affects cooling and causes premature failure during how to change AVR of generator process.
Install New AVR Properly for Reliable Operation

Position the replacement AVR exactly where the old unit sat, matching the orientation precisely. Verify cooling fins face the correct direction—most units require specific airflow patterns for optimal performance. Insert mounting screws and tighten them securely using moderate pressure, but avoid over-torquing which can crack the housing.
Connect the quick connector until you hear an audible click—this confirms proper engagement. Tug gently to confirm the connection is secure before proceeding. Reinstall the carbon brush holder if removed, connecting wires to their labeled terminals with firm pressure. Replace the generator head cover ensuring all screw holes align properly before tightening—cross-threading causes stripped holes and future access problems.
Test Generator After AVR Installation Thoroughly
Start the generator and let it stabilize for 3-5 minutes before testing. Using your multimeter set to AC voltage, test outlet voltage—you should see steady readings within ±5% of your generator’s rated voltage (120V or 240V). Apply a small load like a shop vac or space heater to verify voltage stability under actual operating conditions.
Monitor for warning signs during the first 10 minutes: unusual humming sounds, excessive vibration, or fluctuating voltage readings indicate connection issues. Check all connections if problems appear—loose wires cause 80% of post-installation failures when learning how to change AVR of generator. Let the generator run under light load for 15 minutes to ensure thermal stability before connecting critical equipment.
Recognize Common AVR Failure Symptoms Early
Knowing when your AVR needs replacement prevents unexpected power outages during emergencies. Watch for these red flags: generator runs but produces no electricity, voltage fluctuates wildly during operation (check with multimeter), or the unit shuts down unexpectedly after running for several minutes.
Test monthly using a voltmeter—stable readings indicate healthy AVR function while fluctuations signal impending failure. Physical inspection rarely reveals AVR problems since failures are internal—trust your electrical testing over visual examination. Document any performance changes in a maintenance log to track degradation patterns and schedule preventive replacement.
Maintain Your New AVR for Maximum Longevity
Inspect connections monthly for looseness or corrosion—tighten terminal screws to manufacturer specifications. Test voltage stability quarterly under various loads to catch early problems before they cause complete failure. Keep the generator clean—dust and debris cause AVR overheating and premature failure.
Replace AVRs every 3-5 years under normal use, or immediately after electrical storms or major faults. Stock a spare AVR for critical applications to eliminate downtime during failures—knowing how to change AVR of generator becomes invaluable during emergencies. Train household members to recognize early warning signs and establish rapid response protocols for uninterrupted power.
Troubleshoot Common Post-Replacement Issues
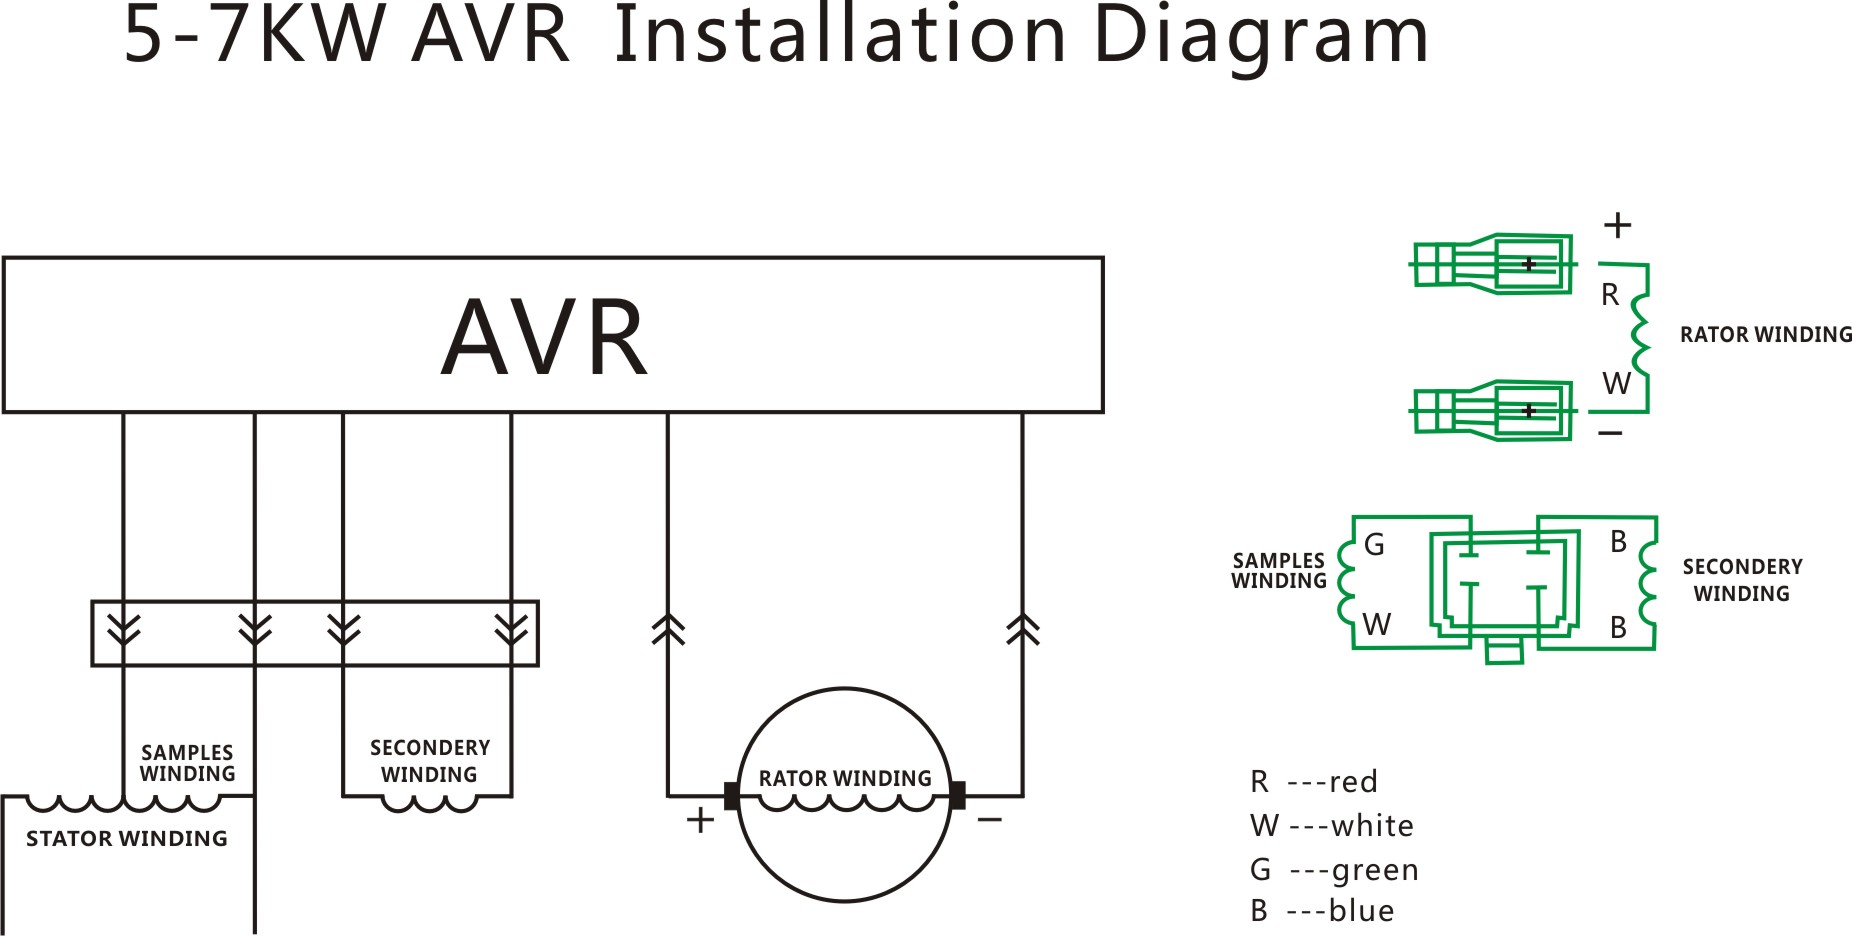
If your generator still doesn’t produce proper voltage after AVR replacement, check these common issues first. Verify all wire connections match the generator manual’s wiring diagram exactly—one misplaced wire causes complete failure. Confirm you installed the correct AVR model—many generators use similar-looking units with different specifications.
Test the exciter circuit for proper field current using your multimeter—if no current flows, check rotor connections. Inspect the stator windings for shorts or grounds that could damage the new AVR. Examine the rotor and bearings for mechanical issues that affect electrical output. If problems persist, consult technical support with your generator model and AVR part numbers—never guess when troubleshooting electrical systems.
Final Tip: Properly changing your generator’s AVR transforms a dead unit into reliable power equipment in under an hour. Keep your replacement AVR model number handy in your maintenance log—having the correct part ready eliminates emergency sourcing delays when you need power most. Regular AVR maintenance ensures your generator delivers clean, stable electricity exactly when you need it, making this simple repair one of the most valuable skills for any generator owner.


