Your pool water turns cloudy, the chlorine generator display flashes “LO SALT” or “CELL ERROR,” and your sanitizer levels plummet. Before calling a technician who’ll charge $150 just to show up, you need to know exactly how to reset salt chlorine generator systems—most glitches can be fixed in under five minutes with the right sequence. This guide delivers manufacturer-specific reset instructions that actually work, plus critical troubleshooting steps when standard resets fail.
When your Hayward AquaRite suddenly stops producing chlorine after a power surge or your Pentair Intellichlor displays cryptic error codes, a proper reset restores normal operation 90% of the time. We’ll walk through precise button combinations, power cycling techniques, and post-reset configurations for every major brand so you never waste another weekend with unsafe pool water.
Soft Reset vs Hard Reset: Choose Correctly
Quick Soft Reset Steps (30-Second Fix)
A soft reset clears temporary glitches without wiping your settings. Perfect for:
– Power outage recovery
– Minor error codes
– Unresponsive controls
Universal soft reset method:
1. Turn off breaker for 30-60 seconds
2. Restore power
3. Wait for startup sequence completion
4. Test basic functions
Pro tip: If your display remains blank after power restoration, wait 90 seconds—modern SCGs have longer startup sequences than older models. Never skip the capacitor discharge period—this 30-second wait prevents electrical damage during reset attempts.
Hard Reset Requirements (Factory Restore)
Use hard resets only when soft resets fail or you’re selling the house. This erases:
– Chlorine output percentages
– Timer schedules
– Custom salt level calibrations
– Diagnostic history
Warning: Document current settings before proceeding—you’ll reconfigure everything from scratch. Never perform a hard reset for “LO SALT” warnings—this just masks the real problem of insufficient salt concentration. First add salt and wait 24 hours for dissolution.
Hayward AquaRite Reset Procedures
AquaRite Pro/Universal Models
Reset sequence:
1. Kill power at breaker
2. Count 30 seconds (capacitors discharge)
3. Restore power
4. Within 30 seconds, press and hold “Diagnostic” for 5 seconds
5. Release when “rSt” appears
6. System auto-completes reset
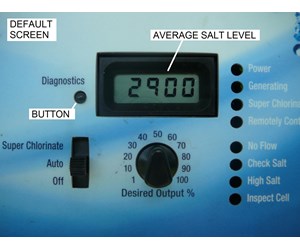
Pro tip: If “rSt” doesn’t appear, repeat step 4 faster. The 30-second window is strict—many users fail resets by waiting too long after power restoration. Critical: After reset, immediately verify salt levels—Hayward systems often miscalibrate following power events.
Standard AquaRite Models
Smaller control box reset:
1. Open control box door
2. Locate tiny reset button near LCD
3. With power ON, press and hold 10 seconds
4. Display flashes “888” then normalizes
5. Critical: All settings return to factory—reconfigure immediately
Common mistake: Users press the reset button with power OFF, rendering the reset ineffective. Always press with power ON for Standard models—this differs from Pro models requiring power cycling first.
Pentair Intellichlor Reset Guide
IC20/IC40/IC60 Physical Reset
Cell removal method:
1. Power down completely
2. Unscrew and remove cell from plumbing
3. Press “More” + “Less” simultaneously
4. Restore power while holding buttons
5. Hold 15 seconds until “rSEt” displays
6. Reinstall cell and reconfigure
Why remove cell? Internal sensors must detect physical separation for reset to initiate. Skip this step and the reset fails every time—Pentair’s safety protocol requires cell removal to prevent electrical damage during reset.
ScreenLogic Interface Reset
Digital reset path:
1. Open ScreenLogic app/interface
2. Navigate Settings → Advanced → System Reset
3. Confirm reset (takes 2-3 minutes)
4. Verify reconnection to automation system
Time-saving shortcut: For ScreenLogic resets, restart your router first if the system doesn’t reconnect—WiFi glitches cause 80% of post-reset communication failures.
Zodiac/Jandy AquaPure Reset Steps

APURE35/APURE1400 Models
Dual-button reset:
1. Cut power at breaker
2. Press “Salinity” + “Output” together
3. Restore power while holding
4. Hold 10 seconds until “RST” appears
5. Release and wait for initialization
Troubleshooting tip: If “RST” doesn’t appear, press harder—Zodiac buttons require firm pressure. Many users give up too soon thinking the reset failed when they simply didn’t apply enough pressure.
PLC Series Menu Reset
Service menu access:
1. Press “Menu” for 3 seconds
2. Use arrows to find “Reset”
3. Press “Select” and confirm
4. Enter “0000” if password prompted
5. Wait 2 minutes for full restart
Expert note: PLC models always require the “0000” password—this default never changes even after user customization. Document your settings before resetting since all configurations revert to factory defaults.
CircuPool System Resets
RJ/Universal Series
Arrow button method:
1. Complete power shutdown
2. Hold “Up” + “Down” arrows
3. Restore power while holding
4. Hold 12 seconds until “RESET” shows
5. Note: Settings erased—have pool volume ready
Critical step: After reset, re-enter pool volume within 15 minutes—CircuPool defaults to 15,000 gallons which causes severe under-chlorination in larger pools. Verify your actual pool size before proceeding.
Si Series Digital Reset
Menu-driven reset:
1. Press “Menu” → Settings → System → Reset
2. Enter password “1234”
3. Confirm reset action
4. System restarts automatically
Pro tip: Si Series units preserve salt level data during resets—no need to retest salt concentration immediately after reset. Focus first on verifying chlorine output settings.
Autopilot Digital Models
Pool Pilot Reset Sequence
Cancel + Down arrow combo:
1. Power off control unit
2. Press “Cancel” + “Down” arrow
3. Restore power while holding
4. Hold 8 seconds until “RESET” displays
5. Release and allow initialization
Common issue: Autopilot resets fail when battery backup is active—remove the backup battery first if the reset sequence doesn’t initiate. This brand-specific quirk trips up most first-time resetters.
Reset Failed? Troubleshooting Guide

Power Supply Issues
Check these first:
– Verify 220V/110V at breaker (multimeter test)
– Inspect GFCI for trips
– Look for corroded electrical connections
– Test with different outlet if possible
Critical insight: Salt generators require stable voltage—fluctuations above 10% prevent successful resets. Install a voltage regulator if your area experiences frequent power surges.
Cell Condition Problems
When resets won’t stick:
– Replace cells older than 3-5 years
– Check for calcium bridging between plates
– Verify salt levels 2700-3400 ppm
– Clean flow switch debris
Expert tip: Before resetting, remove and inspect the salt cell—white crust between plates indicates calcium buildup requiring cleaning. Resetting with a scaled cell just repeats the error cycle.
Error Code Troubleshooting
Clear before resetting:
– HI salt: Drain 6-12 inches, refill, then reset
– LO salt: Add salt, wait 24 hours, retest, then reset
– COLD: Wait for 50°F+ water before resetting
– CELL: Inspect/clean cell first, replace if damaged
Key principle: Never reset error codes without addressing root causes—this is like clearing a car’s “check engine” light without fixing the problem. The error will return within hours.
Safety and Warranty Considerations
Electrical Safety Rules
- Always cut power at breaker, not just switch
- Wait 60 seconds for capacitor discharge
- Use insulated tools around electronics
- Keep water away from control boxes
Critical warning: Never reset with wet hands—salt generators operate at dangerous voltages. One drop of moisture near electrical components can cause fatal electrocution.
Warranty Protection
Document everything:
– Note error codes before reset
– Record reset date/time
– Take photos of settings beforehand
– Keep reset procedure notes
Call professionals when:
– Reset needed more than twice yearly
– Error codes return immediately
– Physical damage visible
– Electrical readings abnormal
Resetting your salt chlorine generator takes minutes but prevents days of unsafe pool conditions. Bookmark your specific model’s reset sequence—when systems glitch at 6 PM Friday, you’ll have crystal-clear water by Saturday morning. Master these procedures and you’ll never pay for a preventable service call again.


