
Your generator won’t start during a power outage. You check everything—fuel, spark plug, air filter—only to discover the oil looks like tar and smells burnt. This scenario plays out thousands of times yearly, often when backup power matters most. Oil changes aren’t just routine maintenance; they’re the difference between reliable emergency power and expensive repairs. Without proper lubrication, generator parts overheat and grind against each other, causing catastrophic engine failure that many users mistakenly blame on buying a “lemon.”
This guide walks you through every step of changing generator oil safely and correctly, whether you own a portable camping unit or a whole-house standby system. By the end, you’ll know exactly when to perform a generator oil change, what oil to use, and how to avoid costly mistakes that could leave you powerless during the next storm.
Oil Change Frequency Requirements
Portable Generator Intervals
Every 100-200 operating hours marks the critical window for portable units. New generators demand special attention—the first oil change happens at just 25 hours to remove break-in debris and metal shavings. After this initial service, schedule full changes before hitting the 100-hour mark. Always check your oil level whenever refueling—topping off as needed prevents dangerous low-oil situations that can destroy your engine in minutes.
Standby Generator Schedule
Unlike frequently used portables, standby generators operate less often but still need annual service. Monthly visual checks catch problems early, while full maintenance occurs at 100 hours or yearly—whichever arrives first. These systems often sit idle for months, so running them for 20 minutes monthly keeps internal components lubricated and identifies potential problems before emergencies strike.
Weather Impact on Timing
Cold weather thickens oil, extending change intervals slightly. Hot weather breaks oil down faster, requiring more frequent monitoring. Track operating hours religiously; guessing leads to premature wear or unnecessary changes. During extreme heat waves, you might need to change oil more frequently as the lubricant breaks down faster under high-temperature conditions.
Choosing Correct Oil Type
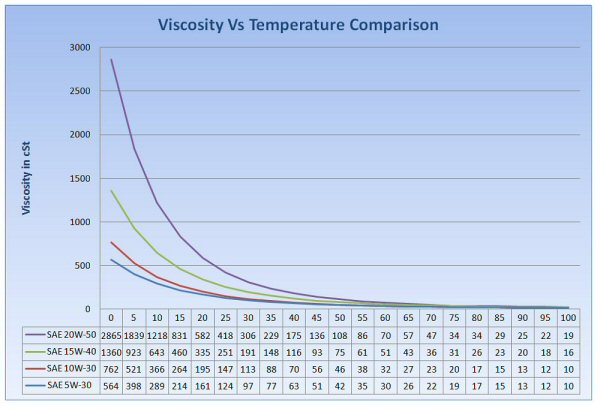
Viscosity Selection Guide
Oil weight determines performance across temperature ranges. 5W-30 flows best in freezing conditions, preventing hard starts and engine damage. 10W-30 works for moderate climates, while 30W suits hot weather operation exclusively. The “W” stands for winter, indicating the oil’s cold-temperature performance—lower numbers mean better cold-weather flow.
Manufacturer Specifications
Your owner’s manual holds the final word on oil selection. Wrong oil choices void warranties and cause irreversible engine damage. Diesel generators need specific formulations—never substitute automotive oil without verification. Small engines run significantly hotter than car engines, requiring oil specially formulated for air-cooled operation.
Cold Weather Considerations
Winter operation demands low-viscosity oil that won’t thicken overnight. If temperatures drop below 40°F regularly, 5W-30 becomes essential. Starting a generator with thick, cold oil starves bearings of lubrication during the critical first seconds. Always verify your specific model’s cold-weather requirements before winter hits.
Pre-Change Safety Protocol
Essential Safety Equipment
Work gloves prevent burns from hot components—37.6% of generator injuries occur during maintenance without proper PPE. Safety glasses protect eyes from splashing oil, while closed-toe shoes guard against dropped tools. Never skip these basic protections; the 30-second oil change isn’t worth a trip to the emergency room.
Engine Preparation Steps
Run your generator for 3-5 minutes before draining. Warm oil flows faster and carries more suspended contaminants out with it. Hot oil also loosens sludge and varnish deposits clinging to internal surfaces. This simple step ensures you remove maximum contaminants during your generator oil change.
Cooling Period Requirements
After shutdown, wait 10-15 minutes for surfaces to cool enough for safe handling. Oil retains heat longer than metal components—test temperature by touching the dipstick before proceeding. Rushing this step causes severe burns; the slight delay prevents weeks of painful recovery.
Complete Oil Change Process
Preparation Phase
Start by disconnecting the battery’s negative cable to prevent accidental starting. Clean accumulated dirt and debris from around the oil fill cap and drain plug—contamination ruins fresh oil instantly. Position your oil catch pan slightly forward of the drain plug location to account for oil stream trajectory and prevent messy spills.
Drain Plug Location

Most generators position the drain plug on the bottom of the engine block, typically a 10-15mm bolt. Some models use a drain tube extension—identify yours before beginning. The plug sits directly beneath the crankcase, angled slightly toward the operator side for easier access. Consult your manual if uncertain about your specific model’s configuration.
Oil Drainage Technique
Remove the drain plug using a socket wrench in a counterclockwise motion. Maintain steady pressure—stripped threads require expensive repairs. Allow complete drainage for 5-10 minutes; residual oil contains the heaviest contaminants. Check the drain plug magnet for metal particles indicating internal wear—significant amounts mean professional inspection is needed.
Refilling With Fresh Oil
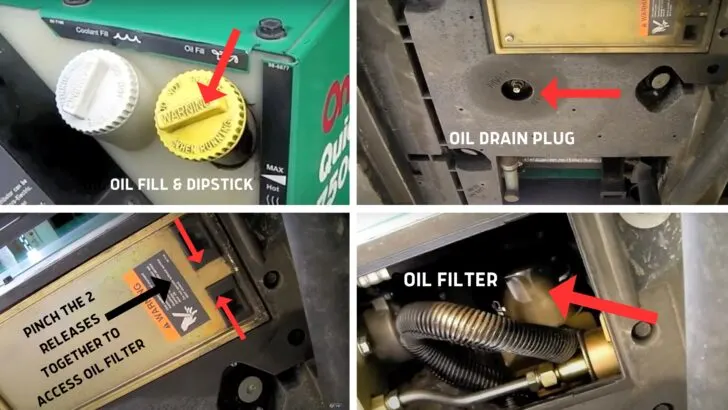
Fill Location Identification
The oil fill cap typically features a yellow handle and sits on top or the side of the engine. Remove slowly to prevent vacuum suction from splashing oil. Use a clean funnel to prevent contamination and overfilling—dirt particles as small as 40 microns can damage internal engine components.
Proper Fill Quantity
Add oil gradually, checking the dipstick every few ounces. Fill to the upper mark on the dipstick—overfilling causes smoking and potential engine damage. Most portable generators hold 0.6-1.1 quarts, but specifications vary widely by model. When in doubt, slightly underfill and recheck after circulation.
Initial Startup Procedure
After filling, run the generator for 3-5 minutes to circulate fresh oil throughout the engine. Shut down and recheck the level after 5 minutes of settling—the dipstick reading may drop slightly as oil fills the filter and internal passages. This critical step ensures proper lubrication before extended use.
Oil Disposal Requirements
Legal Disposal Methods
Never pour used oil down drains or onto soil—EPA violations carry heavy fines. Transfer used oil to sealed containers clearly marked “Used Motor Oil.” Most auto parts stores and recycling centers accept used oil at no charge. Many municipalities offer special collection days for hazardous materials.
Storage Container Selection
Use containers specifically designed for oil storage—milk jugs and water bottles degrade and leak. Clean, empty oil bottles work perfectly for transport. Keep containers sealed and away from ignition sources during storage. Proper disposal protects both your wallet and the environment.
Fuel System Maintenance Integration
Old Fuel Removal
Stale fuel causes starting problems and carburetor issues. Use a shaker siphon from hardware stores to remove old gas safely. Insert the tube into the tank with the copper fitting extending outside—shaking initiates siphon action using gravity. Dispose of old fuel responsibly at approved facilities.
Storage Preparation
Empty the fuel tank completely before long-term storage. Run the generator dry to clear fuel lines and carburetor passages. Store fuel separately in sealed containers with stabilizer added—fresh gas prevents varnish buildup that clogs critical components during emergencies.
Related Maintenance Tasks
Air Filter Service
Remove the air filter cover and inspect the foam or paper element. Wash foam filters in warm, soapy water, then squeeze dry—never twist or wring. Replace paper filters that appear dirty or damaged. A clean filter improves fuel economy by up to 10% and reduces engine wear significantly.
Spark Plug Maintenance
After the engine cools completely, remove the spark plug using the proper socket. Clean light deposits with a wire brush, but replace heavily fouled plugs immediately. Check the gap using a feeler gauge—most generators require 0.028-0.031 inches for optimal performance.
Emergency Preparedness
Oil Supply Storage
Maintain extra oil for emergency changes—power outages often coincide with extreme weather stressing engines. Store oil in original sealed containers in temperature-controlled areas. Rotate stock annually to ensure freshness; degraded oil won’t protect your engine when you need it most.
Hour Tracking
Maintain a simple log of operating hours for maintenance scheduling. Phone apps or paper logs work equally well. Accurate tracking prevents missed changes and unnecessary early service. This small habit extends your generator’s lifespan by years and ensures reliability during critical power outages.
Your generator represents a significant investment in emergency preparedness. Regular oil changes, performed correctly, ensure reliable operation when you need power most. Set calendar reminders based on operating hours rather than months, and keep detailed records of each service. The 30 minutes spent changing oil prevents hundreds in repairs and provides peace of mind during the next storm.


