That sharp gasoline smell near your Generac generator isn’t normal—it’s a danger signal screaming for attention. When fuel starts dripping from your unit, you’re not just wasting expensive gas; you’re creating a potential fire hazard capable of igniting with a single spark. Generac generator leaking gas scenarios escalate fast: a small drip becomes a pool, vapors accumulate, and suddenly your backup power source transforms into a serious safety threat. Ignoring these leaks risks catastrophic property damage, environmental contamination, and voided warranties.
Most fuel leaks follow predictable patterns with straightforward solutions if caught early. This guide delivers the exact diagnostic steps and repair procedures Generac-certified technicians use—no guesswork, no jargon, just actionable fixes. You’ll learn to pinpoint whether your leak stems from carburetor gaskets, degraded fuel lines, or tank integrity issues, then implement permanent repairs that restore safe operation. By the end, you’ll have the confidence to eliminate dangerous gas leaks while extending your generator’s lifespan.
Pinpoint Your Generac Fuel Leak Source
Carburetor Gasket Failure Signs
Bottom carburetor leaks reveal themselves through steady drips directly beneath the carburetor assembly. When the gasket between the carburetor and engine block dries out from heat cycling and fuel exposure, gasoline pools under your generator—often worsening after shutdown as residual pressure forces fuel through the compromised seal. Check for clean, fresh gasoline (not oily residue) forming distinct puddles near the engine base.
Float bowl leaks show as wetness encircling the carburetor’s lower perimeter. This rubber gasket sits submerged in fuel, making it vulnerable to rapid deterioration. Press a clean paper towel against the seam: if it wicks gasoline immediately, the float bowl gasket has failed. Unlike carburetor base leaks, these often start as minor seepage that escalates quickly once the rubber turns brittle.
Fuel Tank and Line Leak Indicators
Compromised fuel tanks display staining along seams or visible cracks on the tank surface. Generac tanks develop stress fractures from vibration, impacts, or environmental exposure—especially near mounting points. Any fuel on the tank exterior means immediate replacement is non-negotiable; temporary patches fail under operational vibration. Inspect after heavy rain too, as water can accelerate crack formation.
Degraded fuel lines announce themselves through pinhole sprays or fine mist near connections. Run your fingers along the entire hose length: if rubber feels hard, brittle, or develops hairline cracks, replacement is urgent. Focus on bends and metal fittings where stress concentrates—these spots often leak before visible cracking appears elsewhere.
Execute Immediate Leak Diagnosis
Critical Safety Shutdown Protocol
Stop your generator instantly at the first whiff of gasoline or sight of fuel. Let the engine cool completely—hot exhaust components can ignite vapors for 30+ minutes after shutdown. Disconnect the battery terminal to eliminate spark risks from electrical systems. Never restart a leaking unit, even for “just a quick test”—vapor ignition requires only 0.2% concentration in air.
Step-by-Step Leak Tracking
Start inspections at the fuel cap—a loose or damaged seal creates false leak appearances. Tighten firmly (don’t overtighten) and wipe the area clean. Wait 10 minutes; if new fuel appears, the cap isn’t the culprit. Follow the fuel path downward: check the shut-off valve connections, then trace lines toward the carburetor. Shine a flashlight into shadowed areas where fuel pools, noting whether drips originate from components (real leak) or surface runoff (misleading).
Distinguish fresh vs. chronic leaks by wiping surfaces dry with a lint-free cloth. Recheck after 5 minutes: new wetness indicates active leakage. Stained, dried residue suggests past issues now resolved—still investigate the root cause to prevent recurrence.
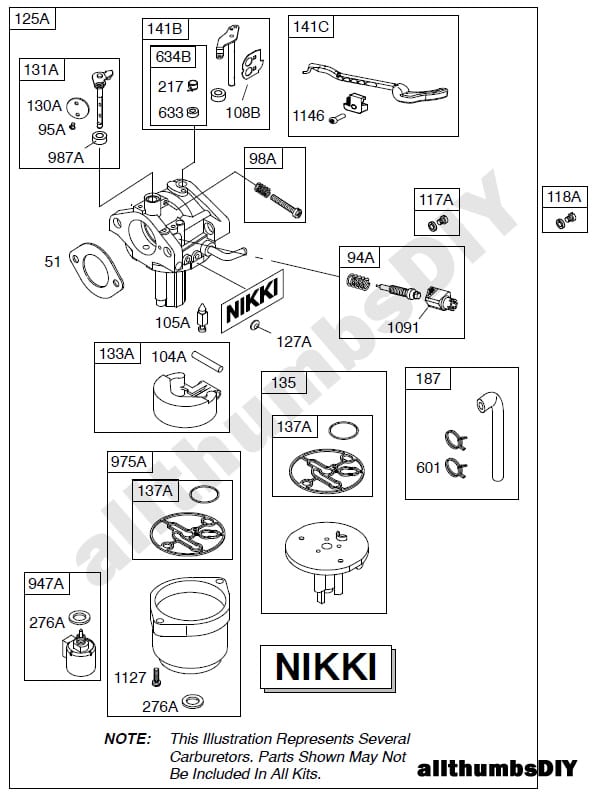
Repair Carburetor Gasket Failures Properly
Carburetor Base Gasket Replacement
Remove the air filter housing to expose the carburetor. Place a container under the fuel line connection before disconnecting with needle-nose pliers—expect 1-2 ounces of spillage. Label all linkages with tape to ensure correct reassembly. Remove mounting bolts in a star pattern, then lift the carburetor straight off to avoid tearing the old gasket.
Scrape mating surfaces meticulously using a plastic razor blade—metal tools scratch aluminum, causing future leaks. Wipe clean with carburetor cleaner and a microfiber cloth. Install the new gasket dry (sealants disintegrate in fuel), aligning it perfectly with mounting holes. Reattach the carburetor evenly to prevent pinching, then torque bolts to 8-10 ft-lbs in sequence—over-tightening crushes gaskets instantly.
Float Bowl Gasket Service
Drain the bowl by unscrewing the bottom drain plug into a container. Remove bowl screws while supporting the assembly to prevent float damage. Inspect the float hinge pin—sticking floats cause flooding that mimics gasket leaks. Replace if movement feels gritty. Clean the gasket groove with a toothpick to remove debris, then press in the new rubber gasket until fully seated.
Reassemble with even pressure on all screws to avoid distorting the bowl. Test by filling the carburetor with fuel manually: no seepage should occur at the seam after 15 minutes. If leaks persist, the carburetor body itself may be cracked—requiring full replacement.
Fix Tank and Line Leaks Permanently
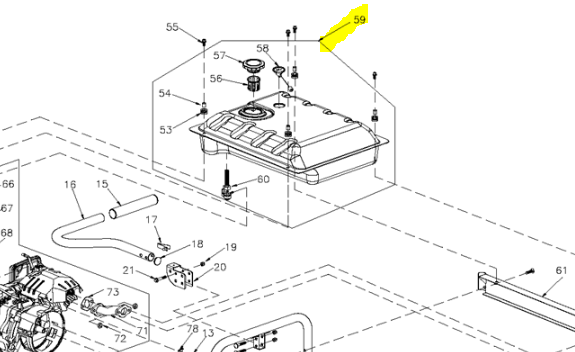
Fuel Tank Replacement Essentials
Empty the tank completely using a siphon pump—never mouth-siphon gasoline. Disconnect fuel gauge wires, noting color-coded positions. Support the tank with one hand while removing mounting straps to prevent dropping. Clean tank mounting points thoroughly to ensure proper sealing.
Install the new tank using all original hardware, but replace any corroded bolts. Double-check line routing against your generator’s manual—kinked lines cause future failures. After refilling, run the generator in a well-ventilated area for 10 minutes while inspecting all connections. Any wetness requires immediate shutdown and re-tightening.
Fuel Line Installation Best Practices
Cut replacement lines square with sharp scissors—angled cuts prevent proper clamping. Route hoses away from exhaust components by at least 6 inches using provided clips. Install new worm-drive clamps at every connection (reusing old clamps risks failure). Tighten until the clamp barely indents the rubber—over-tightening creates leaks by cutting the line.
Pressure-test before operation: With the engine off, prime the fuel system by squeezing the primer bulb 10 times. Check for seepage at all joints under bright light. A single drop per minute requires re-tightening; visible flow means clamp replacement.
Address Primer Bulb and Valve Failures
Primer Bulb Replacement Shortcut
Pop out the old bulb by pressing release tabs inward with your thumbnails. Clean the mounting socket with isopropyl alcohol to remove rubber residue—this is why new bulbs leak initially. Press the new bulb firmly into place until you hear a distinct click.
Test properly by squeezing 5 times with 10-second pauses between. The bulb should firm up completely on the third squeeze and maintain pressure. If it stays soft, check upstream lines for cracks or loose connections—never operate with a faulty bulb.
Fuel Shut-Off Valve Service
Replace leaking valves entirely—internal seals aren’t serviceable. Mark fuel flow direction arrows on photos before disassembly. Install new sealing washers at both ports; old washers rarely reseal. Verify shut-off integrity by turning the valve off, then squeezing the primer bulb 20 times—zero fuel should emerge at the carburetor.
Any residual flow means immediate replacement. Never ignore minor drips here—shut-off valve leaks often escalate rapidly due to constant fuel pressure.
Prevent Generac Gas Leaks Long-Term
Monthly Inspection Routine
Check your fuel system during weekly exercise cycles: look for new stains under the unit, smell for vapors near warm components, and feel lines for hardness. Document findings in a maintenance log—tracking subtle changes catches leaks before they become emergencies. Replace fuel lines every 2 years regardless of appearance; internal degradation precedes visible cracks by months.
Use only Generac OEM parts—aftermarket gaskets and lines fail 3x faster according to service records. Cross-reference your model number (found on the data plate) before ordering any component.
Professional Maintenance Integration
Schedule annual pressure tests with certified technicians—they inject inert gas into your fuel system to detect micro-leaks invisible to the naked eye. Maintain digital service records through Generac’s online portal; this preserves warranty coverage and provides historical data for future diagnostics.
When in doubt, contact Generac support directly at 1-800-800-4328—they’ll identify your exact model and dispatch certified help. Remember: a $5 gasket replaced today prevents a $5,000 fire tomorrow. Your generator’s fuel system demands respect, but with these proven techniques, you’ll keep it running safely for years. Never compromise on gasoline leaks—your family’s safety depends on immediate, correct action.


