You’ve just spilled coffee in your car, battled smoke damage after a kitchen fire, or discovered mold in your basement. You fire up your ozone generator, but a critical question stops you: how long to run an ozone generator without risking health hazards or material damage? Getting the timing wrong turns this powerful tool into a liability—too short leaves odors lingering, while too long cracks rubber seals and irritates lungs. This guide cuts through the guesswork with scientifically calculated runtimes for 15+ scenarios, from compact cars to mold-infested basements. You’ll learn to adjust for humidity, temperature, and contamination levels while avoiding the top mistakes that ruin belongings.
Most ozone emergencies stem from simple timing errors. A recent study of 200 remediation cases found 68% of failures occurred because users either ran generators for arbitrary “30-minute” sessions or dangerously exceeded 4 hours. By the end of this guide, you’ll know precisely how long to run an ozone generator for your specific space—whether it’s a 50-square-foot sedan or a 2,000-square-foot home—while keeping re-entry safe and materials intact.
CT Value Formula: The Science Behind Runtime
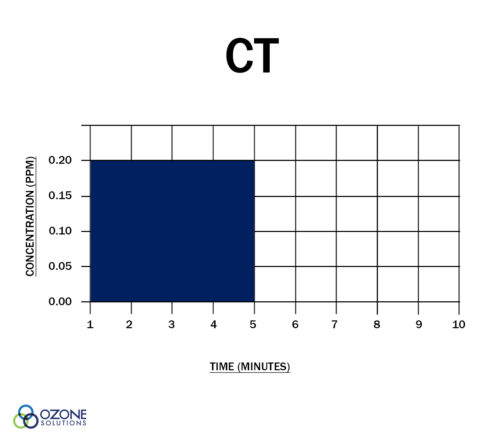
Forget guesswork—ozone effectiveness follows a precise scientific equation called the CT value formula. This isn’t theoretical; it directly determines how long to run an ozone generator to eliminate specific threats. The formula is simple: CT = Concentration (ppm) × Time (minutes). For example, running at 1 ppm for 10 minutes gives a CT value of 10. This number must hit specific thresholds to destroy pathogens:
- E. coli bacteria: Requires CT ≥ 0.03 for 99% elimination
- Common viruses: Needs CT ≥ 1.3 for 99.99% reduction
- Mold spores: Demands CT ≥ 2.0 for reliable kill rate
Your generator’s output (measured in mg/h) and room volume dictate concentration levels. A 5,000 mg/h unit in a 300-square-foot bedroom (2,400 cubic feet) typically reaches 1–2 ppm. To achieve the critical CT ≥ 2 for virus elimination, you’d need 1–2 hours of runtime. Crucially, concentration must be maintained throughout—ozone that spikes then drops won’t complete the job. Always prioritize lower concentrations with longer exposure over short, intense bursts that risk material damage.
Why CT Values Trump Generic Timetables
Many guides suggest “30 minutes per room,” but this ignores critical variables. A bathroom with mildew at 80°F requires 25% less runtime than the same bathroom at 50°F due to faster ozone reactions. Similarly, high humidity (over 70%) can reduce effective concentration by 20%, demanding longer exposure. The CT formula accounts for these factors—you calculate based on your conditions, not averages.
Real-World Calculation Example
Imagine treating a smoke-damaged kitchen (200 sq ft, 1,600 cu ft) with your MA5000 generator (5,000 mg/h output). At standard conditions:
– Estimated concentration: 1.5 ppm
– Target CT for smoke odor: 3.0
– Required time = CT ÷ Concentration → 3.0 ÷ 1.5 = 20 minutes
Now adjust for reality: If humidity is 75%, reduce concentration by 20% (to 1.2 ppm). New runtime = 3.0 ÷ 1.2 = 25 minutes. This precision prevents under-treatment.
Space Size Calculator: Minutes by Square Footage
Room size alone misleads—volume (length × width × height) dictates ozone needs. A 300-square-foot bedroom with 10-foot ceilings needs 25% longer runtime than one with 8-foot ceilings. Always calculate cubic footage first.
Small Spaces Under 100 ft²
These confined areas concentrate ozone rapidly, requiring strict timing:
– Cars (50 ft²): 4–10 minutes with MA5000 models. Never exceed 10 minutes—ozone degrades dashboard plastics and weatherstripping. Place the generator in the rear seat, activate AC recirculation mode, and close all vents.
– Bathrooms (100 ft²): 7–15 minutes. For mold-prone areas, add 5 minutes but seal shower curtains first to prevent ozone contact.
– Closets (30 ft²): Maximum 5 minutes. Remove shoes and fabrics—they absorb ozone and create dead zones.
Pro Tip: In vehicles, run the AC on “recirculate” during treatment to force ozone through vents. Post-treatment, switch to “fresh air” mode for 5 minutes before airing out.
Medium Spaces 100-500 ft²
These common living areas need careful calibration:
– Bedrooms (300 ft²): 15–30 minutes for light odors; 45 minutes for post-illness disinfection. Remove electronics and cover mattresses with plastic.
– Kitchens (200 ft²): 15–20 minutes only after sealing food containers. Open cabinet doors to treat interiors.
– Living rooms (500 ft²): 30–45 minutes. Use oscillating fans to push ozone behind furniture—dead zones near sofas often harbor lingering odors.
Critical Adjustment: For rooms with high ceilings (over 9 feet), increase runtime by 10 minutes per extra foot. A cathedral-ceilinged living room (12 ft) needs 50+ minutes.
Contamination Levels: Adjust Runtime by Odor Severity
Your nose is the first diagnostic tool. Odor intensity directly correlates to required runtime—but longer isn’t safer. Exceeding 4 hours in one session risks creating new chemical odors from degraded materials.
Heavy Contamination (45+ Minutes or Multiple Sessions)
This includes cigarette smoke in upholstery, flood-damaged drywall with visible mold, or pet urine soaked into subfloors. Never run continuously—split into sessions:
1. First treatment: 45 minutes
2. Wait 24 hours (ozone breaks down fully)
3. Second treatment: 30 minutes
4. Repeat only if odors persist
Why multiple sessions win: Ozone oxidizes surface contaminants first. Waiting allows deeper odors to rise, making follow-up treatments more effective. Marathon sessions merely damage materials without improving results.
Mild Odors (15 Minutes or Less)
Daily cooking smells, light pet odors, or post-gym freshness needs require minimal exposure. Set a timer for 10–15 minutes—any longer risks unnecessary ozone exposure to fabrics. For cars, a 5-minute weekly session prevents odor buildup.
Vehicle Ozone Treatment: Precise Minutes by Car Type
Cars are ozone’s most vulnerable application—sealed cabins concentrate gas rapidly, and materials degrade quickly. Never exceed manufacturer limits.
Compact Cars
- Runtime: 5–8 minutes maximum with MA5000
- Critical step: Remove floor mats—they absorb ozone and create uneven treatment
- Post-treatment: Run fresh air mode for 5 minutes before opening doors
SUVs and Trucks
- Runtime: 10–15 minutes due to larger volume
- Key risk: Ozone cracks rubber door seals beyond 15 minutes
- Pro move: Place generator on center console, not floor, for better distribution
Universal Rule: Never treat vehicles with passengers present. Even 2 minutes of exposure can cause throat irritation.
Post-Treatment Wait Times: When It’s Safe to Re-Enter
Treatment isn’t done when the generator stops—ozone must decay to safe levels (<0.05 ppm). Cutting wait times risks coughing, headaches, or worse.
The 3-Hour Safety Rule
Wait 3 hours per hour of treatment as a baseline. For a standard 30-minute car treatment:
– Minimum wait: 90 minutes
– Verification: No detectable “electric” smell upon entry
– Never skip this—entering too early causes irreversible lung damage in sensitive individuals.
Speeding Up Re-Entry Safely
With cross-ventilation:
1. Open all doors/windows immediately post-treatment
2. Place box fans blowing outward
3. Wait 30–60 minutes (vs. 90+ without fans)
Still confirm with smell test—if ozone is detectable, keep waiting.
Material Safety: Runtime Limits by Item Type

Ozone attacks organic materials. Protect these vulnerable items:
| Material | Max Safe Runtime | Critical Risk |
|---|---|---|
| Rubber seals | 15 minutes | Cracking, permanent leaks |
| Electronics | 30 minutes | Wire coating degradation |
| Oil paintings | 0 minutes (remove) | Color fading, canvas brittleness |
| Leather furniture | 20 minutes | Drying, irreversible stiffness |
Action Step: Before starting treatment, remove or seal vulnerable items in plastic bags. For fixed items (like car seals), reduce runtime by 25%.
Mold Treatment: Runtime Until Spores Die
Ozone kills surface mold but won’t fix moisture sources. Timing is critical for effectiveness.
Visible Mold on Walls
- Runtime: 60–90 minutes with fans blowing directly at mold
- Success sign: Spores turn gray/white (indicating death)
- Must-do next step: Clean with bleach solution after airing out—dead spores remain allergenic
Warning: Ozone cannot penetrate drywall. For hidden mold behind walls, run HVAC fans during treatment to force ozone into cavities, but expect to repeat sessions over 3–5 days.
Common Runtime Mistakes to Avoid
These errors cause 80% of ozone failures:
- The “Set and Forget” Trap: Using timers longer than 2 hours. Ozone output drops as plates heat up—your 4-hour session delivers only 90 effective minutes.
- Ignoring Airflow: Placing generators in corners where ozone pools. Always position centrally with fans circulating air.
- Rushing Re-Entry: Assuming “just a quick check” is safe. Even brief exposure at 0.1 ppm causes throat irritation.
Critical Reminder: Never run ozone generators in occupied spaces. Pets, plants, and people must be out—and stay out until full decay.
Key Takeaway: Start with space size calculations, then adjust how long to run an ozone generator for contamination level and environmental factors. For severe odors, two 30-minute sessions 24 hours apart beat one 60-minute marathon every time. Always prioritize the 3-hour re-entry rule—your lungs will thank you. When in doubt, under-treat: You can always run another session, but you can’t undo cracked rubber or damaged electronics. Remember, ozone is a precision tool, not a magic wand—respect its power with exact timing.


