Watching electricity dance through the air as glowing plasma isn’t just for science labs anymore. With the right approach, you can learn how to build a plasma generator right in your home workshop using components you might already have. This fourth state of matter creates mesmerizing displays of ionized gas that respond to electromagnetic fields, offering both visual spectacle and valuable hands-on learning.
Plasma generators operate on principles similar to those found in neon signs, lightning, and even stars. When you build a plasma generator yourself, you gain practical experience with high-voltage circuits, electrical safety, and physics concepts that textbooks can’t replicate. Whether you’re a high school student tackling a science fair project or an electronics hobbyist seeking your next challenge, this guide provides everything you need to create your own plasma generator safely and effectively.
Required Parts for Your DIY Plasma Generator Build
Core Electronics You Can’t Skip
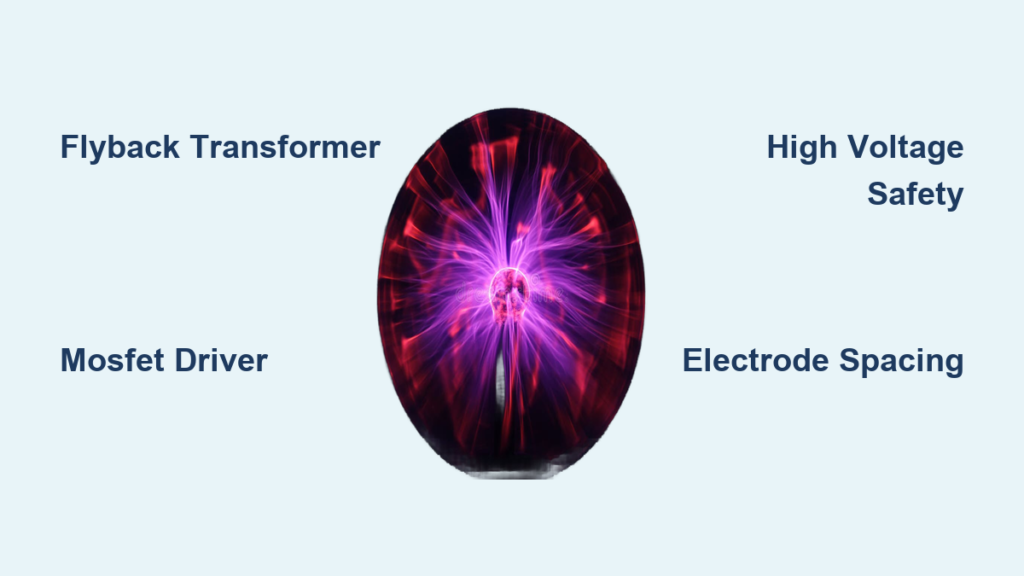
Your plasma generator needs specific high-voltage components to transform ordinary electricity into visible plasma. Start with a flyback transformer salvaged from an old CRT television or monitor—this is your voltage amplifier that converts 12V DC into the 10,000-30,000 volts required for plasma formation. Pair it with a power MOSFET like the IRF540 that can handle these extreme voltage swings without failing.
Don’t overlook the resistor network with 220Ω, 1kΩ, and 10kΩ values that stabilizes your circuit and protects sensitive components. You’ll also need specific capacitors: a 100nF ceramic capacitor for noise filtering and a 1000µF electrolytic capacitor to smooth power delivery. Your power source should be a reliable 12V DC supply—many builders repurpose an old computer power supply for this critical role.
Safety Gear That Could Save Your Life
Working with high-voltage circuits demands serious safety precautions. Thick rubber gloves rated for electrical work (minimum 10,000V) must be your first purchase—never operate your plasma generator without them. Safety goggles with full face coverage protect your eyes from ultraviolet radiation emitted during plasma formation.
Insulated tools with non-conductive handles are mandatory—metal screwdrivers could create deadly short circuits. Keep a Class C fire extinguisher (designed for electrical fires) within immediate reach, and install an emergency shutoff switch that cuts all power with one press. This isn’t just cautionary advice; these measures prevent permanent injury when learning how to build a plasma generator.
Building the High-Voltage Circuit for Plasma Generation
Create the Primary Oscillator Circuit
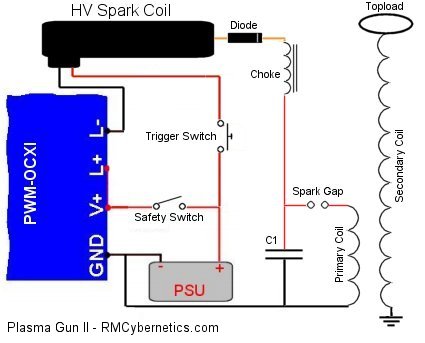
Your plasma generator’s heart is a simple oscillator circuit that drives the flyback transformer at high frequency. Connect the MOSFET’s drain pin directly to your primary coil (10-15 turns of 20-22 AWG enameled copper wire), the source to ground, and the gate through a 220Ω resistor to your oscillator input. This configuration creates rapid switching that induces high voltage in the transformer’s secondary coil.
The key to stable operation is proper feedback—add a 10kΩ resistor between gate and source to prevent floating inputs that could destroy your MOSFET. For beginners, a 555 timer circuit provides reliable frequency control between 15-20kHz, while more advanced builders might use Arduino PWM for precise adjustments. Start at lower frequencies and gradually increase as you observe plasma characteristics.
Install the Voltage Multiplication Stage
The flyback transformer’s secondary output delivers the extreme voltage needed to ionize air molecules between your electrodes. As you build your plasma generator, remember this output operates at lethal voltages—never touch any secondary connections while powered. Plasma forms when this high voltage overcomes air’s dielectric strength, creating visible ionized channels between your electrodes.
Position your electrodes 1-2 cm apart initially—too close and plasma won’t form properly, too far and your circuit lacks sufficient voltage. The characteristic blue-purple glow indicates successful air ionization, while different colors appear when using noble gases like argon. This stage makes your plasma generator truly functional.
Assemble Your Plasma Generator in 7 Critical Steps
Prepare the Flyback Transformer Correctly
- Identify all pins using your multimeter’s continuity test function—mislabeled connections cause catastrophic failures
- Wind your primary coil with 10-15 tight turns of enameled copper wire, securing ends with high-temperature tape
- Solder connections carefully using minimal heat to avoid damaging internal components
- Test all windings with multimeter before applying power to catch shorts early
Construct the Driver Circuit Safely
Mount your MOSFET on a substantial aluminum heatsink with thermal paste—this component generates intense heat during operation. Solder the gate resistor directly to MOSFET leads to minimize parasitic inductance that causes oscillation. Install bypass capacitors across power supply inputs to prevent voltage spikes from damaging your circuit.
Before connecting the transformer, perform a “dry test” with your multimeter to verify proper voltage switching at the MOSFET’s drain pin. This critical step prevents expensive component failures when you power up your plasma generator for the first time.
Test and Calibrate Your Plasma Generator Safely
Initial Power-Up Sequence for Beginners
Begin testing at just 5V instead of full 12V—this reduces stress on components while you verify basic operation. Watch for corona discharge (a faint purple glow around sharp electrode points) which confirms successful high-voltage generation. Gradually increase voltage while monitoring MOSFET temperature—excessive heat indicates circuit problems.
Your first successful plasma should appear as thin, branching filaments between electrodes. If nothing happens after 30 seconds of operation, power down immediately and check connections—forcing operation risks destroying your flyback transformer.
Troubleshooting No Plasma Formation
When your plasma generator refuses to produce visible plasma, check these common failure points:
– Loose transformer connections—vibration from operation loosens solder joints
– MOSFET overheating—add larger heatsink or reduce duty cycle
– Power supply sag—test voltage under load with multimeter
– Electrode oxidation—clean with fine sandpaper and isopropyl alcohol
If plasma appears weak or unstable, increase driving frequency to 25-30kHz using your 555 timer’s potentiometer. Decrease electrode spacing by 1-2mm increments until stable plasma forms. Proper calibration transforms a non-working circuit into a reliable plasma generator.
Critical Safety Measures When Operating Your Plasma Generator
High Voltage Handling Protocols
Never work alone when operating your plasma generator—have someone nearby who knows how to cut power in emergencies. Maintain the “one hand rule” by keeping one hand behind your back when making adjustments to live circuits, preventing current from crossing your heart. Wait at least 5 minutes after power-off before touching any components—capacitors retain deadly charges.
Plasma generation produces ozone and nitrogen oxides—always operate in well-ventilated areas to prevent respiratory irritation. Keep all flammable materials at least 3 feet from your workspace, as plasma reaches temperatures exceeding 20,000°C in localized areas.
Fire Prevention Strategies
Place your plasma generator on non-flammable surfaces like ceramic tiles or glass sheets—wood and plastics can ignite from stray arcs. Have your Class C fire extinguisher mounted within arm’s reach, not buried in a cabinet. Install thermal cutoff switches that automatically disable power if components overheat during extended operation.
Document your safety procedures in a visible location near your workspace. As you build more complex plasma generators, these protocols become even more critical—complacency causes accidents.
7 Costly Errors That Destroy Homemade Plasma Generators
Skipping the gate resistor causes instantaneous MOSFET destruction from voltage spikes—a $2 part protects your $30 transformer. Inadequate heatsinking leads to thermal runaway where the MOSFET draws more current as it heats, creating a destructive cycle. Using audio transformers instead of proper flyback units results in weak output that can’t generate visible plasma.
Other common mistakes include:
– Insufficient wire gauge causing voltage drop and overheating
– Metal enclosures creating dangerous ground paths
– Electrodes too close extinguishing plasma formation
– Working on live circuits inviting serious injury
Each error represents hours of wasted work and potentially dangerous situations. Learning from others’ mistakes makes your plasma generator project successful.
Boost Your Plasma Generator’s Power Output Safely
Advanced Modifications for Serious Builders
Once you’ve mastered basic plasma generation, consider parallel MOSFETs with balancing resistors to handle higher currents. Upgrade to larger flyback transformers from projection TVs for outputs exceeding 50,000 volts—this requires additional safety precautions but creates dramatically larger plasma displays.
Create plasma torches by shaping electrodes into conical nozzles that concentrate the plasma into directed jets. Add small air pumps to stabilize plasma columns at atmospheric pressure without vacuum chambers. These advanced techniques transform your simple plasma generator into a serious scientific instrument.
Document all modifications and their effects—your findings could help other enthusiasts safely build more powerful plasma generators. Remember that increased power demands even more rigorous safety protocols.
Building your own plasma generator successfully merges electrical engineering with physics to create something truly spectacular. Start with the basic configuration described here, then experiment safely within your skill level. Document your progress, share findings with the maker community, and consider how plasma technology applies to other projects like small Tesla coils or plasma speakers.
Remember that plasma generation involves lethal voltages requiring constant safety vigilance—never become complacent after initial success. With proper care and continuous learning, your home-built plasma generator will provide countless hours of scientific exploration and educational value. The skills you gain while learning how to build a plasma generator form a foundation for increasingly sophisticated electronics projects.


