
Your generator sat idle all summer, and now hurricane season is here. You hear the storm approaching, fire up the machine—but is it really delivering safe, stable power? A faulty generator can fry your refrigerator, damage medical equipment, or worse. Knowing how to check generator output in under 5 minutes prevents costly disasters when you need power most. This guide cuts through technical jargon to show exactly what to test, how to spot dangerous voltage fluctuations, and when to call a professional—using only tools you likely already own.
Critical Safety Steps Before Generator Testing
Never skip these checks—burns and electrocution happen in seconds. Top off fuel before starting (sparks ignite vapors), verify oil hits the “FULL” mark on the dipstick, and for water-cooled units, ensure coolant sits 1 inch below the radiator cap. Electric-start models require ≥12.4V battery voltage—measure it now with your multimeter. Most crucially: disconnect the spark plug wire on gasoline generators before touching any electrical components. Finally, let hot exhaust manifolds cool for 10 minutes; their 900°F surface can cause third-degree burns instantly. Skipping these steps risks fire, equipment damage, or life-threatening injury.
Portable Generator Voltage Check: Step-by-Step

Essential Tools for AC Output Testing
- Digital multimeter (set to AC voltage, symbolized as V~ or ACA)
- Alligator clip lead for secure frame grounding
- Flashlight (receptacles are often shadowed in garages)
How to Measure Generator Voltage Safely
- Start the generator – Engage half-choke, turn key ON, then pull cord or press starter
- Set meter to 200V AC range – Never use DC or current settings—this instantly blows the meter’s fuse
- Clip black lead to bare metal frame – Find unpainted metal near the receptacle panel
- Probe receptacle slots – Insert red probe into each slot (hot, neutral, ground)
- Verify readings – 115-125V for 120V outlets, 230-250V for 240V circuits
- Shut down correctly – Remove probes, turn generator OFF, close fuel valve
Pro Tip: If voltage reads below 110V or above 130V at idle, stop testing immediately. This indicates a failing voltage regulator that could destroy connected electronics.
When to Perform a Load Bank Test
Critical appliances like freezers or medical devices demand more than a quick voltage check. For generators powering life-saving equipment:
– Rent a resistive load bank rated at 80-100% of your generator’s kW capacity
– Apply load in 20-amp increments (e.g., 20A → 40A → 60A for a 50A unit)
– Monitor for 30+ minutes—voltage must stay within ±2% (117-123V for 120V systems)
– Red flags: Voltage drops >5% under load, exhaust smoking, or engine surging
Skip this test if you’re not trained—it requires monitoring oil pressure and coolant temps during operation.
Vehicle Generator Testing: Diagnose Charging Failures
Quick Battery Voltage Test While Driving
- Engine OFF – Multimeter across battery terminals: 12.6V = full charge
- Engine RUNNING at 1,500 RPM – Voltage must jump to 13.8-14.7V
– Stays at 12.6V? Your generator or regulator has failed
– Fluctuates wildly? Check for loose wiring or corroded terminals
The 10-Second Brush Check for Weak Output
If voltage stays low while running:
– Use an insulated screwdriver to gently press carbon brushes against the copper commutator
– Voltage suddenly rises? Brushes are worn and need replacement (a $15 fix)
– No change? Proceed to full-field testing below
Full-Field Generator Test (Bypasses the Regulator)
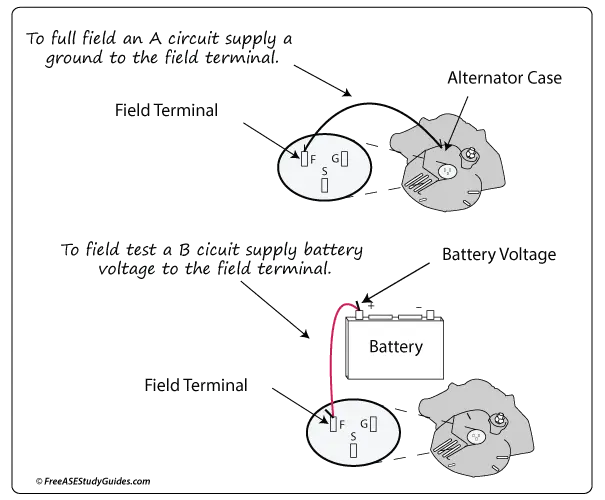
1. Disconnect drive belt and unplug both generator leads
2. Jumper the field (F) and armature (A) terminals together
3. Touch jumper to battery positive for 2 seconds max via a fused wire
– Mild spark + magnetic pull = generator is functional
– No spark = open winding (replace generator)
Warning: Exceeding 3 seconds overheats windings—use a stopwatch!
Voltage Regulator Diagnosis: Fix or Replace?
Visual Inspection Checklist
- Portable units: Check under alternator cover for green corrosion on spade terminals
- Industrial units: Inspect terminal box for cracked capacitors or burn marks
- Clean carefully: Spray electrical contact cleaner, then blow dust with compressed air
How to Test an AC Generator AVR
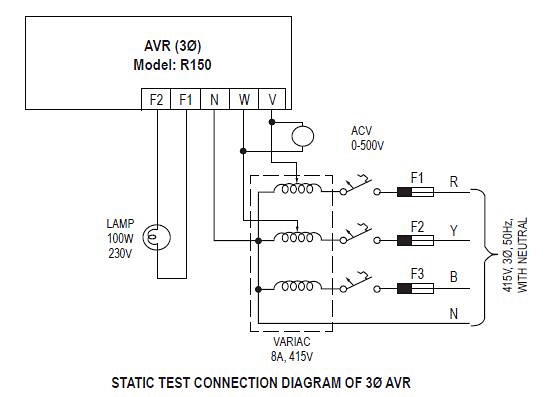
1. Measure no-load AC output – Should match nameplate voltage ±2%
2. Check DC field voltage – Probe F1/F2 terminals; expect 5-30V varying with load
– 0V steady? AVR is dead
– Stuck at 30V? Shorted regulator causing dangerous overvoltage
3. Perform field flash test:
– Disconnect F1/F2 from AVR
– Apply 12V DC for 1-2 seconds across field wires
– Output normal after restart? Replace AVR ($40-$200 part)
– Still no output? Rotor or stator failure requires professional repair
Generator Troubleshooting Flowchart
| Symptom | First Action | Likely Fix |
|---|---|---|
| No AC output | Test voltage at outlet | Replace AVR or check stator |
| Low voltage (<110V) | Verify engine speed (must be 3,600 RPM for 60Hz) | Adjust governor or replace AVR |
| High voltage (>130V) | Shut down immediately | Replace failed AVR |
| Battery not charging | Engine-running voltage test | Worn brushes or bad regulator |
| Flickering lights | Tighten all wiring connections | Replace failing AVR |
Maintenance Schedule to Avoid Emergency Failures
Portable generators:
– Monthly: Inspect wiring for cracks, rodent damage, or loose terminals
– Every 50 hours or 6 months: Perform voltage test (log readings in a notebook)
– Every 2 years: Full load-bank test (critical for hurricane-prone areas)
Vehicle charging systems:
– At every oil change: Check battery voltage while engine runs
– Every 7 years: Replace voltage regulator proactively (even if working)
Pro Tip: Keep your multimeter in the generator’s storage bin. Test output before storing after each use—this catches slow declines in performance.
Must-Have Toolkit for Generator Checks
- Digital multimeter (AC/DC voltage, ohms, frequency modes)
- Insulated tools: 10mm/13mm sockets, screwdrivers with rubber grips
- 12 AWG jumper wires with alligator clips (for safe field testing)
- Spare parts: Matched-spec AVR, brushes, and voltage regulator
- Contact cleaner spray (prevents corrosion in humid climates)
Critical Note: Never use a multimeter rated below your generator’s output. A 200V meter on a 240V circuit risks explosion—always select a range higher than expected voltage.
Final Action Plan: Secure Your Power Before Storm Season
A 3-minute voltage test today prevents a $2,000 appliance meltdown tomorrow. Your immediate next steps:
1. Grab your multimeter and test generator output this week
2. Log readings: Date, voltage, and engine RPM (critical for spotting trends)
3. If voltage drifts outside 115-125V for 120V systems, replace the AVR immediately
4. Schedule annual load-bank testing if powering medical equipment
Generators degrade silently—oil sludge, corroded terminals, and failing regulators won’t announce themselves. By making voltage checks part of your pre-storm ritual, you ensure reliable power when the grid fails. Keep this guide taped inside your generator cover, and you’ll never wonder, “Is my generator safe?” when the lights go out.


