
Your refrigerator stops humming, lights flicker out, and suddenly you’re in darkness—again. Power outages disrupt your life, but a properly installed Generac generator ensures your home keeps running smoothly. Knowing how to hook up a Generac generator correctly separates reliable backup power from dangerous, code-violating installations that fail when you need them most. This guide walks you through every critical step of connecting your Generac system, helping you avoid the common pitfalls that leave many homeowners stranded during outages.
Whether you’re installing a portable unit or a permanent whole-house standby system, proper electrical and fuel connections determine safety and performance. Follow these instructions carefully to ensure your generator delivers power when storms hit—and passes required inspections.
Determine Your Power Needs Before Connecting Anything
Before handling wires or pipes, calculate exactly what your Generac generator must power during outages. Grab your utility bills and list essential circuits you can’t live without.
Essential Circuit Checklist
- Refrigerator/freezer: Requires 800-1,200 starting watts
- Furnace fan: Needs 750-1,500 starting watts
- Well pump: Consumes 1,000-2,400 starting watts
- Security system: Uses 100-500 watts continuously
- Medical equipment: Check nameplate for exact requirements
- Lighting circuits: Typically 600-1,500 watts per room
- Sump pump: Draws 800-1,500 starting watts
Pro tip: Add all running watts together, then add the highest starting watt requirement. This gives your minimum generator size—then increase by 20% for safety margins. Under-sizing causes overload shutdowns during critical moments.
Match Generator to Your Actual Load
- 8-12 kW models: Power essentials like fridge, lights, and furnace
- 13-17 kW units: Add well pump and small AC unit
- 18-22 kW systems: Handle most homes partially during outages
- 23-26 kW generators: Provide whole-house coverage for average homes
Select the Perfect Installation Location for Safety and Performance
Your generator’s position affects both code compliance and operational reliability. Choose incorrectly, and you’ll face failed inspections or dangerous carbon monoxide risks.
Find the Optimal Placement
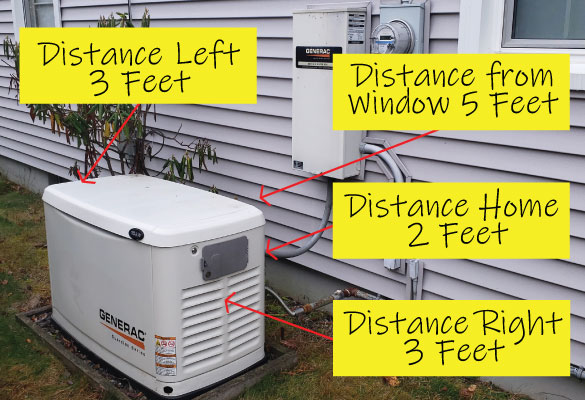
Position your Generac unit on the side of your home opposite prevailing winds to prevent exhaust from entering windows. The site must have:
– Level surface within ¼ inch across the pad
– 5 feet minimum clearance from doors, windows, or vents
– 3 feet clearance from any combustible materials
– 18 inches from house wall for service access
– Year-round accessibility for maintenance and refueling
Build a Stable Foundation That Lasts
A wobbling generator vibrates itself into premature failure. Install a proper foundation using either method:
Concrete Pad Method:
– Size: Generator footprint + 6 inches on all sides
– Thickness: 4-6 inches with rebar mesh reinforcement
– Cure time: Minimum 7 days before generator placement
– Level tolerance: No more than ¼ inch variance
Pre-cast Alternative:
– Purchase composite pad rated for generator weight
– Include rubber isolation pads to absorb vibration
– Ensure weight rating exceeds generator by 50%
Connect Fuel Supply Without Creating Dangerous Leaks

Fuel connection errors cause most generator failures. Whether using natural gas or propane, proper sizing prevents performance issues and safety hazards.
Natural Gas Installation Requirements
Contact a licensed plumber for this critical connection. Gas line sizing depends on both distance and generator capacity:
- 8-12 kW: Requires minimum ¾-inch gas line
- 13-17 kW: Needs minimum 1-inch line diameter
- 18-22 kW: Demands minimum 1¼-inch line
- 23-26 kW: Requires minimum 1½-inch line
Critical requirements:
– Install sediment trap before generator connection
– Place shutoff valve within 6 feet of generator
– Test all connections with professional leak detector
– Ensure gas pressure maintains 5-7 inches water column
Propane Tank Setup Essentials
LP systems need specific components for reliable operation:
Tank Sizing Guide:
– 8-12 kW: Minimum 120-gallon tank
– 13-17 kW: Minimum 250-gallon tank
– 18-26 kW: Minimum 500-gallon tank
Installation must-haves:
– Two-stage regulator system (first stage at tank)
– Approved propane-rated lines only
– Manual shutoff valve in easily accessible location
– Proper ventilation for any enclosure
Install Transfer Switch to Prevent Deadly Back-Feed Hazards
The transfer switch is your generator’s safety brain—install it wrong, and you risk damaging appliances or creating electrocution risks for utility workers.
Choose the Correct Switch Type
Generac generators require an automatic transfer switch (ATS) matched to your electrical service:
- 100-amp: Suitable for most residential homes
- 150-amp: Needed for larger homes with electric heat
- 200-amp: Required for whole-house systems
Location rules:
– Install adjacent to main electrical panel
– Follow manufacturer clearances (typically 3 feet)
– Ensure weather protection for outdoor units
Wire the Sub-Panel for Safe Circuit Separation
Create a dedicated load center for generator circuits to prevent dangerous back-feeding:
Essential circuits to connect:
1. Refrigerator/freezer (20-amp breaker)
2. Furnace/AC (20-30-amp breaker)
3. Well pump (20-30-amp breaker)
4. Security system (15-amp breaker)
5. Medical equipment (dedicated circuit)
6. Emergency lighting (15-amp circuits)
7. Essential outlets (20-amp circuits)
Wire specifications by generator size:
– 8-12 kW: 10 AWG for 30-amp, 8 AWG for 50-amp
– 13-17 kW: 8 AWG for 50-amp, 6 AWG for 65-amp
– 18-22 kW: 6 AWG for 65-amp, 4 AWG for 100-amp
– 23-26 kW: 4 AWG for 100-amp, 2 AWG for 150-amp
Critical warning: Use only THHN/THWN stranded copper wire in approved conduit with proper grounding.
Ground Your Generator System to Prevent Electrical Hazards
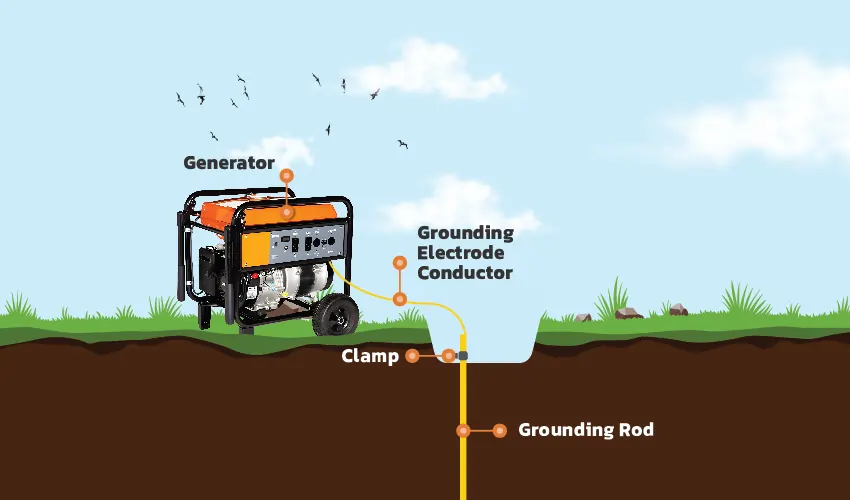
Inadequate grounding damages generators and creates electrocution risks. Drive a dedicated grounding rod specifically for your Generac system.
Grounding requirements:
– Rod: Minimum 8-foot copper-clad steel
– Wire: #6 AWG copper minimum
– Connection: Bond generator frame to grounding system
– Testing: Verify resistance below 25 ohms
Connection sequence:
1. Drive rod flush with ground level
2. Clean connection points to bare metal
3. Use acorn clamp or exothermic weld
4. Apply anti-oxidation compound
5. Test continuity with multimeter
Test Your Installation Before Relying on It During an Outage
Never trust an untested generator. Complete these validation steps before considering your installation complete.
Initial Startup Checklist
Pre-start verification:
– [ ] All connections tight and corrosion-free
– [ ] Oil level at full mark (use 10W-30)
– [ ] Fuel supply adequate and pressurized
– [ ] Battery connected (positive first, then negative)
– [ ] Control panel set to “Auto”
Testing sequence:
1. Simulate outage: Turn off main breaker
2. Observe startup: Generator should start within 10 seconds
3. Check transfer: ATS should switch to generator power
4. Verify loads: Test each connected circuit
5. Measure voltage: Should read 240V ±5%
6. Check frequency: Must be 60 Hz ±1%
7. Return to utility: Restore main power, verify transfer back
Establish a Maintenance Schedule for Reliable Operation
Your Generac needs regular care to start when called. Set up these maintenance intervals:
Initial service (after 8 hours):
– Change oil and filter
– Check all connections
– Inspect air filter
– Clean battery terminals
Ongoing schedule:
– Weekly: Visual inspection, check for leaks
– Monthly: Battery voltage test, exercise cycle
– Quarterly: Oil level check, air filter inspection
– Semi-annually: Oil change, spark plug check
– Annually: Complete tune-up, valve adjustment, load test
Troubleshoot Common Problems Before Calling for Service
Even perfect installations encounter issues. Know these quick fixes:
No-Start Solutions
- Check battery: Minimum 12.4V required
- Verify fuel: Ensure adequate supply and pressure
- Inspect air filter: Clean or replace if dirty
- Check oil: Low oil prevents starting
- Read codes: Control panel displays error messages
Transfer Switch Issues
- Utility sensing: Check connections to main panel
- Control wiring: Verify continuity in all control wires
- Contactor inspection: Look for burned or pitted contacts
- Ground testing: Ensure solid ground connections
Know When to Call Professionals for Generator Installation
Some tasks require licensed experts—know your limits:
Must hire professionals:
– Electrical connections (licensed electrician required)
– Gas line installation (licensed plumber required)
– Permit applications and inspections
– Complex load calculations
– Integration with solar or battery systems
Professional installation costs typically range $3,000-$8,000 depending on generator size, distance from utilities, and local labor rates.
Your Generac generator now stands ready to power your home through any outage. With proper installation complete, test it monthly under load to ensure reliability. Keep maintenance records updated, and you’ll enjoy peace of mind knowing your backup power system won’t let you down when storms hit.


