When the power suddenly fails during a storm, your portable generator becomes your lifeline—but connecting it improperly can create deadly hazards. Knowing exactly how to hook up portable generator to house safely ensures you can power essential appliances without risking carbon monoxide poisoning, electrical fires, or backfeeding dangers. This guide delivers proven methods used by professionals, from simple extension cord setups to permanent transfer switch installations, so you’re prepared when the grid goes down.
Extension Cord Connection Method
This approach works best for short outages when you only need to power critical appliances like refrigerators and medical equipment. While limited in scope, it’s often the fastest solution when seconds count.
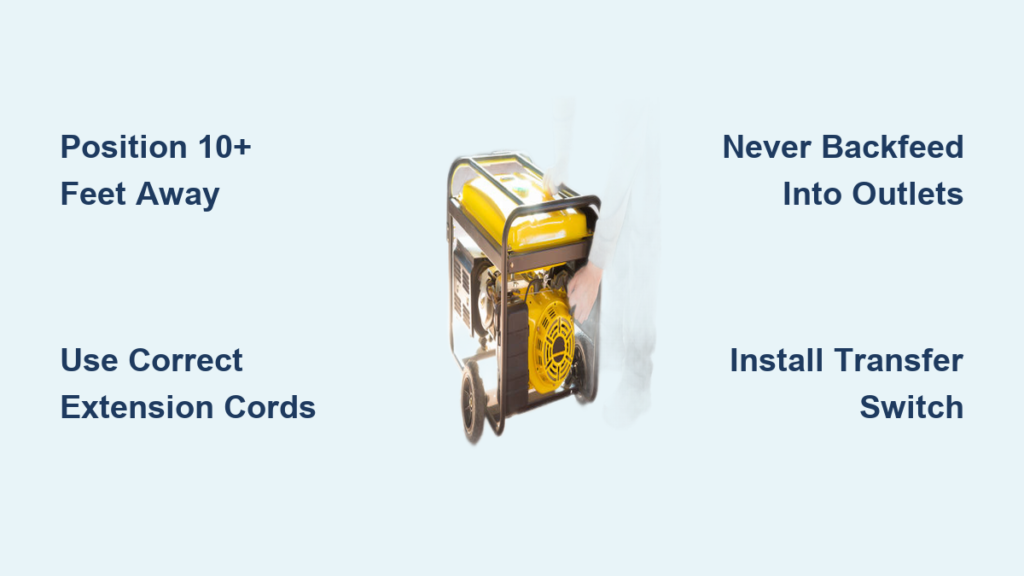
Position Generator Safely
Move your generator at least 10 feet away from your house before starting it, positioning it downwind from windows, doors, and vents. This critical distance prevents carbon monoxide from entering your home—this invisible gas kills more people during outages than electrical hazards. Choose a dry, level surface on concrete or gravel, never on wooden decks that could catch fire from exhaust heat.
Choose Correct Extension Cords
Your extension cords must handle both the wattage and amperage of connected appliances without overheating. For refrigerators (600-800 running watts), use 14-gauge minimum cords; for space heaters (1500 watts), upgrade to 12-gauge wiring. Longer runs require heavier gauges—use 10-gauge for distances over 50 feet. Warning: Warm cords or frequent breaker trips signal dangerous overload conditions requiring immediate correction.
Connect Appliances Directly
Start your generator following the manufacturer’s pre-start checklist, then connect appliances using this sequence:
- Plug extension cord into generator’s outlet
- Route cord through a slightly opened window or door
- Connect appliance directly to cord
- Start appliance on lowest setting first
- Add additional appliances one at a time
Pro tip: Use generator cords with built-in GFCI protection for outdoor appliances like sump pumps to prevent shock hazards during wet conditions.
Generator Cord Power Distribution
For powering multiple devices efficiently, generator cords (gen-cords) offer a significant upgrade over individual extension cords. These specialized cables connect to your generator’s 20- or 30-amp outlet and provide multiple household outlets in a single weather-resistant enclosure.
Gen-Cord Advantages
Gen-cords transform your generator into a mini power station—instead of running multiple cords through windows, a single 30-amp cable provides four or six household outlets safely inside. This eliminates tripping hazards while keeping doors and windows more secure during storms. Most gen-cords support 7,200 watts maximum—enough for refrigerator, freezer, lights, and electronics simultaneously.
Installation Process
Connect your gen-cord using these steps:
- Ensure generator is positioned 10+ feet from house
- Connect gen-cord’s twist-lock plug to generator’s outlet
- Route weatherproof cable through a single entry point
- Distribute power through built-in household outlets
- Use standard appliance cords from gen-cord to devices
Critical note: Never exceed the gen-cord’s rated capacity—overloading causes overheating and potential fire hazards.
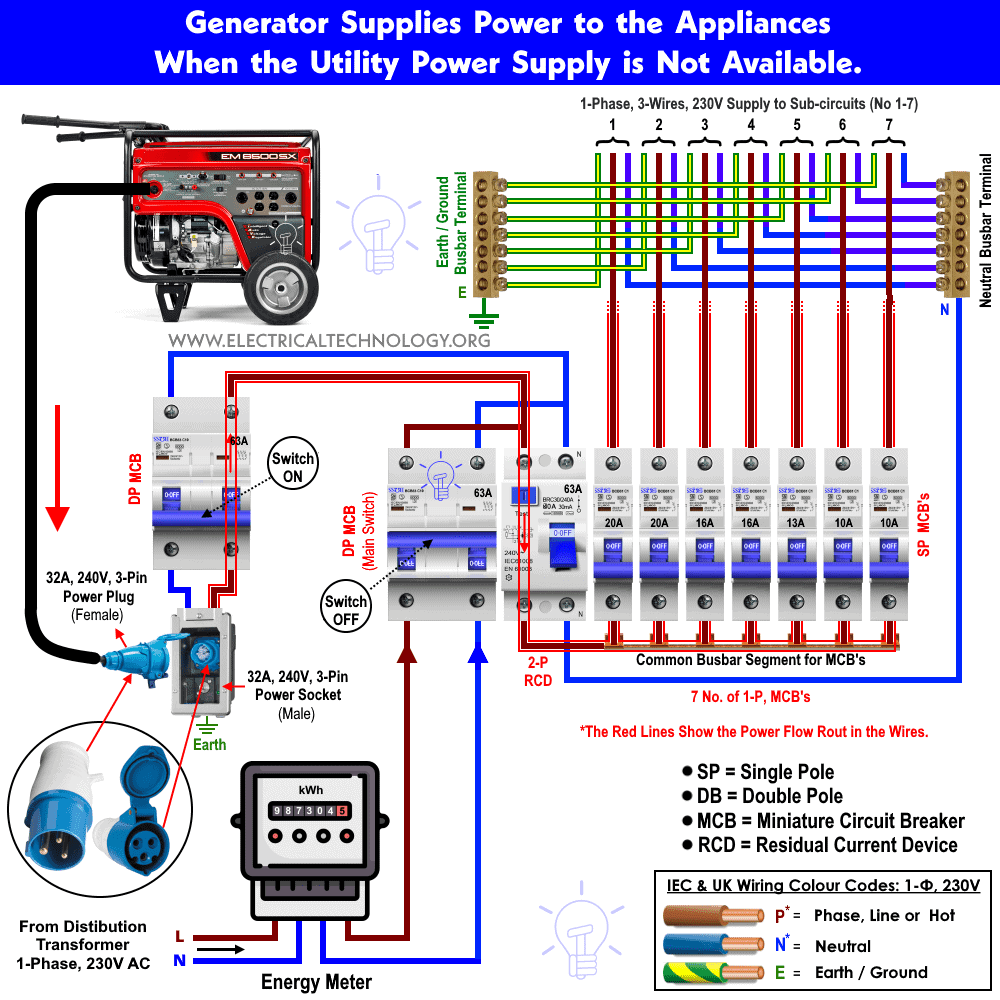
Manual Transfer Switch Installation
When you need to power hardwired appliances like furnaces, well pumps, or central air conditioning, a manual transfer switch becomes essential. This professional installation enables your generator to feed power directly into your home’s electrical panel while maintaining complete safety.
Professional Installation Required
Manual transfer switches must be installed by licensed electricians who will:
– Mount the switch adjacent to your main electrical panel
– Connect individual circuits you want to power during outages
– Install dedicated inlet box for generator connection
– Test all connections and safety features
Cost range: Expect $500-1,500 for complete professional installation, depending on switch capacity and local labor rates. This investment pays off during extended outages when you need to power multiple hardwired systems.
Operating Transfer Switch
Once installed, using your transfer switch follows a simple sequence:
- Connect generator using appropriate cord to outdoor inlet box
- Start generator and let it stabilize for 2-3 minutes
- Switch circuits from “Line” to “Generator” position
- Power essential circuits based on generator capacity
- Monitor loads using built-in watt meters
Load management: Most 5,000-7,500 watt generators can handle refrigerator, freezer, furnace, and basic lighting circuits simultaneously.
Breaker Interlock Kit Alternative

Breaker interlock kits offer a more economical approach to whole-house generator connection while maintaining safety standards. These mechanical devices prevent your generator and utility power from operating simultaneously.
Kit Selection Process
Choose an interlock kit specifically designed for your electrical panel brand and model. Critical: UL-listed kits only, matched to your panel’s amperage rating. Generic or mismatched kits create serious safety hazards that could void your homeowner’s insurance.
Installation Requirements
Professional electrician installation includes:
– Mounting interlock bracket on main breaker
– Installing dedicated generator breaker
– Wiring outdoor inlet connection
– Testing interlock mechanism for proper operation
Code compliance: Interlock kits must meet local electrical codes—never attempt DIY installation on main electrical panels.
Natural Gas Generator Connections
For extended outages, tri-fuel generators connected to your home’s natural gas line eliminate refueling concerns entirely. This setup provides continuous operation as long as gas service remains available.
Gas Line Connection Steps
Licensed plumber required for permanent gas connections. The process involves:
- Install gas branch after your meter with dedicated shutoff valve
- Connect flexible hose using quick-connect fittings
- Test all connections for gas leaks using soap solution
- Set fuel selector to “Natural Gas” position
- Start generator and adjust gas flow using built-in regulator
Safety note: Gas connections must include sediment trap and proper ventilation per local codes.
Critical Safety Protocols
Understanding what not to do is as important as knowing proper procedures. These mistakes can be fatal for you, utility workers, or neighbors.
Never Backfeed Through Outlets
Backfeeding—plugging a generator directly into wall outlets—is extremely dangerous. This practice energizes your entire electrical panel and sends voltage back through utility lines. Lineworkers attempting to restore power face electrocution risk from your generator’s output. Never use double male plugs (widow maker/suicide cords)—these create severe fire hazards.
Generator Positioning Rules
Carbon monoxide kills more people during power outages than electrical accidents. Follow these positioning guidelines:
– Minimum 20 feet from any building opening (exceeds the 10-foot minimum)
– Elevated surface to prevent flooding damage
– Dry location under canopy or generator tent
– Secure anchoring to prevent theft or wind damage
Electrical Safety Checks
Before each use:
– Inspect all cords for cuts, nicks, or exposed wiring
– Verify grounding using generator’s grounding rod
– Check GFCI protection on all outdoor connections
– Test carbon monoxide detectors inside your home
Pre-Outage Preparation Checklist
Success during emergencies depends entirely on advance preparation. Assemble these supplies and complete preparations before storm season arrives.
Essential Supplies
- Generator fuel: Store 24-48 hours worth (gasoline stabilizes for 12 months)
- Heavy-duty extension cords: Multiple lengths and gauges
- Transfer switch or interlock kit: Professionally installed and tested
- Generator maintenance kit: Oil, filters, spark plugs
- Carbon monoxide detector: Battery backup model for each floor
Generator Testing Schedule
Test your complete setup every three months:
1. Start generator and run for 30 minutes under load
2. Exercise transfer switch through complete cycle
3. Check fuel levels and add stabilizer as needed
4. Inspect all connections for wear or damage
5. Review load calculations for any new appliances
Load Calculation Guide
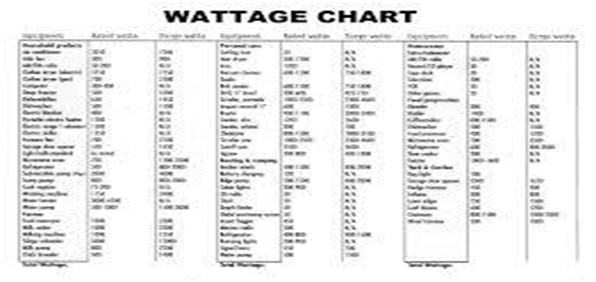
Determine your generator size needs by calculating essential appliance wattage:
Essential loads:
– Refrigerator: 600-800 running watts (1,200 starting)
– Freezer: 500-700 running watts (1,000 starting)
– Furnace fan: 600-1,300 watts
– Well pump: 1,000-2,400 watts
Sizing formula: Add running watts + highest starting watts = minimum generator size. Most homes need 5,000-7,500 watts for essential circuits.
Emergency Connection Timeline
When the power fails, speed matters. Follow this sequence:
First 15 minutes:
1. Position and start generator
2. Connect essential appliances using extension cords
3. Verify carbon monoxide detectors working
First hour:
1. Install generator cord if available
2. Power additional circuits through transfer switch
3. Monitor load and fuel consumption
Your portable generator can provide reliable backup power for years when connected properly. Whether you choose simple extension cords or invest in a professional transfer switch installation, following these safety protocols and maintenance procedures ensures your family stays comfortable and safe during any power outage. Remember—when learning how to hook up portable generator to house, safety always comes before speed.


