
When the power grid fails during a storm, your portable generator becomes your lifeline—but only if properly connected. A correctly installed generator hook up safely powers essential circuits without risking electrocution or carbon monoxide poisoning. This guide shows you exactly how to install generator hook up systems that meet electrical codes while keeping your family protected during outages.
Most homeowners don’t realize that improper generator connections cause thousands of injuries annually. Whether you’re preparing for hurricane season or ensuring your medical equipment stays operational, the right installation method transforms your generator from a potential hazard into reliable backup power. Follow these steps to create a permanent, code-compliant connection that delivers power exactly where you need it.
Choose the Right Generator Connection Method

Transfer Switch vs Interlock System
A transfer switch provides foolproof operation by automatically disconnecting utility power when generator power engages. You’ll select essential circuits during installation—like refrigerator, furnace, and lighting—that won’t overload your generator. The built-in safety mechanisms prevent dangerous backfeeding that could electrocute utility workers restoring power.
Mechanical interlocks offer greater circuit flexibility at lower cost but require manual load management. This system installs directly in your electrical panel, allowing you to power any circuit—but you must carefully monitor total wattage to avoid overloading. Only choose this method if you’re comfortable calculating electrical loads and managing multiple circuits during operation.
Why Extension Cords Won’t Cut It
Extension cords create serious safety hazards during extended outages. They can’t power hardwired appliances like your furnace, well pump, or central air conditioning. During storms, extension cords become tripping hazards and potential shock risks when exposed to rain. The National Electrical Code prohibits extension cords as permanent generator hook up solutions—you need a professionally installed system for reliable, safe backup power.
Gather Essential Installation Components
Power Inlet Box Selection Guide
Your power inlet box creates the weatherproof connection point between generator and home. Bottom-mount inlets offer superior protection against rain and snow compared to front-mount models. Position the inlet within 25 feet of your generator’s permanent location while staying close to your electrical panel—this minimizes expensive conduit runs and voltage drop.
Avoid locations near deck stairs, irrigation heads, or low-lying areas prone to flooding. The inlet must sit at least 18 inches above ground level and remain accessible year-round, even during heavy snowfall. Proper placement ensures you can safely connect your generator during the worst weather conditions.
Critical Wire Gauge Specifications
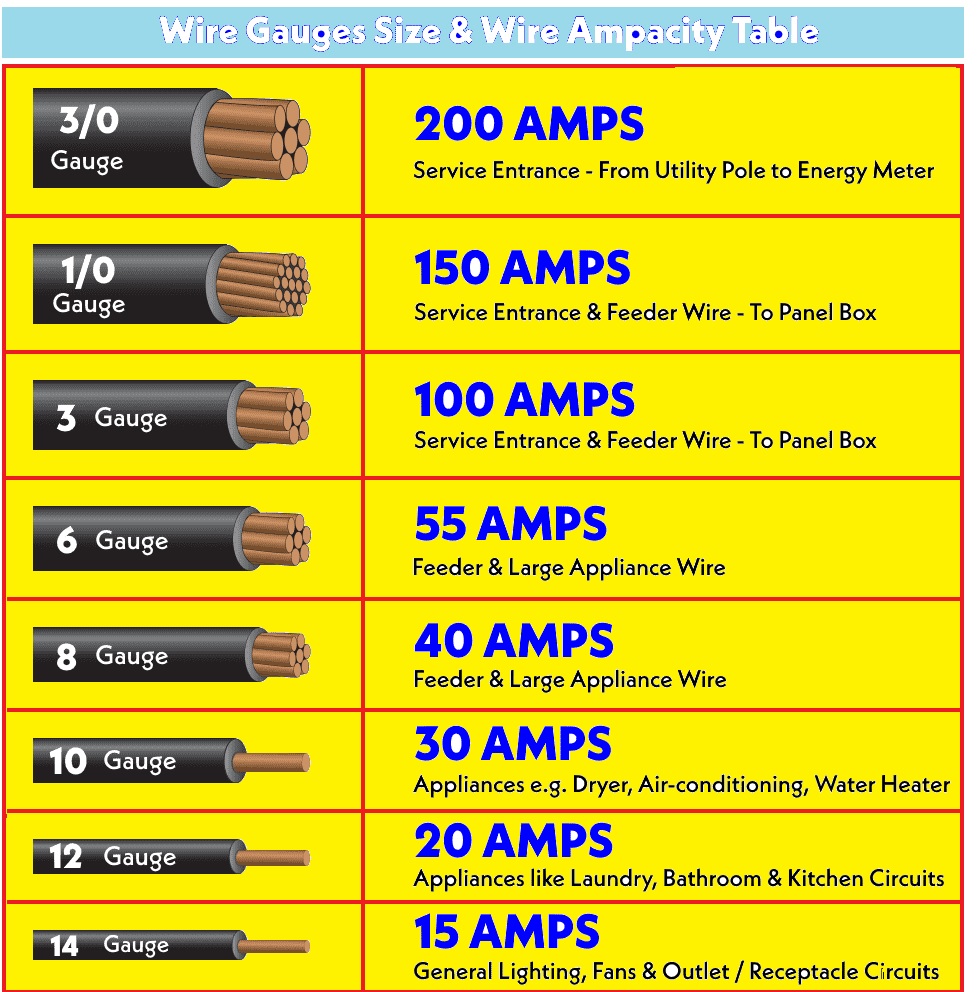
Wire gauge directly impacts safety and performance—using undersized wire creates fire hazards. For 30-amp generators (most common portable models), you need minimum 10-gauge wire. 50-amp generators require 6-gauge wire to handle the increased current without overheating. Never substitute smaller wire to save money—this violates electrical codes and risks catastrophic failure during operation.
Safety Protocols Before Installation Begins
Carbon Monoxide Prevention Essentials
Generator exhaust contains deadly carbon monoxide—position your unit at least 10 feet from all windows, doors, and vents. Never operate a generator in an attached garage, even with the door open. Install battery-powered CO detectors on every level of your home, especially near sleeping areas. Test these detectors monthly—they could save your family’s life during an extended outage.
Electrical Safety Non-Negotiables
Backfeeding through a wall outlet kills utility workers restoring power—this illegal practice sends lethal voltage back through utility lines. Always use a transfer switch or interlock system that physically prevents backfeeding. Never attempt electrical panel modifications with live power—contact your utility company to disconnect service before starting work. Electrocution risk is immediate and potentially fatal when working with live panels.
Install Transfer Switch System Properly
Mounting the Transfer Switch
Install your transfer switch on a 3/4-inch plywood mounting board adjacent to your main electrical panel. The board must be securely anchored to wall studs with 2.5-inch wood screws and provide 30 inches of clear working space in front. Position the transfer switch centered on this board for easy access during operation.
Connecting Essential Circuits
Select circuits that match your generator’s capacity without exceeding 80% of its rated output. A 5,000-watt generator typically handles:
– Refrigerator circuit (8-12 amps)
– Furnace circuit (6-12 amps)
– Lighting circuits (5-10 amps)
– Well pump (10-20 amps)
Label each circuit clearly at both the transfer switch and main panel. This organization proves invaluable when operating your system during stressful power outages.
Install Power Inlet Box Correctly

Weatherproof Mounting Procedure
- Mark mounting holes using the inlet box as a template
- Drill pilot holes into wall studs or use appropriate anchors
- Apply outdoor-rated silicone sealant around mounting area
- Secure inlet box with stainless steel screws
- Run 3/4-inch flexible conduit to transfer switch or panel
- Pull wires through conduit using fish tape
- Connect wires following color coding: black/red (hot), white (neutral), green (ground)
Seal all conduit entries with weatherproof fittings. The inlet box must remain watertight during heavy rain to prevent dangerous short circuits.
Connect Natural Gas Supply Safely
Professional Gas Line Requirements
Never attempt DIY natural gas connections—licensed plumbers must install generator gas lines due to explosion risks. The plumber will add a dedicated branch immediately after your gas meter with a manual shutoff valve for emergency isolation. They’ll run flexible gas line rated for outdoor use and install quick-connect fittings for easy generator attachment.
After installation, the plumber must pressure test all connections for leaks and tag the new line per local codes. Gas line modifications require professional expertise—your safety depends on proper installation.
Test Your Generator Hook Up System
Comprehensive Pre-Operation Checklist
Before your first real outage, verify:
– All electrical connections are tight and properly labeled
– Carbon monoxide detectors function correctly
– Generator oil level and fuel supply are adequate
– Power cord shows no cuts or damage
– Load calculations match your generator’s capacity
Startup Testing Sequence
- Connect power cord between generator and inlet box
- Start generator and let it stabilize for 2-3 minutes
- Engage transfer switch or interlock system
- Verify power to selected circuits with a circuit tester
- Monitor generator load using built-in watt meter
- Test each circuit individually for proper operation
Run this test monthly to ensure reliability when you need it most. Document each test in a maintenance log for future reference.
Maintain Your Generator Hook Up System
Monthly Inspection Routine
Every month, perform these critical checks:
– Tighten electrical connections to proper torque specifications
– Inspect power cords for cuts, nicks, or heat damage
– Test transfer switch operation without generator
– Check inlet box gasket for cracks or deterioration
– Verify carbon monoxide detectors have fresh batteries
Essential Spare Parts to Stock
Keep these items readily available:
– Extra power cord rated for your generator
– Weatherproof covers for inlet box
– Electrical tape and wire nuts
– Generator oil and filters per manufacturer specs
– Fuel stabilizer for gasoline models
Troubleshooting Common Installation Issues
Generator Won’t Start During Outage
Check these critical items first:
– Fuel quality (gas older than 30 days needs stabilizer)
– Oil level and condition
– Spark plug connection and gap
– Choke position for cold weather starting
– Fuel valve position (natural gas models)
Transfer Switch Problems
No power to circuits? Verify:
– Generator is running and producing proper voltage
– Power cord connections at both ends are secure
– Transfer switch is fully engaged in correct position
– Individual circuit breakers in transfer switch aren’t tripped
– No tripped GFCI outlets on generator circuits
Code Compliance and Permitting Requirements
Professional Installation Necessities
Licensed electricians must perform:
– Electrical panel modifications
– Transfer switch installations
– Natural gas line connections
– Utility company coordination
– Final electrical inspections
Permit requirements vary by jurisdiction—contact your local building department before installation. Professional installation ensures code compliance and protects your family’s safety—never compromise on electrical work quality for this critical home system.
Your properly installed generator hook up provides peace of mind during power outages while maintaining the highest safety standards. Test the system monthly, maintain your generator per manufacturer recommendations, and you’ll have reliable backup power when you need it most. Remember that professional installation ensures code compliance and protects your family’s safety—never compromise on electrical work quality for this critical home system.


