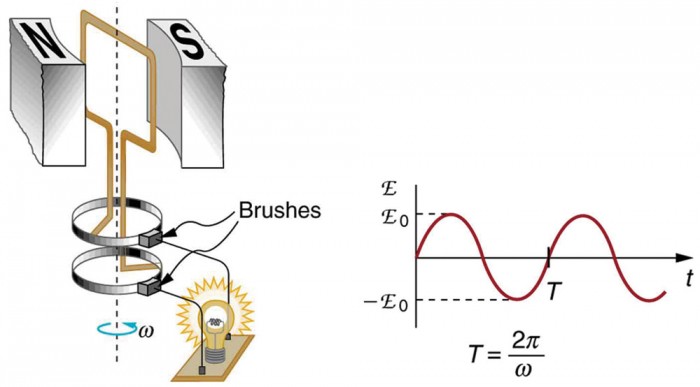
Ever wonder how to make a electromagnetic generator that actually powers devices? You don’t need fancy equipment to harness Faraday’s Law of Induction—the principle that converts motion into electricity. When magnets spin past copper wire coils, they literally pull electrons through the conductor, creating usable current. This guide shows you exactly how to make a electromagnetic generator at three different complexity levels, from a 30-minute science project to a renewable energy system that generates power continuously for weeks.
Whether you’re troubleshooting a failed experiment or preparing for off-grid power needs, you’ll discover practical, step-by-step instructions to transform motion into electricity safely. By the end, you’ll understand the magnetic field interactions that make generators work and have a functioning device you built yourself.
Build a Working Electromagnetic Generator in 30 Minutes (Science Project)
Gather Essential Science Project Materials
You’ll need just eight basic components to create your first electromagnetic generator: an 8×30.4 cm cardboard strip, 200 feet of #30 enamel-coated copper wire, four 1×2×5 cm ceramic magnets, hot melt glue or epoxy, a 6-8 inch metal shaft (nail or steel rod), a 1.5V LED bulb, wire strippers, and a utility knife. These affordable items transform household materials into a working demonstration of electromagnetic induction.
Construct Your Generator Frame in Four Steps
Fold your cardboard strip precisely at 8 cm, 11.5 cm, 19.5 cm, and 22.7 cm marks to form a rectangular frame. Secure the overlapping ends with tape or glue, then punch a centered hole through all layers using your nail—this creates your shaft housing. Insert the metal shaft through this hole, ensuring it rotates smoothly with minimal wobble. Critical detail: The hole must be perfectly centered to prevent magnet-coil collisions during operation.
Wind Your Power-Generating Coil Properly
Tightly wrap the 200 feet of magnet wire around the cardboard frame while maintaining consistent tension. Leave 16-18 inches of wire free at each end for connections. After completing your winding, carefully strip 1 inch of enamel insulation from both wire ends using wire strippers—this exposes the copper for electrical contact. Pro tip: Wrap tape around the coil after winding to prevent unraveling during magnet rotation.
Mount Magnets for Maximum Current Output
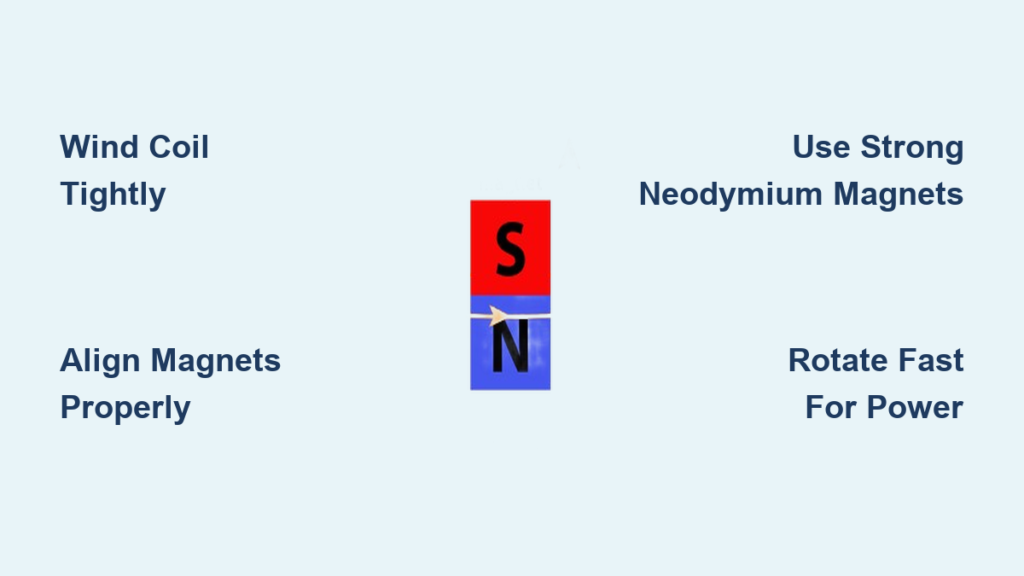
Glue your four ceramic magnets to the metal shaft with alternating poles—two north-facing magnets positioned opposite two south-facing magnets relative to the coil. Ensure magnets sit perpendicular to the shaft axis and maintain 1-2 mm clearance between magnet ends and coil windings. This precise spacing maximizes magnetic field interaction with your coil for optimal electricity generation.
Test Your Generator Successfully
Rotate the shaft by hand while connecting your LED bulb to the exposed wire ends. For stronger output, wind string around the shaft end and pull sharply for faster rotation. You should see the LED illuminate with vigorous spinning, confirming you’ve successfully created electricity from motion. Connect a voltmeter to measure your 0.5-1.5V AC output—this demonstrates the fundamental principle behind all electromagnetic generators.
Create a 1,500-Turn Coil Generator That Powers Miniature Bulbs
Upgrade Your Materials for Higher Output
For a more powerful generator, gather these enhanced components: a 15 cm iron nail (6mm diameter), an 8-10 cm bolt with nut, a hand drill with 6mm chuck capacity, two 3cm cardboard discs with 4-5mm center holes, insulating tape, and a small torch bulb with holder. The iron nail core significantly boosts magnetic field concentration compared to the simple cardboard frame.
Assemble Your High-Output Coil System
Insert the nail through both cardboard discs, spacing them 2-3 cm apart, and secure with insulating tape. Wind approximately 1,500 turns of copper wire between the discs using a layered approach—this dramatically increases voltage output. Cover completed windings with insulating tape and strip 1 cm of insulation from both wire ends. Key insight: More coil turns directly increase your generator’s voltage output according to Faraday’s Law.
Position Magnets for Optimal Power Generation

Mount a strong magnet to your bolt using the nut for a secure fit. Position the nail horizontally in a vice with the nail head positioned just 1mm from the spinning magnet edge. Mount the bolt in your drill chuck, ensuring you can maintain this critical 1mm gap during operation. This precise positioning maximizes magnetic flux changes through your coil.
Generate Visible Light with Hand-Powered Rotation
Rotate the drill handle at maximum speed while carefully maintaining the 1mm gap between magnet and nail head. Your miniature bulb should illuminate brightly, proving your generator produces usable power. You’ll notice: Faster rotation and closer magnet proximity significantly increase brightness—demonstrating how speed and magnetic field strength directly impact power output.
Construct a Month-Long Renewable Generator Using Wind or Water Power
Integrate Renewable Energy Sources for Continuous Operation
Your electromagnetic generator requires external mechanical energy—combine it with wind turbines, water wheels, or solar-assisted systems for month-long operation. For wind power, select Savonius or Darrieus blade designs optimized for 3-15 mph winds. Water-powered systems work with micro-hydro turbines handling 0.5-5 gallons per minute flow rates.
Implement Longevity-Enhancing Components
Install stainless steel 608-2RS or ceramic bearings with silicone-based grease rated from -40°C to +200°C. Use 316 stainless steel shafts and 18-22 AWG enameled copper wire with Class H insulation. Critical upgrade: Epoxy-impregnate your coil windings for moisture resistance—this prevents performance degradation in outdoor environments.
Achieve Reliable Month-Long Performance
Your properly constructed renewable generator delivers 5-15 watts at 12V DC with 70-85% efficiency across temperatures from -20°C to +60°C. Schedule visual inspections every two weeks and bearing lubrication every three months to maintain continuous operation. Real-world result: This system can power LED lighting, charge mobile devices, or maintain critical communications equipment during extended outages.
Fix Low Voltage and Intermittent Operation in Your Electromagnetic Generator
Diagnose Common Generator Failures
When your generator produces weak output, first check magnet strength using a gauss meter—ceramic magnets should read 3,000-4,000 gauss. Verify your coil turns match specifications and ensure rotation speed exceeds 500 RPM for noticeable output. Warning: Intermittent operation often indicates bearing problems—replace any components that show grinding or catching during rotation.
Align Magnets for Maximum Efficiency
Use a compass to verify proper magnet alignment—opposite poles should attract strongly when correctly positioned. Adjust magnet placement until you achieve consistent voltage output during full rotation cycles. Expert tip: Mark magnet positions with colored tape to maintain proper pole orientation during reassembly.
Boost Generator Efficiency with Magnet and Core Upgrades
Upgrade to High-Performance Magnets
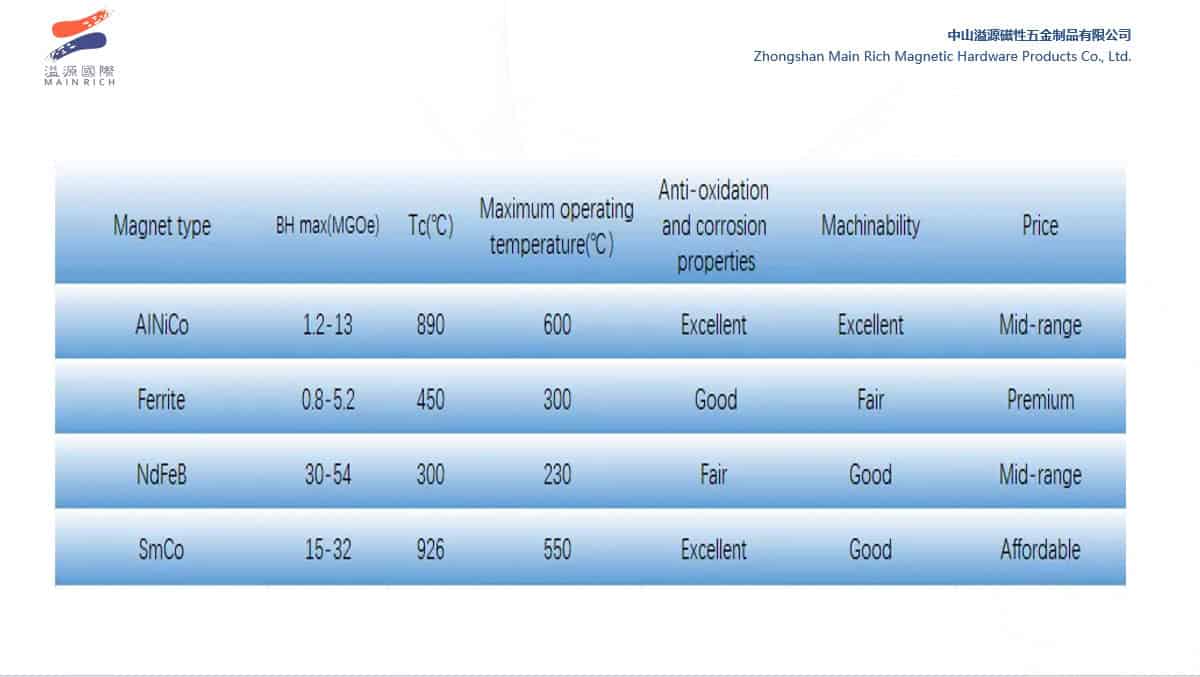
Replace standard ceramic magnets with N52-grade neodymium magnets for 3-5x stronger magnetic fields. Critical safety note: Always use magnet keepers when handling powerful neodymium magnets to prevent injury from sudden attraction forces.
Optimize Your Core Material
Switch to laminated silicon steel cores with insulating varnish between layers to reduce eddy current losses. This simple upgrade can increase your generator’s efficiency by 20-30% compared to solid iron cores. For specialized applications, consider implementing Litz wire construction to minimize skin effect in high-frequency operations.
Essential Safety Measures for DIY Electromagnetic Generator Projects
Prevent Electrical Hazards
Never exceed your wire’s current ratings—install appropriate fusing for your load. For outdoor systems, use ground fault circuit interrupters (GFCIs) and verify all connections with a multimeter before operation. Non-negotiable: Install safety guards around all rotating parts and mark emergency stop switches clearly.
Ensure Battery Safety in Renewable Systems
Use only protected lithium batteries with built-in thermal management systems. Install 15A inline fuses and reverse polarity protection—lithium batteries can catch fire if mishandled. Critical rule: Never charge batteries below 0°C or above 45°C to prevent thermal runaway.
Power Real Devices: Practical Applications of Homemade Generators
Create Emergency Power Solutions
Your electromagnetic generator can power essential devices during outages—build a system that maintains 12V battery banks for LED lighting, small fans, or mobile device charging. A properly constructed generator provides reliable backup power when the grid fails.
Build Remote Monitoring Systems
Power environmental sensors or wildlife cameras in off-grid locations using your generator combined with renewable energy sources. Add Arduino-based monitoring systems with low-power modes to create self-sustaining data collection stations that operate for months without maintenance.
Building your own electromagnetic generator transforms theoretical physics into tangible power you can see and use. Start with the simple science project to grasp fundamental principles, then advance to renewable energy systems that deliver practical, continuous power. Remember that stronger magnets, more coil turns, and faster rotation directly increase your output—these three factors give you complete control over your generator’s performance. With proper construction and safety measures, your homemade electromagnetic generator will provide reliable electricity for years of educational exploration and practical power needs. The next time you flip a switch, remember you now understand—and can create—the technology that makes it possible.


