That fizzing soda bottle experiment from your childhood science class? It’s actually a simple gas generator in action. If you’ve ever wondered how to harness chemical reactions to produce usable gases for aquariums, science projects, or educational demonstrations, you’ve come to the right place. Making a chemical gas generator at home is far simpler than most people realize—it requires no expensive lab equipment and can be built with everyday household materials. This guide reveals three proven methods to create safe, functional gas generators that produce carbon dioxide, hydrogen, and other gases through controlled chemical reactions, with clear instructions anyone can follow.
Build Your First Chemical Gas Generator Without Specialized Equipment
Basic Bottle System for Immediate Results
Skip the complicated setups and get gas production going within minutes using items already in your kitchen. This beginner-friendly approach creates a functional CO₂ generator using a simple plastic soda bottle, demonstrating the core principles without requiring special skills or tools.
Start by gathering your materials: a clean 2-liter plastic soda bottle, rubber stopper or tight-fitting cap, 1/4-inch plastic tubing (3 feet), and basic reagents like baking soda and vinegar. Drill a small hole through your bottle cap just large enough for the tubing to fit snugly. Insert the tubing through the hole, leaving about 6 inches extending inside the bottle, and seal around the connection with silicone caulk to prevent leaks.
Critical preparation step: Test your seal before adding reagents. Fill the bottle with water, cap it tightly with your tubing assembly, and gently blow into the tube. Any bubbles forming around the cap indicate leaks that need resealing. Let the caulk cure for 24 hours for maximum strength—rushing this step causes frustrating leaks during operation.
When ready to generate gas, add 3 tablespoons of baking soda to your dry bottle. In a separate container, mix equal parts white vinegar and water. Slowly pour this solution into the bottle, immediately cap it, and watch as CO₂ flows through your tubing within seconds. The reaction completes in 4-6 minutes, producing approximately 7-8 liters of carbon dioxide—perfect for small aquariums or science demonstrations.
Pro tip: Tilt your bottle at a 45-degree angle to control bubble rate. More tilt reduces contact between reagents, slowing gas production when you need a gentler flow.
Controlled Addition System for Precise Gas Output
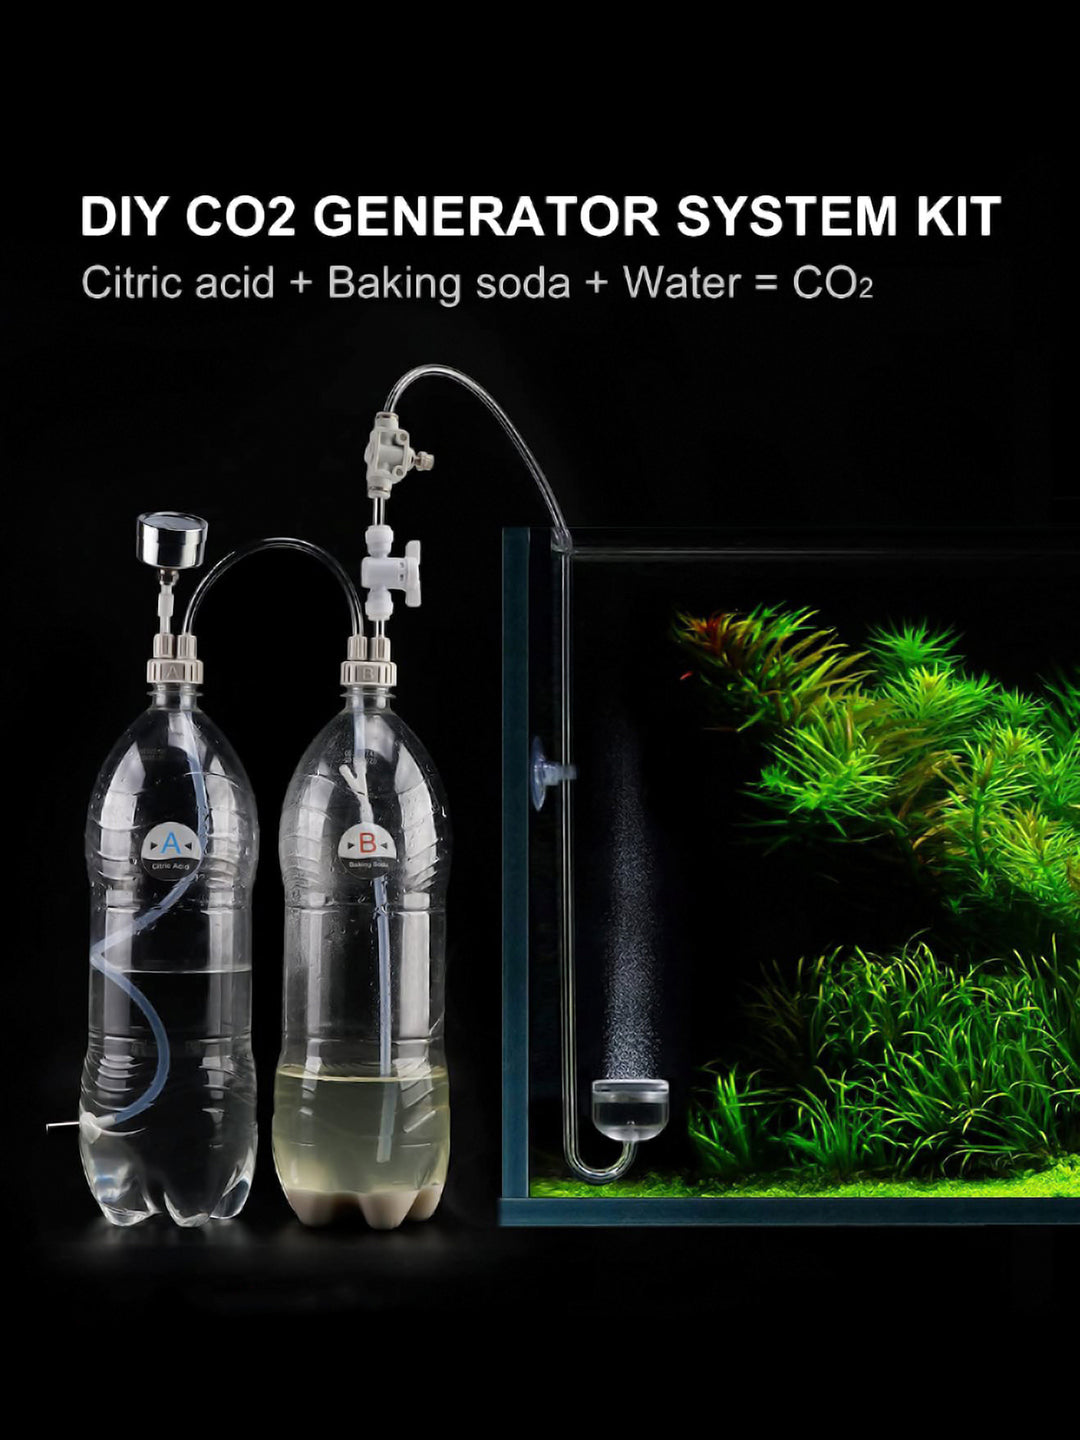
Eliminate the guesswork of reaction timing with a two-bottle system that gives you instant start/stop capability and fine control over gas production rates—no glassware required. This method solves the biggest limitation of basic setups by preventing premature reactions and allowing you to regulate output on demand.
Construct your reaction chamber by drilling two holes in a plastic bottle cap—one centered for gas output, one offset for reagent delivery. Insert tubing through the offset hole so it extends just 1 inch from the bottom, then seal thoroughly with silicone. For the reagent reservoir, drill a single hole in another bottle cap and insert tubing that reaches nearly to the bottom when assembled.
Connect the bottles by attaching the reservoir tubing to the reaction chamber’s input tube. Fill the reaction bottle with dry baking soda (1/4 cup for a 1-liter bottle), then fill the reservoir bottle with your vinegar solution. Squeezing the reservoir bottle pushes liquid into the reaction chamber, instantly starting gas production. Release the squeeze to stop the flow immediately—no more wasted reagents or uncontrolled reactions.
Safety enhancement: Add a simple pinch clamp to your gas output tubing for emergency shutoff. This $2 aquarium accessory gives you instant control if gas flow becomes too rapid.
Create Professional-Grade Gas Production with Mason Jar Kipp’s Apparatus
Mason Jar Generator Assembly Process
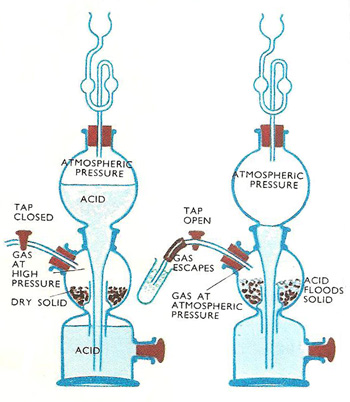
Upgrade to a self-regulating system that automatically adjusts gas production based on demand—a clever adaptation of the century-old Kipp’s apparatus design using affordable mason jars. This setup solves the pressure control problem that plagues simpler designs, making it ideal for continuous applications like planted aquariums.
Begin by placing a small piece of clean cloth or coffee filter at the bottom of your mason jar—this creates a separation layer between dry and liquid reagents. Add 1/4 cup of baking soda on top of the cloth, then prepare your lid assembly. Drill two holes in the lid: one for a plastic funnel that reaches nearly to the jar bottom, and another for your gas output tubing.
Sealing critical points: Use high-temperature silicone sealant around all penetrations—this withstands the mild heat generated during reactions. Install a simple aquarium check valve in your gas line to prevent backflow, which could cause dangerous pressure buildup. Let all seals cure completely before first use.
Automatic Pressure Regulation Explained
Unlike basic systems that either run continuously or require manual control, your mason jar generator automatically regulates gas flow through simple physics. When you pour vinegar into the funnel, it flows down to contact the baking soda, producing CO₂. As pressure builds inside the jar, the liquid gets pushed back up the funnel, breaking contact with the dry reagent and stopping the reaction.
Real-world operation: Open your gas valve to use CO₂, reducing internal pressure. This allows more vinegar to flow down and react with baking soda, automatically resuming gas production. Close the valve, and pressure builds until the liquid disengages—creating a perfect self-regulating system that matches output to your actual usage.
Visual indicator tip: Add food coloring to your vinegar solution. The colored liquid rising and falling in your funnel provides instant visual feedback about your generator’s operational status.
Select the Right Gas Production Method for Your Needs
Safe Carbon Dioxide Generation for Beginners
Start with CO₂ production using the classic baking soda and vinegar reaction—it’s non-toxic, easy to control, and perfect for most home applications. This combination produces approximately 1.2 liters of carbon dioxide per tablespoon of baking soda, making it ideal for small aquariums, science projects, or fire extinguisher demonstrations.
Optimize your reaction: Use a 1:1 ratio of baking soda to vinegar for standard output, or increase vinegar concentration for faster production. Warm your vinegar to 75-80°F (not hot) to boost reaction speed by 30-40% without losing control. For extended operation, use the mason jar system with 1/2 cup baking soda and 2 cups vinegar—this provides 2-3 hours of continuous CO₂ for planted aquariums.
Critical safety note: Always operate in a well-ventilated area. While CO₂ isn’t flammable, high concentrations can displace oxygen in enclosed spaces—never use in small, unventilated rooms.
Hydrogen Production with Extreme Safety Precautions
Generate hydrogen gas for advanced experiments using aluminum foil and diluted muriatic acid, but only if you strictly follow these safety protocols. Hydrogen is highly flammable and requires special handling—this method is NOT recommended for beginners or indoor use.
Non-negotiable safety rules:
– Operate exclusively outdoors with no ignition sources within 15 feet
– Dilute muriatic acid 1:3 with water before use
– Never collect hydrogen in sealed containers
– Use only small amounts of aluminum (3-4 foil balls)
– Keep a fire extinguisher immediately accessible
Safer alternative: For educational hydrogen demonstrations, consider pre-made hydrogen gas generators designed specifically for classroom safety—these contain the reaction within controlled environments.
Troubleshoot Common Generator Problems Immediately
Fix Gas Leaks in Under 5 Minutes
Leaks typically occur at cap connections or tubing joints, wasting your gas and potentially creating safety hazards. Use the soap bubble test: mix dish soap with water and apply to all connections while gas flows. Bubbles instantly reveal leak locations.
Quick field repairs:
– Tighten all connections with your fingers (avoid over-tightening plastic)
– Apply additional silicone sealant to problem areas
– Replace cracked or brittle tubing sections
– Wrap Teflon tape around threaded connections
Prevention strategy: Before each use, perform a quick pressure test by blowing gently into your system and checking for bubbles—this catches developing leaks before they become operational problems.
Stabilize Inconsistent Gas Flow
Uneven output usually indicates reagent depletion or temperature fluctuations. Maintain steady room temperature and refresh reagents when flow drops below usable levels. For continuous applications, implement these flow control techniques:
- Install a simple pinch clamp to manually adjust flow rate
- Pre-warm vinegar to 75-80°F for consistent output
- Add a needle valve ($8-12) for precise control
- Use smaller reagent batches with more frequent refreshes
Pro tip: Place your generator in an insulated container during cold weather—this maintains reaction temperature and prevents flow slowdowns.
Maximize Generator Longevity with Proper Maintenance
Essential Post-Use Cleaning Routine
Clean your generator immediately after each use to prevent residue buildup that clogs tubing and degrades performance. Rinse all components thoroughly with warm water, then soak tubing in vinegar solution for 10 minutes to dissolve any mineral deposits. Dry completely before storage—moisture causes premature seal degradation.
Component-specific care:
– Mason jars: Hand wash with mild detergent (avoid dishwasher)
– Plastic tubing: Store coiled loosely to prevent kinking
– Valves: Exercise moving parts before storage
– Seals: Inspect for cracks or hardening
Critical labeling: Clearly mark containers used for specific gases—never reuse CO₂ components for hydrogen production without complete disassembly and cleaning.
Monthly Inspection Protocol
Check your system monthly during active use with this quick checklist:
– Examine tubing for cracks, discoloration, or brittleness
– Test all seals with soap solution under gentle pressure
– Replace any worn gaskets or O-rings
– Verify valve operation through full range of motion
– Check reagent containers for proper labeling and condition
Red flag alert: Replace any component showing cloudiness, cracks, or stiffness immediately—these indicate material degradation that could lead to dangerous failures.
Scale Your Gas Production for Different Applications
Small-Scale Educational Demonstrations
For classroom use or simple experiments, scale down to 500ml water bottles with reduced reagent quantities. Use 1 tablespoon baking soda and 1/4 cup vinegar to produce 1-2 liters of CO₂ over 5 minutes—perfect for safe, visible demonstrations without overwhelming students.
Teaching tip: Add a few drops of universal indicator to your vinegar to show pH changes during the reaction—this visual element enhances the educational value of your demonstration.
Medium-Scale Aquarium CO₂ Systems
Upgrade to 1-gallon containers for planted aquariums requiring continuous CO₂. Use 1/2 cup baking soda with 2 cups vinegar for 2-3 hours of operation, and install a simple timer valve for automated nighttime shutoff when plants don’t need CO₂.
Optimization trick: Add a small amount of potassium bicarbonate to your baking soda—this stabilizes pH and creates more consistent bubble rates for healthier plant growth.
Cost Comparison: DIY vs. Commercial Gas Generators

Budget Build Under $10
Most components for a basic CO₂ generator already exist in your home. Repurpose soda bottles instead of buying containers, reuse aquarium tubing from old setups, and substitute wine corks for rubber stoppers. The only new purchases needed are baking soda and vinegar—both available in bulk for minimal cost.
Money-saving hacks:
– Make check valves from small balloon pieces
– Use hot glue instead of silicone for temporary setups
– Substitute plastic funnels from medicine bottles
– Create your own pinch clamps from binder clips
Professional Results for $25
Invest in key components that dramatically improve performance and safety:
– Brass needle valve ($8-12) for precise flow control
– High-temperature silicone sealant ($5) for durable seals
– Pressure-rated tubing ($4) that won’t collapse
– Commercial check valve ($3) preventing dangerous backflow
Worth every penny: These upgrades transform your generator from a one-time experiment to a reliable tool you’ll use for years—especially valuable for aquarium enthusiasts or educators.
Your homemade chemical gas generator opens doors to countless practical applications and educational opportunities. Start with the basic bottle system to master fundamental principles, then progress to the self-regulating mason jar design for more demanding projects. Always prioritize safety by working in well-ventilated areas, respecting chemical properties, and never rushing the sealing process—proper preparation prevents 90% of generator problems. With these proven methods, you’ll have a functional, reliable gas production system ready for your next science project, aquarium setup, or educational demonstration within hours. Remember that the simplest systems often work best—your $10 DIY generator can outperform expensive commercial units when built with attention to detail and proper sealing techniques.


