
When winter storms knock out power, keeping your furnace running becomes critical for safety and comfort. Many homeowners face the urgent question of connecting their heating system to a portable generator, but this process involves serious electrical hazards if done incorrectly. This guide walks you through the safe, code-compliant methods to power your furnace during outages, from simple extension cord setups to permanent transfer switch installations. You’ll learn exactly how to plug furnace into generator without risking carbon monoxide poisoning, electrical backfeed, or equipment damage—ensuring your family stays warm when the grid fails.
Generator Safety Requirements Before Connecting
Carbon Monoxide Prevention Protocol
Generators produce deadly carbon monoxide gas that can kill within minutes. Place your generator outdoors at least 20 feet from windows, doors, and vents—never operate it in garages, basements, or covered areas, even with doors open. The exhaust must flow away from your home, so position the generator downhill if possible. Install battery-powered CO detectors on every level of your home and near sleeping areas as a critical safety layer. During extended outages, check these detectors daily to ensure they’re functioning properly.
Electrical Backfeed Prevention Measures
Connecting a generator directly to home wiring without proper isolation creates backfeed—electricity flowing backward through utility lines. This can electrocute utility workers repairing power lines miles away. Never plug a generator directly into wall outlets (a dangerous practice known as backfeeding). Instead, use proper transfer switches or direct connections only. If you hear utility workers working nearby during an outage, shut down your generator immediately—they may not be aware of your setup.
Grounding and GFCI Verification Process
Your generator frame must be properly grounded according to manufacturer instructions, typically using an 8-foot copper grounding rod. Most modern generators include built-in GFCI (Ground Fault Circuit Interrupter) protection, but verify this feature exists before relying on it. Test GFCI outlets monthly using the test/reset buttons to ensure protection works during emergencies. If your generator lacks GFCI protection, use a GFCI-protected extension cord rated for outdoor use.
Calculate Your Exact Generator Size Needs
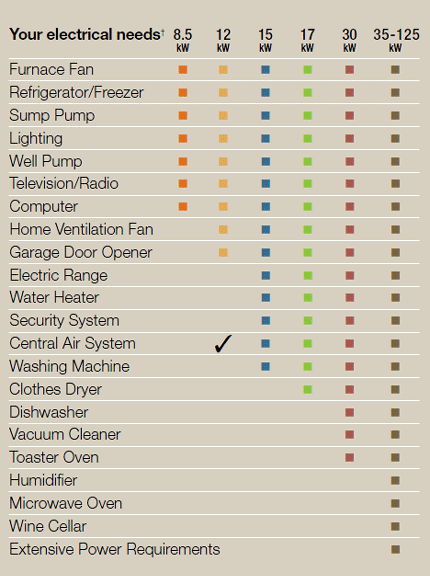
Furnace Wattage Requirements Breakdown
Gas furnaces typically need 600-1,200 running watts but require 1,800-3,600 starting watts for the blower motor startup surge. Oil furnaces demand more power: 1,200-2,000 running watts and 3,600-6,000 starting watts. Electric furnaces are impractical for generator backup, requiring 15,000-25,000 watts—beyond most portable units. Always check your furnace’s nameplate for “FLA” (Full Load Amps) and “LRA” (Locked Rotor Amps) to calculate exact requirements: multiply voltage by these values.
Quick Size Calculation Formula
Add your furnace’s running watts plus 25% safety margin, then ensure your generator can handle 3-4 times this amount for motor startup. For a gas furnace using 800 running watts: 800 × 1.25 = 1,000 watts continuous, plus 3,000 watts surge capacity. A 4,000-5,000 watt generator provides adequate headroom for this scenario. Remember that low-quality generators often overstate their capacity—verify both running and surge wattage ratings before purchasing.
Extension Cord Connection Method for Emergencies
Required Equipment Specifications
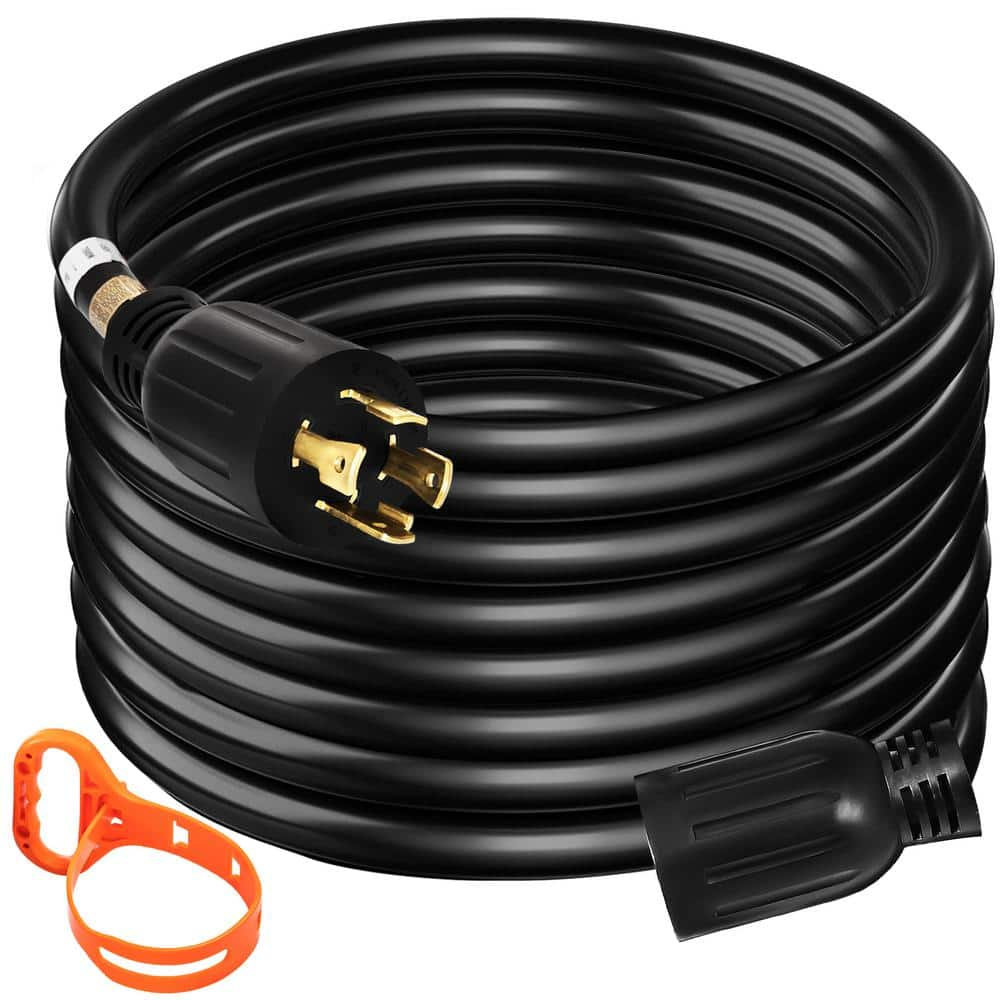
Use 12-gauge extension cords minimum for runs under 50 feet, upgrading to 10-gauge for 50-100 foot runs. Cords must be outdoor-rated, weather-resistant, and rated for your generator’s maximum output. Check for the UL listing and “W” (weather-resistant) marking. Avoid connecting multiple cords together—this creates voltage drop and fire hazards. For furnace connections, never use cords smaller than 12-gauge, even for short distances.
Safe Connection Sequence
- Turn off the furnace circuit breaker in your main electrical panel
- Position the generator outdoors on level ground, 20+ feet from your home
- Run the extension cord from generator to furnace location, keeping it dry and protected
- Disconnect the furnace from house wiring (this requires an HVAC technician)
- Connect directly to generator via the extension cord
- Start generator and let stabilize 2-3 minutes before powering the furnace
Critical Limitations to Understand
This method requires disconnecting your furnace from house wiring—never attempt this yourself unless qualified. The furnace must be completely isolated from your home’s electrical system. This temporary solution works for emergencies but isn’t suitable for repeated use or extended outages. HVAC technicians must reconnect your furnace to house wiring when grid power returns—don’t attempt this yourself.
Transfer Switch Installation: The Recommended Solution
Equipment Selection Guidelines
Choose a 6-8 circuit manual transfer switch rated for your generator’s output. You’ll need a weatherproof power inlet box mounted outside your home, plus appropriate gauge wire (typically 10 AWG for 30-amp circuits). Transfer switches cost $300-600 plus installation. Verify that both your generator and transfer switch have matching plug configurations—most common are L14-30R (30-amp) or L5-30R (120V only) connectors.
Professional Installation Process
- Mount the transfer switch adjacent to your main electrical panel
- Install the power inlet box on your home’s exterior wall
- Run conduit between the inlet box and transfer switch
- Connect the furnace circuit to the transfer switch
- Install interlock kit preventing simultaneous utility/generator power
- Test the complete system under load conditions
Cost vs. Safety Analysis
Professional installation costs $500-1,200 but ensures code compliance and warranty protection. Attempting DIY installation may void homeowner’s insurance coverage and create dangerous electrical hazards. Local electrical codes often require licensed electricians for these installations—check with your building department before starting. The safety of utility workers depends on proper installation, making this investment non-negotiable.
Pre-Connection Checklist for Safe Operation
Power Load Verification Steps
- Calculate total load: Add furnace watts + blower watts + essential circuits (refrigerator, lights)
- Ensure 20% headroom: Total load × 1.2 = minimum generator capacity needed
- Verify voltage stability: Use multimeter to check 120V ±5% under load
- Test GFCI protection: Press test button to confirm proper operation
Generator Preparation Protocol
- Check oil level with dipstick and top off if needed
- Fill fuel tank completely—outages can last days
- Verify voltage output with multimeter (120V ±5%)
- Position on level ground 20+ feet from home with exhaust directed away
- Install hour meter to track maintenance intervals
Connection and Startup Process
Safe Startup Sequence
- Start the generator following manufacturer instructions
- Let engine stabilize for 2-3 minutes at operating speed
- Check voltage stability with connected load
- Using transfer switch: Move furnace circuit to “generator” position
- Using extension cord: Direct connection following safety protocols
- Turn on furnace circuit and set thermostat to desired temperature
Critical First Operation Monitoring
Monitor the first complete heating cycle closely. Listen for unusual motor sounds, check for proper ignition, and verify adequate heat output. Use an inline watt meter to confirm actual power draw matches calculations. If your furnace blower struggles to start or cycles on/off rapidly, your generator lacks sufficient surge capacity—shut down immediately and upgrade equipment.
Troubleshooting During Operation

Generator Overloading Solutions
- Engine bogging down: Reduce connected loads or upgrade generator
- Circuit breakers tripping: Check for short circuits or undersized wiring
- Voltage fluctuations: Verify generator isn’t overloaded (should run at 50-75% capacity)
- Insufficient surge capacity: Confirm generator provides 3-4x running watts
Furnace Control Issues Resolution
- Control board lockout: Power down completely for 2 minutes to reset
- Blower motor strain: Check voltage at furnace during startup (should be >105V)
- Ignition failures: Ensure generator has adequate surge capacity for startup
- Thermostat errors: Replace thermostat batteries before relying on generator
Maintenance for Backup Readiness
Monthly Generator Maintenance
- Check oil level and top off with proper weight
- Inspect air filter and clean or replace as needed
- Test fuel condition—add stabilizer if stored over 30 days
- Verify starter battery charge (electric start models)
- Exercise transfer switch following manufacturer guidelines
Emergency Fuel Storage Guidelines
Store maximum 25 gallons gasoline in approved containers per local fire codes. Rotate stored fuel every 6 months to prevent degradation—use older fuel in your car first. Consider propane conversion kits for extended storage capability without fuel degradation concerns. During extended outages, prioritize furnace operation over other appliances to conserve fuel.
Keeping your furnace running during power outages requires proper planning and safe installation methods. While extension cord connections work for temporary emergencies, transfer switches provide the safest long-term solution for how to plug furnace into generator. Always prioritize safety over convenience—carbon monoxide poisoning and electrical backfeed pose serious risks that outweigh any time savings from improper connections. Choose the connection method that matches your needs, budget, and local code requirements, then maintain your system regularly for reliable backup heating when you need it most. During extreme cold, a properly installed generator connection isn’t just about comfort—it’s essential for preventing frozen pipes, protecting vulnerable family members, and maintaining safe indoor temperatures when the grid fails.


