
Your generator sits silent in the garage—dead battery again. Whether it’s been months since your last power outage or you simply forgot to run it monthly, a dead generator battery can leave you powerless when you need it most. The good news? Most generator batteries can be revived with the right charging approach, and you can prevent this headache from happening again.
This guide walks you through exactly how to recharge your generator battery using both built-in systems and external chargers, plus how to identify when replacement is the smarter choice. You’ll learn professional techniques that could save you from costly service calls and ensure your generator starts reliably when disaster strikes.
Identify Your Generator Battery Type
Before connecting any charger, you need to know what you’re working with. Most generators use 12-volt lead-acid batteries, but the specific type determines your charging approach and equipment requirements.
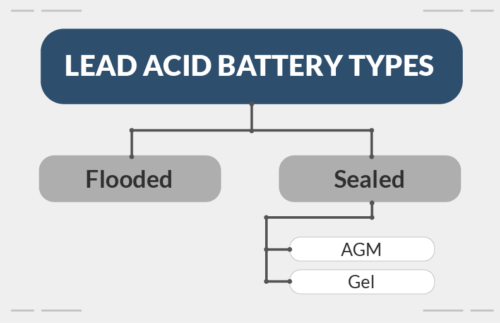
Lead-Acid Batteries come in three common variants. Flooded Lead-Acid batteries have removable caps for water addition and require regular maintenance. Sealed Lead-Acid (SLA) models need no maintenance and are completely enclosed. AGM (Absorbed Glass Mat) batteries offer premium sealed construction with better vibration resistance and longer life than standard SLA.
Some newer generators use Lithium Options like LiFePO4 (Lithium Iron Phosphate) batteries, which are lightweight with longer cycle life but require specialized charging. Standard Li-ion appears in some inverter generators for auxiliary systems. Check your battery label for “AGM,” “SLA,” or “LiFePO4” markings—flooded batteries will have visible caps on top for adding water. Never use a standard charger on lithium batteries as this creates serious safety hazards.
Essential Safety Steps Before Generator Battery Charging
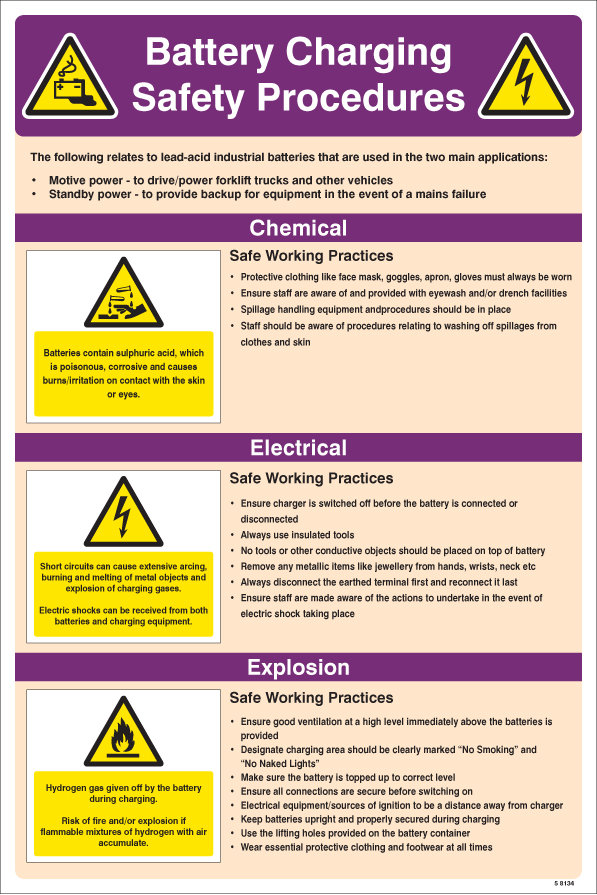
Battery charging produces hydrogen gas—a single spark can cause explosion. These precautions aren’t optional if you want to recharge your generator battery safely.
Immediate Actions require working in a well-ventilated area (garage door open minimum 3 feet), removing all jewelry and metal objects, keeping ignition sources 10+ feet away, and positioning the battery away from direct sunlight. Hydrogen gas is invisible and highly flammable, so proper ventilation is non-negotiable.
Protective Gear should include safety glasses (acid splash protection), nitrile or acid-resistant gloves, long sleeves and pants, and closed-toe shoes. Battery acid can cause severe burns on contact with skin, so full coverage is essential.
Power Down Process must follow these critical steps: Stop generator completely, disconnect all electrical loads, turn off battery charger before connecting, and verify both charger and generator are off. Never connect or disconnect charger clamps while equipment is powered on—this creates dangerous sparks near hydrogen gas.
Quick 30-Second Battery Health Check
A brief inspection prevents wasted charging time on a battery that’s beyond recovery. Visual Inspection should reveal no cracks (which mean immediate replacement), leaks (white crusty buildup or wet spots), bloated cases (swelling indicates internal failure), or terminal corrosion (green/white buildup on posts).
Voltage Test provides definitive health assessment: 12.6V+ means good battery, 12.4-12.5V needs charging, below 12.0V indicates deep discharge (may not recover), and below 10.5V suggests a dead cell. Use a digital multimeter on DC voltage setting across battery terminals. Pro Tip: If you get zero volts, check for a blown fuse in the battery circuit before assuming the battery is dead.
External Generator Battery Charging Process
When your generator hasn’t run in months or the battery reads below 12.4V, external charging is necessary. Choose Correct Charger Type carefully—smart chargers automatically adjust voltage/amperage and prevent overcharging, making them ideal for all battery types. Trickle chargers (1-2 amp output) work for maintenance during storage, while manual chargers require constant monitoring and carry higher overcharging risk.
Connection Sequence for Safe Charging
Step 1: Charger Setup requires setting to 12V mode, selecting 10% of battery’s Ah rating (26Ah battery = 2.6A charge rate), and verifying clean, tight clamps. Step 2: Battery Connection follows strict order: connect red clamp to positive (+) terminal first, then black clamp to negative (-) terminal, and wiggle clamps to ensure tight fit. Step 3: Start Charging only after plugging in charger and turning it on—never reverse this sequence.
Monitor Charging Progress Effectively
Check battery voltage every 30 minutes (should rise steadily), feel battery case (warm is OK, hot means trouble), and look for excessive bubbling (light bubbling normal). Charging Stages progress through bulk (voltage rises to 14.4V for 80% charge), absorption (voltage holds at 14.4V while current drops), and float (voltage drops to 13.2-13.8V for 100% charge). Completion Indicators include smart charger showing “Full,” current dropping to 2% of battery’s Ah rating, or voltage holding steady for 2+ hours.
Built-in Generator Charging System Verification
Most generators charge their own battery while running—when working properly. Verify Charging System Works by starting generator with external charger (if needed), letting it run 5 minutes to stabilize, then measuring battery voltage with generator running. Expected readings are 13.5-14.5V—anything below 13.0V indicates charging system failure requiring professional attention.
Monthly Exercise Protocol prevents future dead batteries: Run generator 20-30 minutes monthly under 25-50% load (a 1500W space heater works well), check battery voltage during operation, and verify 12.6V+ after shutdown. For 3+ Month Storage, fully charge battery first, disconnect negative terminal, store in cool dry location (40-60°F ideal), and check voltage monthly—recharge if below 12.4V.
Troubleshooting Common Generator Battery Charging Failures
Battery Won’t Hold Charge After Recharging
Quick Diagnosis involves charging fully, disconnecting everything, waiting 24 hours, then testing voltage. Above 12.4V indicates parasitic drain in generator, while below 12.0V means battery failure. Parasitic Drain Test requires disconnecting negative terminal, connecting ammeter between cable and post, and checking for readings above 50mA—common causes include faulty voltage regulators or stuck relays.
Slow Charging Problems and Solutions
If your generator battery takes 6+ hours to reach full charge, Cold weather requires allowing extra 30-50% time, Small chargers need upgrading to 6-10 amp models, Poor connections demand cleaning and tightening all terminals, and Old batteries (3+ years) may need replacement. Pro Tip: A 10-amp charger can fully charge a dead 26Ah battery in about 3 hours versus 26+ hours with a 1-amp trickle charger.
Battery Replacement Guidelines
Replace Your Generator Battery When it won’t hold 12.0V after charging, fails load test (voltage drops below 9.6V under load), shows declining performance after 3+ years, or displays visible damage or leaks. Replacement Specs should match minimum 250-400 CCA (cold cranking amps), 60-90 minutes reserve capacity, and the same group size as original or specified in generator manual.
Monthly Maintenance to Prevent Dead Generator Batteries
Weekly (2 minutes): Perform visual inspection for corrosion and check for loose connections. Monthly (15 minutes): Clean terminals with wire brush, check electrolyte levels (for flooded batteries), and run generator under load. Quarterly (30 minutes): Conduct load test, verify charging system voltage, and apply terminal protection. Annually: Replace battery if over 3-4 years old—even if working, capacity significantly declines after this point.
A dead generator battery doesn’t have to mean an expensive replacement. With proper charging technique and regular maintenance, most batteries provide reliable starts for years. Remember: monthly exercise prevents 90% of dead battery situations, and a quality smart charger pays for itself after the first saved battery. When you need to recharge your generator battery, following these precise steps ensures safety, effectiveness, and long-term reliability—so your power stays on when the grid goes down.


