That sharp snap when your Honda generator pull cord breaks mid-start leaves you stranded without power. Whether it’s your EU2000i during a storm or EU3000IS at a job site, a snapped cord transforms reliable backup power into a frustrating paperweight. The good news? You can repair it yourself in under an hour using basic tools. This guide covers the exact steps for all Honda models—from compact inverters to GX utility engines—using proven techniques that restore smooth starting without expensive shop fees. Learn how to safely replace the cord, set perfect spring tension, and prevent future failures.
Why Your Honda Generator Pull Cord Snaps Mid-Start
Honda pull cords fail most often from three culprits: frayed nylon sheaths from UV exposure, wire-core separation inside the rope, or spring fatigue after years of tension. You’ll recognize the problem when the cord feels gritty during pulls or suddenly goes slack with a loud snap. Critical warning: Never force repeated pulls when the cord feels abnormal—this can damage the recoil pawls or bend the starter shaft. Instead, immediately shut off fuel and disconnect the spark plug lead. Ignoring early warning signs risks complete recoil assembly failure, turning a $5 rope fix into a $150 part replacement. Most repairs take 45 minutes once you’ve relieved spring tension and identified your model’s access points.
Essential Safety Steps Before Opening Your Honda Generator
Disconnect spark plug lead first—before any tool touches the generator. This prevents accidental ignition from residual fuel vapors. Next, turn the fuel valve OFF and let the engine cool completely; hot plastic housings crack when disassembled. Wear ANSI-rated safety glasses and cut-resistant gloves—the recoil spring can launch metal parts at 30+ mph if mishandled. Work on a flat, dry surface with a magnetic tray for tiny screws. Pro tip: Place a shop towel over the spark plug boot to catch fuel drips during disassembly. Skipping these steps risks severe hand injuries or fire—Honda’s recoil springs store enough energy to fracture bones.
Required Tools for Honda EU2000i and EU3000IS Repair
| Tool | Critical Purpose | Model-Specific Notes |
|---|---|---|
| Phillips #2 screwdriver | Remove plastic shrouds | EU2000i: Use anti-static tip to avoid cracking brittle plastic |
| 8 mm socket (EU2000i) / 10 mm socket (EU3000IS) | Starter housing bolts | Hand-tight only—overtightening strips plastic threads |
| Needle-nose pliers | Knot tensioning and spring control | Grip rope knots without crushing nylon |
| 2 mm nylon rope (3.0 m) | EU2000i replacement | Must be wire-core rated for outdoor engines |
| Lighter | Seal rope ends | Prevents fraying during retraction |
| Aluminum T-handle | Reduces hand fatigue | Fits all Honda 2 mm cords; avoid cheap plastic |
Model-Specific Disassembly: EU2000i vs. EU3000IS

EU2000i Top Cover Removal Without Damaging Inverter Components
- Remove four Phillips screws on the upper shroud—lift straight up without tilting to clear the inverter module beneath.
- Locate the four 8 mm bolts securing the recoil assembly to the engine face (hidden under the shroud). Remove bolts and slide the entire plastic housing forward 1 inch.
- Critical visual cue: The starter drum lifts out with the spring—note the spring anchor tab position against the housing slot. If the tab isn’t seated correctly during reassembly, the cord won’t retract.
EU3000IS Metal Starter Cup Access in 3 Steps
- Remove four screws (two top, two rear) to free the large cosmetic cover.
- Identify two 10 mm screws on the metal starter cup (left engine side)—these often have threadlocker. Tap screws loose with a hammer before turning.
- Pull the cup straight off to expose the 12 mm center bolt. Remove this bolt to release the recoil pulley. Warning: Hold the pulley while removing the bolt—spring tension will launch it if unsecured.
GX160/GX200 Utility Engine Quick-Access Method
Unlike inverter models, GX engines let you bypass full disassembly. Remove three 10 mm perimeter screws on the round recoil cover—no shroud removal needed. The entire starter module sits exposed, with the pulley visible through the housing window. Key advantage: You can inspect spring tension without removing the assembly. If the spring gaps look uneven (wider at top than bottom), replace it immediately—this causes inconsistent retraction.
How to Remove Old Cord Without Triggering Spring Explosion
Never cut the rope while under tension. First, pull the cord out 5–6 inches and hold the pulley stationary. Slowly release tension by letting the pulley rotate counter-clockwise—this winds the spring safely inward. Once slack, inspect the knot: Honda uses either an overhand knot locked in a pulley slot or a knotted end under a metal tab. Cut the knot free and remove the entire cord. Critical inspection points:
– Check for glazed rope surfaces (shiny, stiff spots indicating heat damage)
– Test the spring by pressing coils together—it should rebound instantly. A “soft” spring needs replacement.
– Examine the pulley groove for melted edges (sign of rope binding).
Pro mistake to avoid: Forgetting the rope’s original routing path. Take a photo before removal—Honda’s path wraps under a guide tab before entering the pulley.
Install New Rope: Exact Lengths and Spring Tensioning
Cut precise lengths based on your model:
– EU2000i: 3.0 meters (118 inches) of 2 mm wire-core rope
– EU3000IS: 3.5 meters (138 inches) of 1.8 mm rope
– GX160/GX200: 2.8 meters (110 inches) of 2 mm rope
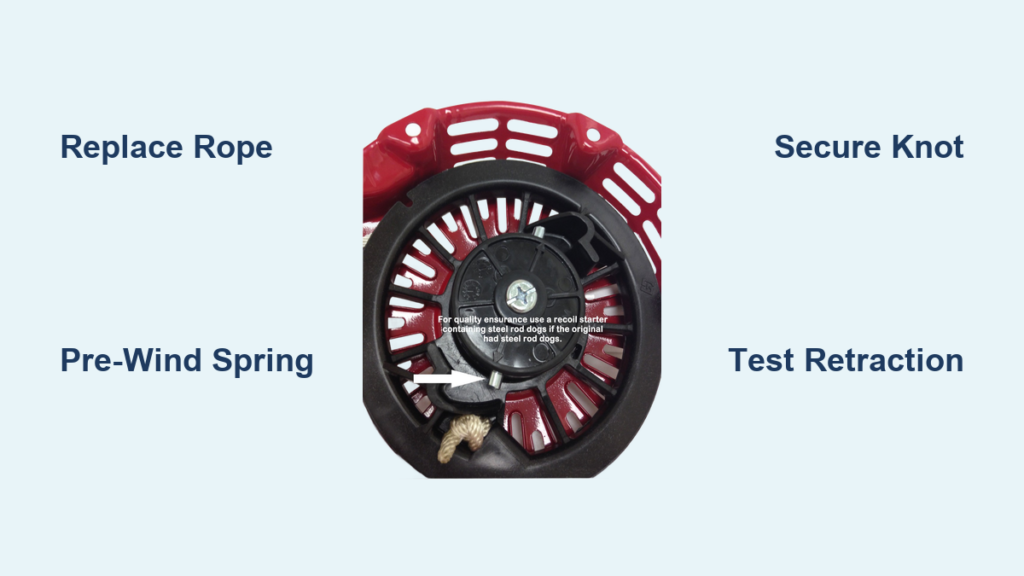
Melt both cut ends with a lighter to prevent fraying. Now, the make-or-break step: pre-winding the spring. Rotate the pulley counter-clockwise (facing the engine) 4–6 full turns for EU models, 3–4 for GX until firm resistance builds. Visual cue: Stop when the pulley fights your hand but doesn’t lock solid. Misjudging this causes 90% of post-repair failures—too few turns = no retraction; too many = snapped cord.
Knot Tying and Retraction Test
- Align the pulley’s cord hole with the housing grommet.
- Thread the rope from outside inward through the pulley slot.
- Tie an overhand knot and seat it flush—you should feel it click into the slot.
- Release tension slowly: The cord must retract fully in 2 seconds without jerking. If it snags, the knot is too big or misaligned.
Pro tip: After attaching the handle (figure-eight knot fused with lighter), pull the cord 10 times to “break in” the spring. This prevents early slack.
Reassemble and Test: Avoid These Costly Errors
Reverse disassembly but with critical tweaks: Before tightening the center bolt, verify the spring anchor tab is fully seated in its housing slot. Hand-tighten plus ¼ turn only—Honda’s plastic housings crack at 8 N·m torque. On EU models, ensure the rubber gasket is seated around the recoil cup for weatherproofing.
Functional test checklist:
1. With spark plug disconnected, pull the cord 5 times—feels should be smooth with consistent resistance.
2. Reconnect spark plug, set choke, and open fuel valve. Normal operation: Engine fires in 1–2 pulls with solid compression feedback.
3. Failure sign: Cord pulls freely with no resistance—recheck pawl engagement and rope routing.
Critical error: Skipping the pre-start test. Starting the engine with misaligned parts can shear starter dogs.
Fix Common Post-Repair Failures in 5 Minutes
Cord Pulls Out But Engine Won’t Turn
Cause: Rope slipped off pulley or recoil pawls aren’t engaging flywheel.
Fix: Reopen housing and verify the rope knot is seated under the pulley’s metal tab. Check pawl springs for breakage—bent springs won’t extend the dogs.
Sluggish Retraction After Repair
Cause: Spring under-wound by ½ turn or kinked during installation.
Fix: Remove assembly, add ½ counter-clockwise turn to preload, and retest retraction. If spring gaps look uneven, replace it immediately.
Cord Snaps Again Within Days
Cause: Sharp grommet edge sawing through rope or cheap non-wire-core cord.
Fix: Deburr the grommet with 400-grit sandpaper. Upgrade: Use Stens 150-303 Kevlar-core rope—it survives 3x longer in humid climates.
Prevent Future Breakdowns With Smart Maintenance
Every 50 hours: Flex the cord along its length to check for hidden wire-core breaks. If the sheath feels stiff or “crunchy,” replace it immediately. Before long storage: Pull the cord out 6 inches and let it retract under light tension—this prevents spring set (permanent coil deformation). In salty or humid environments, apply one drop of silicone lubricant to the recoil mechanism annually—never use WD-40, which attracts dust.
Pro upgrade: Install an aluminum T-handle ($8 online). Standard plastic handles crack from hand fatigue, but metal versions distribute force evenly. For marine use, swap the spring for a stainless-steel version—it resists salt corrosion indefinitely.
Final Confidence Checklist
- [ ] Spark plug lead disconnected before any disassembly
- [ ] Rope length cut precisely (3.0m EU2000i / 3.5m EU3000IS)
- [ ] Spring pre-wound 4–6 turns (EU) or 3–4 turns (GX)
- [ ] Knot seated flush in pulley slot with no protrusions
- [ ] Center bolt tightened to hand-tight + ¼ turn only
- [ ] 5-pull test completed before reconnecting spark plug
Master this repair once, and you’ll never pay for generator shop visits again. The exact same principles apply to pressure washers, lawn mowers, and other small-engine recoil starters—Honda’s system is the industry gold standard. With fresh rope and proper spring tension, your generator will start on the first pull for years, whether you’re powering a job site or weathering a blackout. Keep this guide in your tool kit, and that dreaded snap becomes just another 45-minute victory.


