Your portable generator sat idle through the off-season, and now when the power goes out, it won’t start. That sinking feeling hits hard when you’re facing darkness with a silent machine. This happens to 7 out of 10 generators after just three months of storage. Don’t panic—over 90% of “portable generator won’t start” issues stem from preventable fuel, oil, or electrical problems you can fix yourself in under 30 minutes. By following this step-by-step guide, you’ll systematically eliminate failure points and get your generator running before the storm hits.
Verify Fresh Fuel Supply Immediately
Check Tank Level and Gas Quality
Remove the fuel cap and inspect gasoline visually—never assume the gauge is accurate. If the tank’s below half full, add fresh gasoline within the last 30 days. Critical warning: Gas older than two months turns gummy and clogs critical components. Drain old fuel completely using the drain valve or siphon pump before refilling. During storage, oxygen exposure creates varnish-like deposits that choke your carburetor. If you smell sour or varnish-like odors from the tank, replace all fuel system components before proceeding.
Diagnose Fuel Valve Blockages
Locate the fuel valve near the tank base—set it perpendicular to the fuel line for OPEN position. If no fuel flows when open:
– Press the vacuum relief button on the gas cap (often overlooked!)
– Disconnect the fuel line at the valve’s outlet while holding a container
– Observe steady flow—if weak or absent, inspect the in-line filter
Replace clogged fuel filters immediately; attempting to blow through them damages delicate screens. For Generac models, prime the fuel system by pressing the carburetor’s primer bulb 5-7 times before cranking.
Clear Carburetor Clogs in 15 Minutes
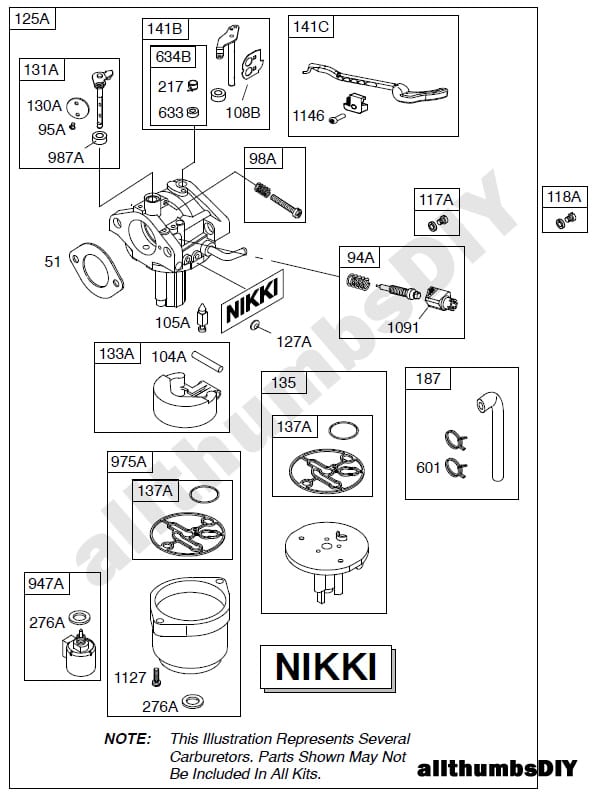
Drain and Clean the Bowl
Shut the fuel valve OFF first. Position a container under the carburetor’s drain bolt (typically 10mm) and open it fully. Let stale fuel drain until clear gasoline flows. If starting fails post-drain:
1. Remove the bowl nut with a 13mm wrench
2. Scrape hardened deposits from the bowl interior using a plastic tool
3. Soak the bowl in carburetor cleaner for 10 minutes
4. Rinse with compressed air (never use metal wires on metering jets)
Pro tip: For WEN inverter models, the drain bolt doubles as a main jet access point—clean it with a guitar string for best results.
Unclog the Main Jet Without Removal
The primary clog culprit hides in the brass main jet inside the carburetor stem. With the bowl removed:
– Shine a flashlight through the jet opening—no light means blockage
– Insert a single strand of copper wire (NOT steel) to gently dislodge debris
– Spray carb cleaner while rotating the jet for 360° coverage
– Verify flow by blowing through the inlet—air should pass freely
Reassemble immediately to prevent dust contamination. If your generator starts but stalls, the idle jet likely needs identical cleaning.
Confirm Oil Level and Bypass Faulty Sensors
Check Oil on Level Ground
Wipe the dipstick completely clean before reinserting. Rest the generator on concrete—not grass or gravel—to get an accurate reading. Oil must reach the “FULL” mark; top up with SAE 30 for temperatures above 40°F. Critical mistake: Many users trigger false low-oil shutdowns by checking oil on slopes. If your unit runs on flat ground but dies on inclines, the sensor is overly sensitive—not necessarily faulty.
Temporarily Bypass Oil Sensors

Locate the sensor wire on the crankcase (black/yellow for most Champion models). Disconnect it while noting wire positions. Attempt a start—if successful, the sensor is defective. Never operate long-term without this sensor; reconnect immediately after diagnosis. For Generac XP series, the sensor integrates with the oil fill tube—replace the entire tube assembly if faulty. Budget 20 minutes for professional replacement to avoid engine seizure.
Adjust Choke Settings and Airflow Correctly
Set Choke Based on Engine Temperature
For cold starts below 50°F:
– Move choke lever fully to “CLOSED” position (often marked with a rabbit icon)
– Pull starter cord 3 times without throttle input
– Advance to “RUN” position after first combustion
WEN inverter owners: Rotate the power knob fully counterclockwise for “CHOKE,” then clockwise to “RUN” after 15 seconds. Critical error: Leaving choke engaged beyond 30 seconds floods the engine—wait 10 minutes for fuel evaporation before retrying.
Clean Foam Filters Safely
Remove the air filter cover and inspect the sponge element. For oil-soaked or muddy filters:
1. Wash in warm, soapy water (no solvents!)
2. Squeeze dry between clean towels—never wring
3. Re-oil with 10 drops of air filter oil
4. Compress 5 times to distribute oil evenly
Paper filters require replacement when dirty—attempting cleaning tears the media. Restricted airflow causes lean mixtures that prevent ignition; replace filters annually even if clean.
Replace Faulty Spark Plugs in 5 Minutes
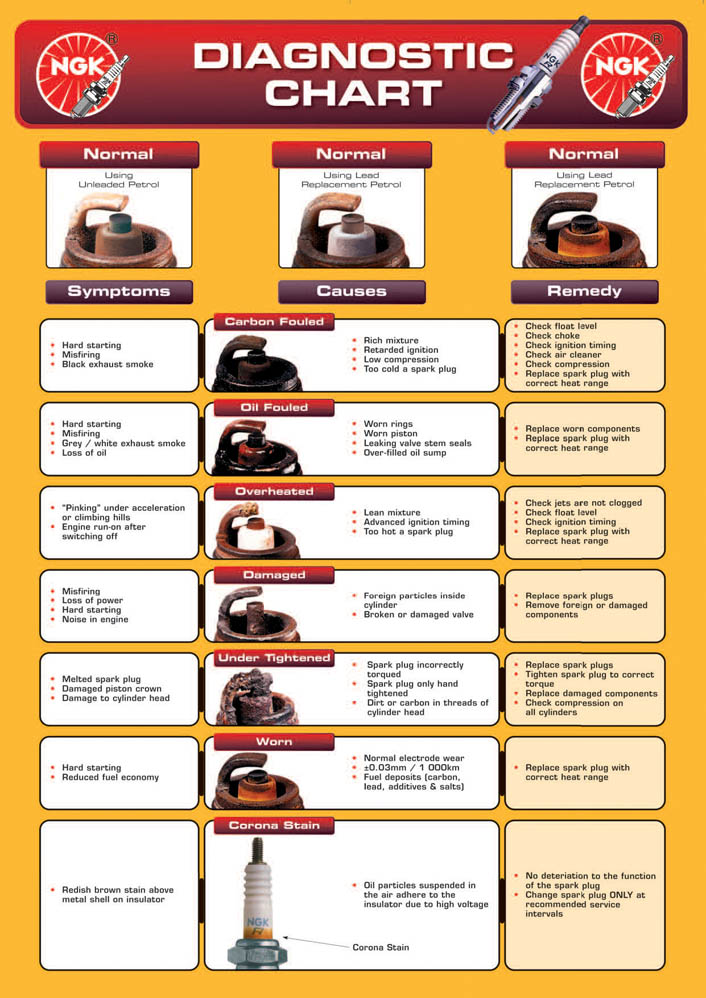
Inspect Electrode Condition
Use the included 5/8″ spark plug wrench to remove the plug. Examine:
– Carbon fouling: Black, fluffy deposits (rich fuel mixture)
– Oil fouling: Wet, black coating (worn piston rings)
– Gap erosion: Electrode worn flat or widened beyond 0.030″
Clean carbon with a wire brush; replace oil-fouled plugs immediately. Regap using a feeler gauge—bending the ground electrode damages internal seals.
Test Ignition Strength Visually
Reattach the spark plug boot but leave the plug dangling. Ground the metal base against the engine block. Pull the recoil starter while watching the gap:
– Strong spark: Bright blue, snapping sound (healthy)
– Weak spark: Orange glow, faint click (failing coil)
– No spark: Complete silence (check kill switch wiring)
Replace plugs showing weak sparks even if electrodes look clean—corroded internals cause intermittent failures.
Resolve Electric Start Failures Fast
Jump-Start Weak Batteries
For dead batteries in inverter generators:
1. Disconnect battery terminals (black first!)
2. Clean corrosion with baking soda/water paste
3. Reconnect and use pull cord to run for 30 minutes
4. Test voltage—should read 12.6V after charging
No recoil option? Use a car battery with jumper cables for 2 minutes. Critical step: Reset the control panel by holding the circuit breaker OFF for 10 seconds before restarting.
Prevent Load-Induced Startup Failures
Isolate All Electrical Loads
Unplug every extension cord and appliance before starting. Even a single phone charger draws enough power to prevent ignition in 2,000W models. Wait 3 minutes after startup before connecting loads. For transfer switch installations, verify the switch is in “LINE” mode—not “LOAD”—during startup.
Follow This Diagnostic Sequence
Complete Pre-Start Visual Checklist
In 60 seconds flat:
1. Confirm fresh fuel (less than 30 days old)
2. Verify oil level on flat surface
3. Inspect air filter for obstructions
4. Set choke to cold/warm position
5. Open fuel valve fully
Prioritize Component Testing
Start with these high-yield checks:
1. Spark test (5 minutes)—eliminates ignition issues
2. Fuel flow test (3 minutes)—confirms delivery
3. Oil sensor bypass (2 minutes)—rules out false shutdowns
4. Load disconnection (1 minute)—simplest fix
Prevent Future Starting Failures
Store Generators Properly
Before 30+ day storage:
– Run dry: Operate until engine stalls (empties carburetor)
– Change oil while warm to remove contaminants
– Remove battery and connect to trickle charger
– Store upright in moisture-controlled space (desiccant packs essential)
Monthly Maintenance Routine
Run for 15 minutes under 50% load every 30 days. This prevents:
– Carburetor varnishing (80% of failure causes)
– Battery sulfation
– Seal drying in fuel lines
Keep a log noting run time and fuel age—most warranties require proof of maintenance.
Safety Protocols That Save Lives
Carbon Monoxide Prevention
Operate at least 20 feet from structures with exhaust pointed downwind. Install battery-operated CO detectors within 10 feet of sleeping areas. Never run in garages—even with doors open—as fumes accumulate rapidly. Shut down immediately if you smell exhaust near living spaces.
Electrical Hazard Avoidance
Ground the generator using the green terminal bolt and 8-gauge copper wire driven 8 feet into soil. Use GFCI-protected cords only outdoors. Never daisy-chain extension cords—this causes voltage drop that damages appliances. After rain, wipe all outlets dry with microfiber cloth before connecting loads.
When Professional Help Is Essential
If your portable generator won’t start after completing all steps:
– Generac: Call 1-800-800-5372 with your model/serial number
– Champion: Visit championpowerequipment.com/support
– WEN: Email support@wenproducts.com with video of symptoms
Critical tip: Document your troubleshooting steps—warranty claims often require proof you performed basic maintenance. Never disassemble recoil starters or fuel pumps; specialized tools are needed for safe reassembly.
Your generator should now start reliably when needed. Remember: 95% of “portable generator won’t start” emergencies stem from preventable fuel degradation. By running monthly and storing properly, you’ll avoid 9 out of 10 failures. Keep this guide in your emergency kit—it could be the difference between light and darkness when storms hit.


