Your generator just died at the worst possible moment—middle of nowhere, AC cut out, fridge warming up. Before panic sets in, most RV generator problems have straightforward fixes you can handle yourself. This RV generator troubleshooting guide walks you through systematic diagnostics that get your power restored without expensive service calls.
Whether you’re dealing with a dead generator, one that starts then stops, or power without electricity, these proven procedures will identify and solve 90% of common issues in under an hour. You don’t need to be a mechanic—just follow these logical steps to pinpoint exactly what’s wrong.
Generator Won’t Start: Dead Battery vs Fuel Problems

No Response When Pressing Start
Complete silence means one of three things: dead battery, failed starter switch, or loose connections. Start with the battery—grab your multimeter and test across the terminals. You need minimum 10.6 volts DC to even attempt starting, but 11.4-12.6 volts gives reliable results.
Quick battery check sequence:
– Test voltage directly at battery terminals
– Check battery disconnect switch (usually near RV entrance)
– Clean corrosion from terminals with wire brush
– Verify ground connection tightness
Many RVers waste hours chasing fuel problems when a simple battery disconnect switch was accidentally flipped off during travel. Always rule out this $5 fix before moving to complex diagnostics.
Clicking Sound But No Turnover
Rapid clicking equals weak battery—your RV’s house battery might read 12 volts static but drop below 9 volts under load. Single click suggests starter solenoid failure. Test by checking voltage at the starter while someone presses the start button.
Battery testing procedure:
– Set multimeter to DC voltage
– Test across battery terminals
– Test from positive terminal to starter solenoid ground
– More than 5% voltage drop indicates poor connection
Pro tip: Jump your generator directly from your vehicle battery—many house batteries are too weak to crank the generator but can still power lights and appliances.
Turns Over But Won’t Fire
This points to fuel delivery issues. First, check your fuel gauge—most RV generators auto-shutdown when fuel drops below ¼ tank. Some models cut off at ⅓ tank, so always keep extra fuel above these thresholds.
Fuel system quick check:
– Verify fuel level above generator cutoff
– Look for fuel stains near lines (evaporative leaks)
– Check fuel filter for visible contamination
– Test fuel flow at carburetor connection
If your generator sat unused for months, stale fuel likely clogged the carburetor. Add fuel stabilizer before your next trip and run the generator for 15 minutes to circulate treated fuel.
Generator Starts Then Dies: Safety Shutdown Causes
Oil Level Shutdown System
Low oil triggers automatic shutdown to prevent engine damage. Check your dipstick—oil should sit between “low” and “full” marks. Add manufacturer-recommended oil if below one quart from full.
Oil check steps:
– Ensure generator is cool
– Remove dipstick, wipe clean, reinsert
– Check level on second pull
– Top off with proper viscosity oil
Critical mistake: Never assume the oil level is fine because you just changed it. Generators burn oil during operation, especially when running under heavy load with multiple AC units.
Fuel Flow Interruption
Stale fuel causes generators to start rough then die. If your RV sat for months, fuel varnished in the carburetor. Add fuel system cleaner to the tank and run for 30 minutes under load.
Fuel quality indicators:
– Generator starts then sputters
– Rough idle before stalling
– Dark or watery fuel appearance
– Strong varnish odor from exhaust
Gasoline degrades quickly—replace fuel that’s been sitting longer than 30 days without stabilizer. Diesel generators avoid this issue but require different maintenance protocols.
Exhaust Blockage Safety
Bird nests love exhaust pipes during storage. Visual inspection reveals obvious obstructions. Exhaust must extend 1 inch beyond RV exterior with 6-inch clearance from any openings.
Exhaust inspection points:
– Check pipe for nesting material
– Verify carbon buildup at connections
– Ensure proper routing away from RV
– Test gas flow when running
Blocked exhaust creates dangerous carbon monoxide buildup and triggers automatic shutdown. Never operate your generator with restricted exhaust flow.
Generator Runs But No AC Power Output
Circuit Completion Check
The most overlooked fix—ensure your shore power cord plugs into the RV’s internal generator outlet. Many RVers forget this step after switching from campground power.
Power circuit verification:
– Disconnect from shore power completely
– Plug power cord into generator outlet
– Check main breaker panel for tripped breakers
– Reset any tripped breakers firmly
Pro tip: Mark your shore power cord with “GEN” to prevent this common mistake during rushed power transitions at campgrounds.
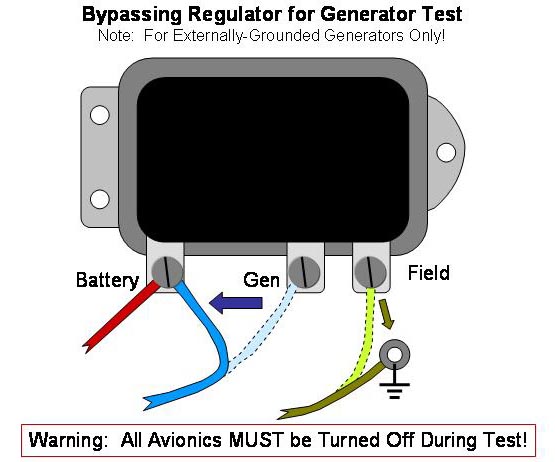
Voltage Regulator Testing
With generator running, test AC voltage at generator output terminals using a multimeter set to AC voltage. You should see 120-121 VAC. Significant deviation indicates voltage regulator failure.
Voltage testing procedure:
1. Start generator, let stabilize 2-3 minutes
2. Test across generator output terminals
3. Apply load (air conditioner or microwave)
4. Monitor voltage under load (should stay 110-125 VAC)
If voltage drops below 100 VAC under load, your generator may be overloaded or the voltage regulator needs replacement.
Emergency Roadside Fixes
Quick Diagnostic Sequence
When your generator fails on the road, run through this 5-minute checklist before calling for service:
- Fuel level check – add fuel if below ¼ tank
- Battery disconnect – ensure switch is “on”
- Oil level verification – top off if low
- Breaker inspection – reset any tripped breakers
- Battery voltage test – jump if below 10.6 volts
This simple sequence solves 70% of roadside generator failures. Keep a printed copy in your generator compartment for quick reference during emergencies.
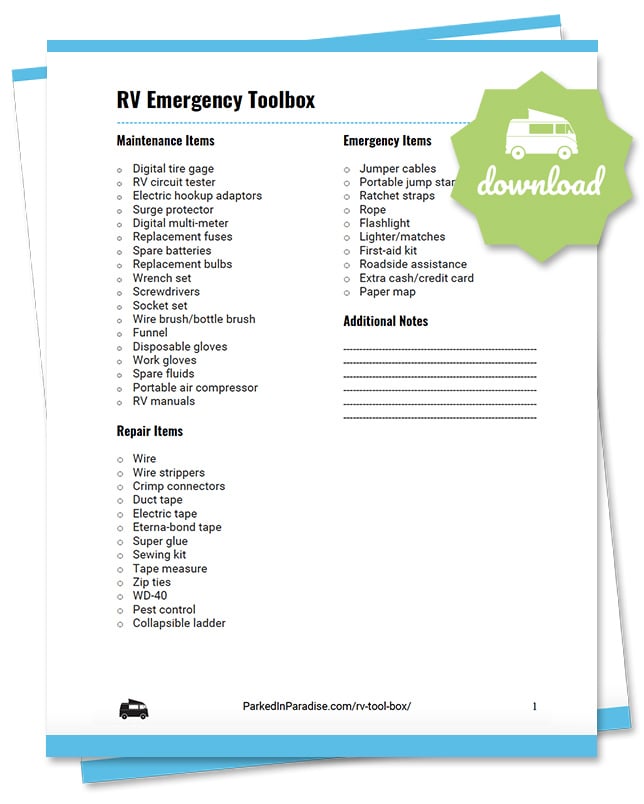
Essential Road Tools
Carry a basic generator emergency kit: digital multimeter, basic wrench set, spare spark plugs, fuel filter, jumper cables, and appropriate fuses. These tools solve most roadside failures.
Emergency tool kit:
– Digital multimeter (DC and AC)
– Basic wrench and socket set
– Spark plug wrench and spare plugs
– Fuel filter wrench and spare filter
– Jumper cables
– Flashlight and fuses
Without these essentials, you’re completely dependent on professional service that may take days to reach remote locations.
Maintenance Schedules That Prevent Breakdowns
Monthly Maintenance Tasks
Run your generator under 50% load for 30 minutes monthly. This prevents fuel system issues and keeps electrical components functional. Check oil level and battery charge during this exercise.
Monthly routine:
– Run generator 30 minutes with AC or microwave load
– Check oil level on dipstick
– Inspect for leaks or damage
– Verify battery voltage above 12.4 volts
Generators left idle develop fuel varnish, corroded connections, and seized components. This simple monthly ritual prevents 80% of emergency breakdowns.
Annual Professional Service
Once yearly, change oil and all filters regardless of hours. Replace spark plugs every 400-500 hours. Have voltage regulation and transfer switch operation verified by a certified RV generator technician.
Annual service items:
– Complete oil and filter change
– Spark plug replacement
– Fuel filter replacement
– Cooling system flush
– Professional electrical testing
Your generator is your lifeline on the road—don’t wait for failure before scheduling professional maintenance.
When Professional Service Becomes Necessary
Complex Fuel System Repairs
Fuel pump replacement, carburetor rebuilding, and complete fuel line replacement require professional tools and expertise. These jobs go beyond basic troubleshooting.
Internal Engine Problems
Knocking, grinding, or metal-on-metal sounds indicate internal engine failure. These issues require teardown and specialized tools beyond DIY capabilities.
Red flag: If you hear unusual engine noises, shut down immediately to prevent catastrophic damage that could cost thousands to repair.
Your RV generator provides comfort and convenience on the road—when it works. These RV generator troubleshooting procedures put you back in control of your power system. Remember: most failures stem from neglected maintenance rather than complex mechanical issues.
Start with the basics—fuel, oil, battery, and connections—then progress systematically through each system. Keep detailed maintenance logs and perform preventive care religiously. Your generator will reward you with years of reliable service, keeping your adventures powered wherever the road leads.


